
 Anyone who explores the backcountry knows, a winch is one of the best recovery tools to have on your 4×4 truck when you’re on an off-road adventure.
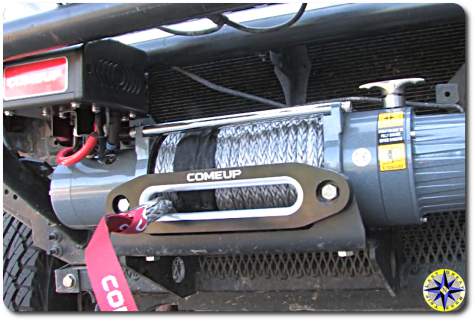
Recently we received a new DV 9s Comeup winch. The DV 9s has a pull line rated at 9,000 lbs, 3-stage planetary 156:1 gear train, an automatic full load Cone Brake Structure (CBS) and comes loaded with a 100’ of 3/8″ synthetic rope as well as a Hawse fairlead and mounting hardware.
Mounting the Comeup winch on most 4×4 aftermarket bumpers is relatively straight forward (Comeup winch installation manual). Comeup includes a footprint template to locate the hole position for the winch’s four mounting bolts. Once you have the the four holes marked, grab an 11mm bit and drill them out.
We’re installing our Comeup winch on a Metal Tech 4×4 tube bumper’s winch mount. While Metal Tech’s winch mounting plate is pre-drilled, the holes will need to be increased in size to account for Comeup’s larger mounting bolts. Once the holes are drilled out, a little shot of spay paint on the holes will protect your bumper against rust as you take on the elements.
Start the installation by inserting the mounting nuts into the slots on the winch’s feet. Carefully lift your Comeup winch into place aligning it with the mounting holes. From below, attach the winch using the 8.8 grade bolts that come with the kit.
Metal Tech 4×4 provides a set of brackets designed to mount Comeup’s solenoid pack to their tube bumper. Attach one of the brackets to the back of the solenoid pack using the supplied hardware. The bracket should remain loose in order to make any final adjustments when it is attached into place. The other bracket can be firmly attached to the Metal Tech tube bumper.
Attach the solenoid pack’s “F1”, “F2” and “A” leads to their matching terminal on the winch’s motor. Using two wrenches hold the lower nut steady as you tighten the upper nut over the lead.
Next attach the thinner “green” lead from the solenoid pack and black ground cable to the bottom of the winch motor. Now attach the motor’s lead using its pre-wired connector to it’s mate from the solenoid pack.
Work the solenoid pack into place where it will attach to the bumper. Before screwing the two plates together ensure the leads remain untangled and can be tucked out of the way than tighten all the nuts to secure the solenoid pack in place.
Route the black ground and red power cables to engine compartment and attach them directly to the battery posts starting with the black ground cable.
Once the winch is installed and wired it’s time to run a few tests. Prior to using your Comeup winch ensure you have read and fully understands the Comeup winch operating instruction manual. Test that the winch free spools, then engage the clutch in order to test both power out and power in.
A properly installed winch is a powerful tool for self recovery on any off-road adventure. If properly maintained your Comeup winch should provide years of service on your off-road adventures.