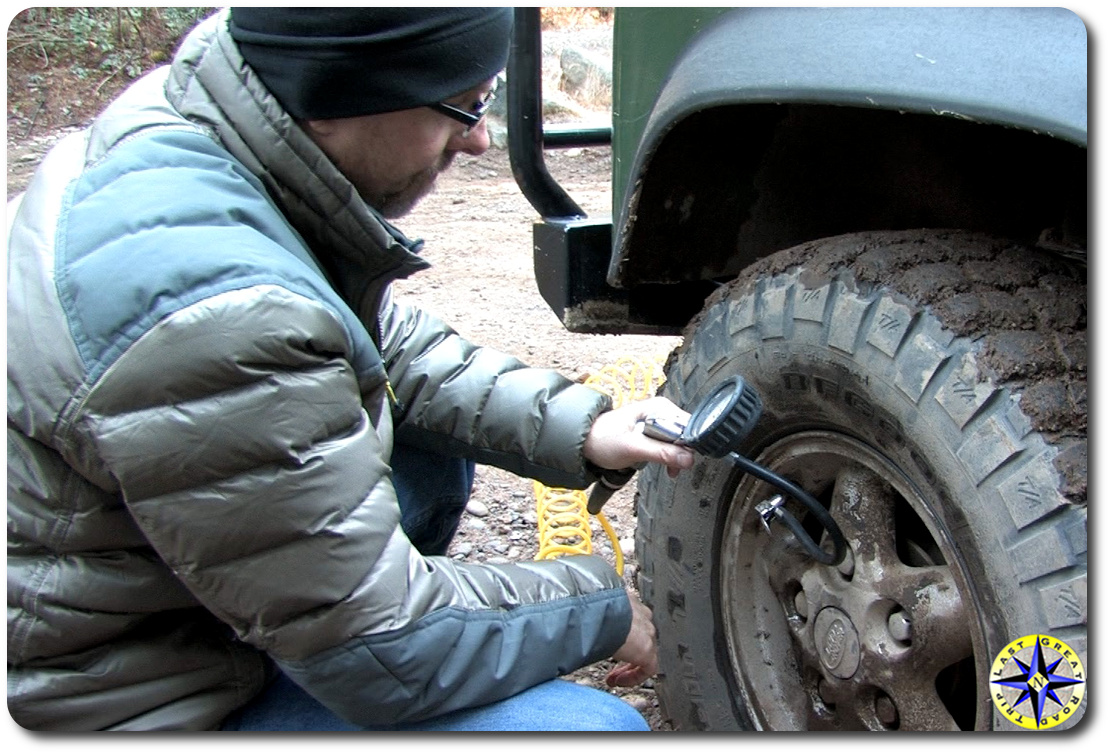
 We love the soft, rock gripping ride you get when you air down big E rated, 10 ply off-road tires. Hate is not too strong a word when we have to inflate the tires back up. We often argue about who’s turn it is to sit next to a tire while our little compressor pumps its brains out to re-inflate the rubber up to highway pressure.
An air tank will make quick work of re-inflating tires but it doesn’t really work for trips like our Baja overland adventure where we were constantly adjusting our tires’ PSI up and down as we moved between asphalt, desert sand, boulder filled dry riverbeds, muddy swamps and beaches.
We knew there had to be answer… it just took eight years of scouring the Internet and talking to other overlander travelers to figure it out!
We decided to build our own automatic tire infator using an adjustable in-line air regulator??!! What is this tire inflator voodoo witchcraft you ask? Add a common air tool inline regulator that lets you set the desired PSI to a tire inflator, hook it up your air compressor and walk away. The regulator will stop the air flow automatically when the tire’s PSI reaches the preset level.
This project took some experimenting before finding what worked best for us. The key is to start by selecting your regulator, then build your parts list off of the port sizes available on your regulator.
NPT references the national pipe thread taper (aka American standard pipe), refers to the size of a connector and the size of the thread on any connector. The thread size is especially important, because non-standard fittings may not provide a full seal, and will allow air to escape from your hose lines and connectors.
A note on hoses before we get started. The hoses with built-in chucks that we tried seemed to come with flimsy chucks that we managed to break in the field, which is why the recommendation below is to purchase a separate hose and separate locking brass chuck.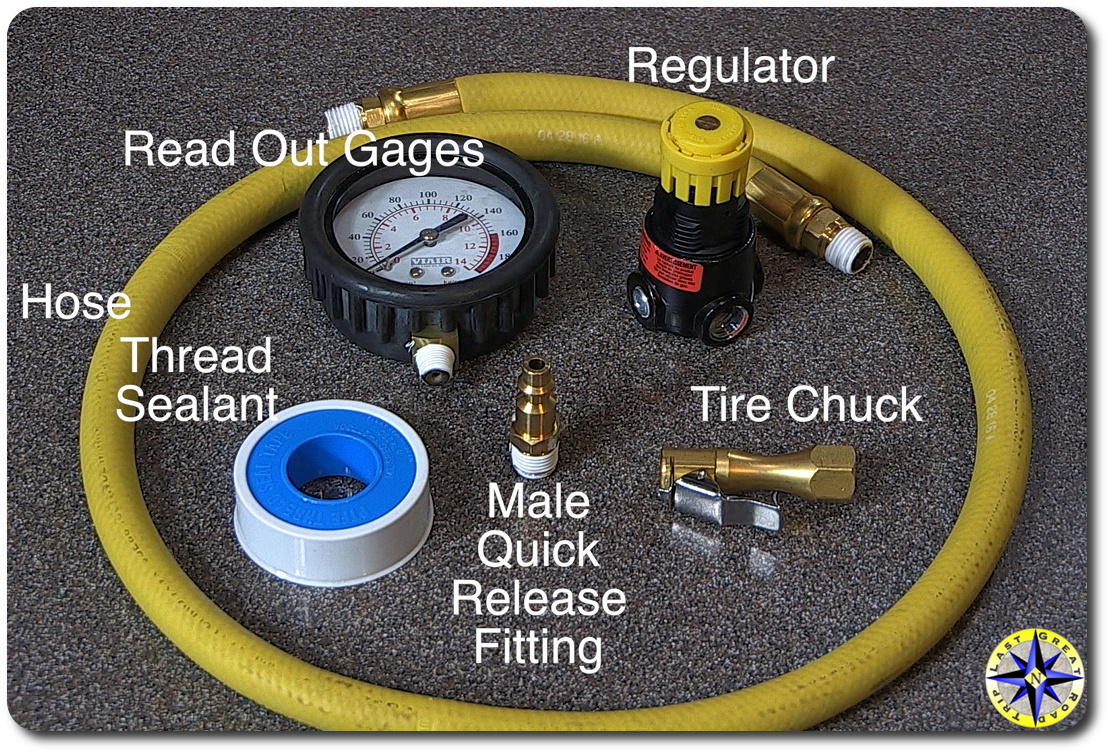
What you need (or at lease what worked for us):
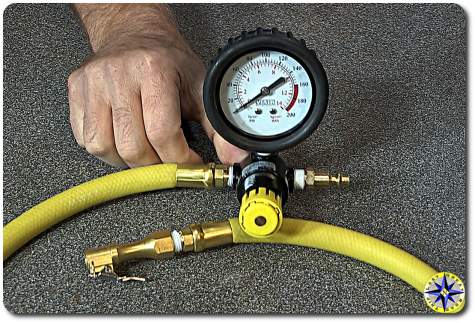
- An inline regulator. There are several inline regulators designed for air-tools. We like the Parker 14R118FC Regulator, Relieving Type, 2-125 psi Pressure Range, Gauge, 15 scfm, 1/4″ NPT. You can order the regulator with or without a gauge
- 1/4 in. NPT male brass quick release plug (Foster 3 Series – Brass Plug, 1/4″ Body, 1/4″ NPT – Industrial Interchange, M Style, D Type, I/M, MIL Spec,)
- Goodyear 3′ x 3/8″ Rubber Whip Hose Yellow 250 PSI
- CTA Tools 1930 Straight Lock-On Air Chuck
- Air gauge. Many regulators will come with a gauge. We cannibalized an old manual tire inflator for its gauge that fit the regulators 1/8″ NPT port. Just make sure the gauge’s threads match the regulator’s available port and that it registers above your tire’s max PSI.
To start, attach the brass male quick release plug to the input (or intake) side of the regulator.
To the output side (which is all other ports) of the regulator attach your hose. Attach your brass lock-on air chuck to the end of your whip hose.
Note: to prevent air leaks at the joints, you want to use a little Teflon tape or Permatex 59235 Pst Pipe Sealant on the threads prior to connecting everything.
If you plan to use a gauge, attach it now to an open port on your regulator.
Now following the regulator’s direction, set your regulator to the desired PSI. Depending on the regulator this may take a little trial and error.
With everything assembled, connect your automatic tire inflator to your compressor and test it out on your spare tire to make sure it is stopping at the desired PSI.
That is it!!
Instead of sitting next to each tire for up to 10 minutes, we can now attach our auto-fill tire inflator to our pump, connect the locking chuck to the valve stem, start the compressor and move on to other important things, like checking for trail damage, repacking our recovery kit, changing out of our trail boots, posting a picture to Instagram or just grabbing a soda and sitting in the shade. Gone are the days of sitting next to a tire, up to our ankles in mud while the rain pours down, holding a tire inflator and watching the tire gauge.
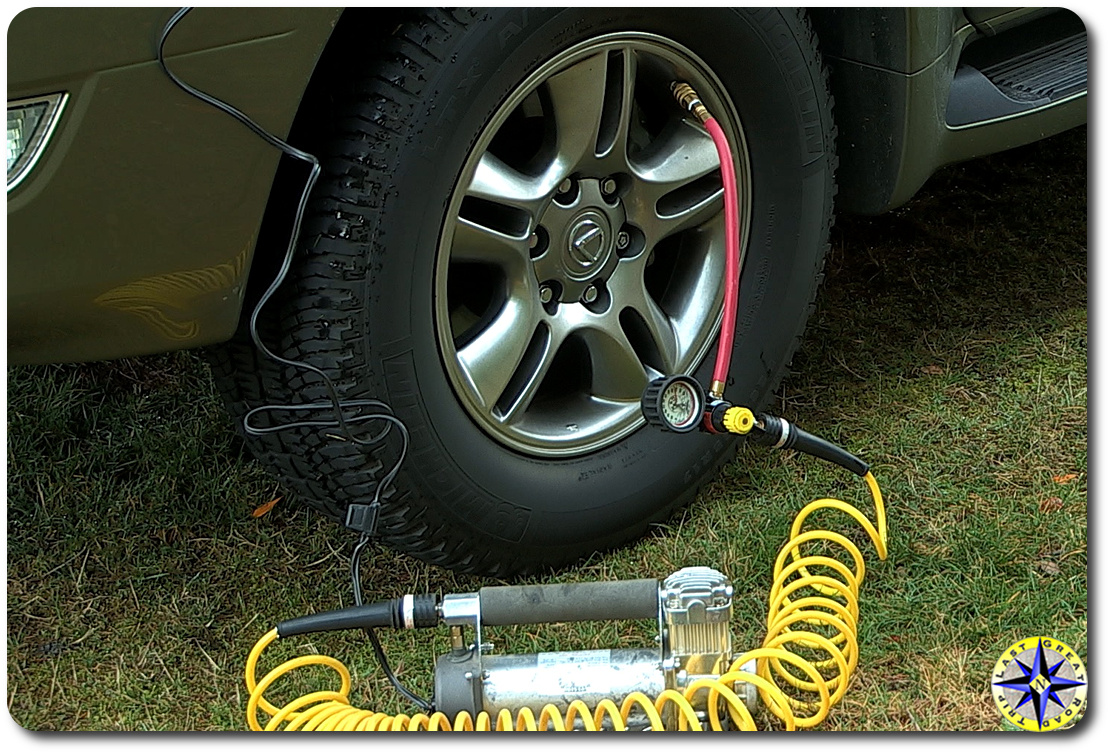 An additional benefit of this regulated automatic tire inflator is that all four tires are at the exact same PSI when it stops. No more back and forth to reset pressure all around.
Will this little device change our life… probably not… but it will free up time to get repacked and ensure we are ready to go when our last tire is aired back up.
If you don’t want to DIY it… how about the Longacre 50581 Auto-Fill Tire Inflator / Deflator. Longacre Racing does offer an automatic tire inflator… But there is one down side. We found the chuck that attaches to the tire’s valve stem leaves a lot to be desired. The word “cheap crap” comes to mind. Rather than return the inflator (it had been 6 months and a few uses) we went on to Amazon where we picked up a high quality hose for the 1/8″ port they used (Interstate Pneumatics TW100 12 Inch Gray Hose Whip for Inflator) and tire chuck (Coilhose Pneumatics CH15A Open Lock-On Chuck, 1/4-Inch FPT). Easy swap and together they make this a good tire accessory. But it added $18 (+ shipping and taxes) to the overall cost.