
 On an off-road adventure, spare parts are great but if you don’t have the tools or the know-how to complete the repair… those parts aren’t going to change themselves.
You’ve heard us preach: “If the rig you drive off-road has independent front suspension (IFS) carry a spare drive-shaft”, can I get an AMEN. The CV Joint provides a great deal of movement over a wide range of angles but it is a weak link that we don’t do any favors for when we add larger tires, re-gear our differentials and provide additional articulation with suspension lifts. The problem occurs as you put large amounts of torque on the joint when it is at a maximum angle. A classic case is where the wheels are spinning and the driver turns them to gain traction to climb a rock. As the tires catch traction all that spinning force is thrown directly into the CV which usually explodes under the immediate transition of force.
Some folks have opted for beefier CV joints. Our philosophy is a little different. When driving off-road you will always have weak links. We prefer to keep those weak links where they can be repaired in the field. Beef up your CV and now the differential gears have to absorb all the torque that the CV was previously protecting them from. A drive-shaft replacement in the field (or just pulling the axle and limping in 3WD) is manageable, replacing differential gears in the field not so much.
We recently had a CV boot on one of our drive-shafts start oozing lube while on the Utah backcountry discovery route (UTBDR). We managed to bandage it up with zip ties and duct tape in the field but upon arriving back in the garage it was time to make a proper repair by swapping out the damaged drive-shaft.
The process of swapping a drive-shaft is pretty straight forward with the right tools and a little planning. The old Toyota Trails Team used to brag about changing out a drive-shaft in under 30 minutes. For us mere mortals it can be accomplished in about an hour or so with a few basic tools under reasonable conditions. But who breaks anything under reasonable conditions?
Most of us carry a small assortment of tools when we wheel. You will most likely need to add a couple of items to your tool bag if you are going to complete this repair. Here is the list of bits and bobble to have on hand.
- 1/2” socket wrench
- 12mm, 14mm, 17mm, 19mm sockets
- 35mm socket (for the axle nut. This repair lacks entertainment value without a 35mm socket)

- Big flat head screwdriver
- Pliers
- Slide hammer (not something we carry) or small crowbar
- Small mallet
- Breaker bar (or a pipe that fits over your socket wrench to get leverage on that axle nut)
- brass bar
- Torque wrench that will go to 175 ft/lbs (if you want to do it right)
- Gear oil (some is going to spill out)
- Funnel hose (have you seen where the front diff fill is located)
- Shop rags, tarp or plastic sheet, trash bags (you’ll be making a mess)
- Gloves, hand cleaner, baby wipes (unless you’re ok with grease all over your steer wheel on the drive home)
- Flashlight (always carry a good flashlight)

The parts:
- Preassembled spare drive-shaft (sort of the point)
- Steering knuckle oil seal – recommended but optional
- Hub dust cover (Toyota calls it a hub grease cap) – recommended but optional
On the optional parts, you can be careful and reuse the dust cover and seal but it’s hardly worth the frustration when your in the field. It will save you time and trouble if you carry these extras.
The method we’ll describe here is with field repair in mind. It may not be pretty but if we could get by on our good looks, we’d have a chase truck and a team of mechanics on our off-road adventures.
 First and foremost, secure the rig. Try to limp to a flat, dry spot. Chock the other wheels to keep the rig from moving. This repair is much easier with a floor jack and a couple of jack stands. In the field we carry a bottle jack and a hi-lift.
Grab your spare drive-shaft and give it a look. Double check for cracks or leaks in the boots or assemblies… You really don’t want to put in a broken part. And if your spare is bad, begin considering your options.
Start by removing your spare tire (yes, the spare tire) and set it aside for a moment. Now loosen the lugs on the wheel with the bad drive-shaft before raising the rig with the Hi-lift. Once you have the wheel off, lay it flat, slide it under the rig and stack the spare on top. You are creating a jack stand out of the two tires so position them under the frame toward the front of the rig and lower the rig off the hi-lift onto the tire stack. You will need to put lot of torque on some of the nuts and you don’t want to have a hi-lift holding the rig in the air as you’re pushing an pulling things around. Now throw down a tarp or plastic sheet to catch the gear oil that will seep out from the front differential as we move to the meat of this repair.
Pry off the hub dust cover. Toyota says you can pry the cover loose… We just punch through it with a big screwdriver and tug at it, but then again, we carry a spare cap. Remove the cotter pin and locking nut cap setting them is a safe place. Removing the axle nut takes that 35mm socket, a breaker bar and a little muscle. Have the rig in 4W-Lo to keep the axle from turning as you wrench off the nut.
Remove the nut and cotter pin holding the steering tie rod in place and wiggle the tie rod free from the steering knuckle. It might take a light wrap or two with the mallet to free the tie rod.
 Free the two bolts holding the lower ball joint to the steering knuckle. These bolts are a bit tight so put some muscle into it and take care to set them in a safe place… finding a lost bolt, a nut or god forbid a cotter pin in the dirt can be harder than any field repair.
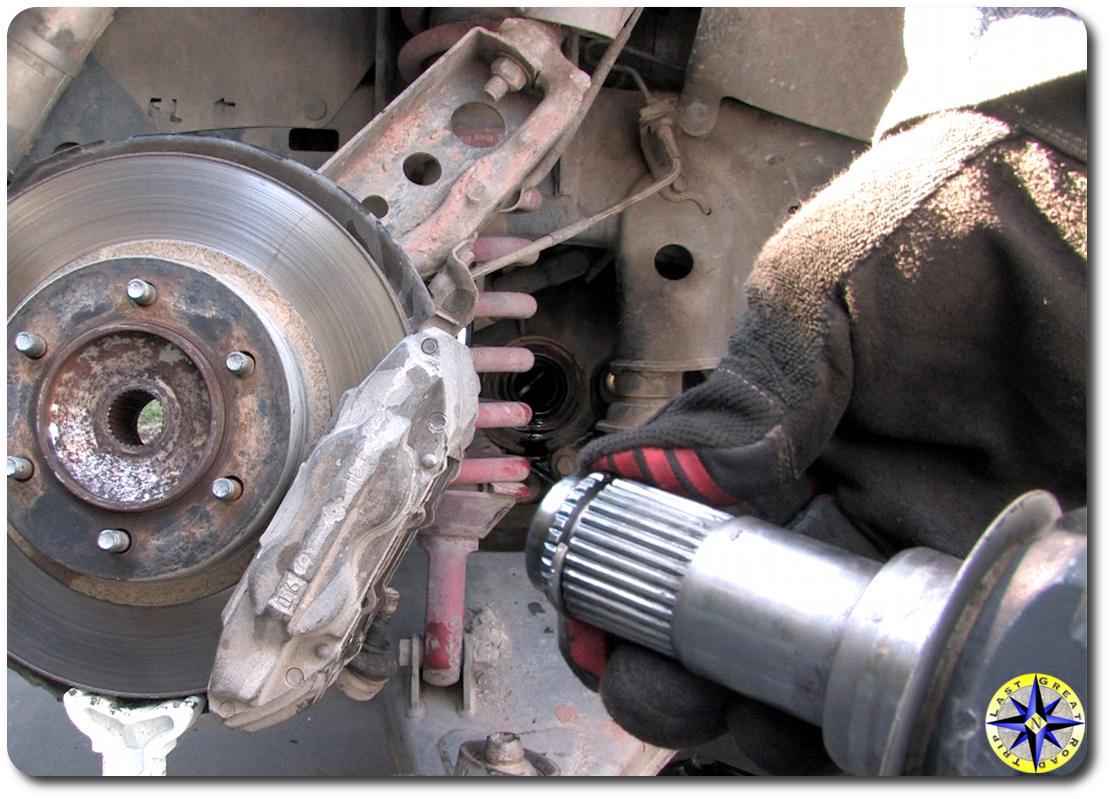
At this point the steering knuckle and wheel hub can be swung out of the way and you can slide it off the outboard side of the drive-shaft. Be careful not to pull on or stress the ABS sensor plug, its wire or the brake line. Once the shaft is pulled out, rest the hub back down on the lower ball joint attachment.
 To remove the inner portion of the drive-shaft from the differential, Toyota recommends using a slide hammer and hook to pull the drive-shaft free. A slide hammer is not in our tool kit on the trail, and we’ve found a small crowbar works well to pry (really more of a pop) it out. In either case you are putting enough force on the drive-shaft cup to pop the snap ring free. Be careful not to damage the transfer case’s oil seal. As the drive-shaft comes free, gear oil will start to leak out and you will want to catch it in a tin can, bucket or what ever is handy in order to protect the environment.
Ok… take a breath, grab a few swigs of water and relax, you’re half way through the repair.
Take a look at the steering knuckle oil seal on the inside of the steering knuckle. There is a good chance it is chewed up, dirty and worn out which is why we carry the spare. Replacing the seal involves pulling the old one out with a pair of pliers and then working the new one into the steering knuckle. Tap the new seal in using a soft touch with the mallet, hammer or rock on a brass rod working your way around and tapping it into place. The seal is a tight fit so take your time until it is snugged into place and flush against the knuckle.
On the FJ Cruiser a single drive-shaft will fit either passenger or driver side, but there is a clear inboard and outboard side to the drive-shaft shaft. As you prepare to install the new drive-shaft notice the snap ring on the inboard side. An extra set of hands will make this much easier if they can swing out the hub holding it out of the way while you install the drive-shaft. In order to install the drive-shaft align the shaft splines with the differential and have the snap ring open side facing down. Slide the shaft into the differential. It will take some force to get the snap ring that holds the drive-shaft in the differential into place. If after a couple of strong nudges the drive-shaft does not pop in, take the mallet and brass rod and drive it into place using the notches on the inboard CV cup.
 Once the inboard side of the drive-shaft is in place you can slide the outboard side through the wheel hub and start buttoning everything back up and hand tighten the axle hub nut, snugging it up to hold the drive-shaft and hub together. You’ll be torquing it tight later.
Torque down the front lower ball joint attachment that holds the knuckle to the lower arm. Reassemble the tie rod torquing the nut and replacing the cotter pin. And now torque up tight the front axle nut with the required 175 ft/lb. Slide the nut locking cap over the axle nut and put the cotter pin back in. Tap the hub’s dust cover (grease cap) into place and your just about done.
Before putting the wheel back on, look over the whole IFS. We will put a bottle jack under the lower control arm and raise it a bit to simulate how it will sit when the tire is back on and the drive-shaft is relatively horizontal. Tug, pull and push on everything to make sure the entire assembly is snug and fit. If your not sure about the play in a part, check it against the other side. Remember your other side is under weight and will react a bit different but yo u will understand what parts have play in them and what do not.
You will want to top off your front differential with gear oil to make up for what has seeped out through the repair. The easiest way we’ve found to fill the front differential on an FJ Cruiser is with a funnel and long hose run from the differential fill port up to a location where the gear oil can be pored into the funnel and run down to the differential. The amount of oil required depends on the angle your rig was at during this repair and the amount of oil that leaked out.
Once you’ve topped off the oil and reinstalled the fill plug, the final step is to put the wheel back on, clean up your mess and continue on your way.
No… those parts aren’t going to change themselves but with the right parts and tools, there is no reason you can’t make a field repair and continue your off-road adventure.
Bonus resources: You might want to print these off, put them is a zip lock freezer bag and tape to your spare drive shaft.
Great write up and great video. Thanks for putting it together.
Best explanation, Great video and best of all, Great narrative…
You guys rock..
Thanks
Hope you have the same on changing out the 4 U joints…
Thank would also be very helpful..
Hello George from Tucson.. again
Do you guys have any preference on where and brand type, you get the replacement axles from..
Again any information would be greatly appreciated.. thanks
for long axles we use Metal Tech’s.
You don’t have to undo the tierod she
This is the BEST how to video for this repair. Thx Guys!!