
 One of the best ways to avoid trouble on an off-road adventure is to know your rig… inside and out. One of the best ways to get to know your rig is through regular maintenance. Toyota recommends changing your spark plugs every 30,000 miles. Changing the spark plugs on a Toyota FJ Cruiser is a simple activity for any backyard mechanic and a good way to get to know your rig.
A couple of things you’ll need in order to change out the spark plugs includes:
- 6 spark plugs
- 12 mm and 10 mm socket
- spark plug socket
- spark plug gapper
- couple of 10″ extensions
- socket wrench
- torque wrench
- 2 flat head screw drivers (very helpful)
- anti-seize (optional)
- silicon grease (optional)
- gloves (sure this is optional but Hula Betty wants to protect her manicure. Mechanic or latex gloves work great)
Spark plugs are the business end of your engine’s ignition system. Its the spark plugs that delivers the spark needed to ignite the air/fuel mixture. No spark means no combustion! Combustion occurs when high voltage supplied by the ignition coil jumps across a small gap between the spark plug electrodes. The high voltage surge from the coil goes down the spark plug’s center electrode and forms an arc as it jumps across the gap. The voltage required to form the spark ranges from 4,000 up to 28,000 volts depending on the spark plug gap, engine load and compression. The spark only lasts a tiny millisecond, but it is long enough to start the burn. And lets face it, a millisecond is a lot longer than you think about the answer to “would you like another beer”.
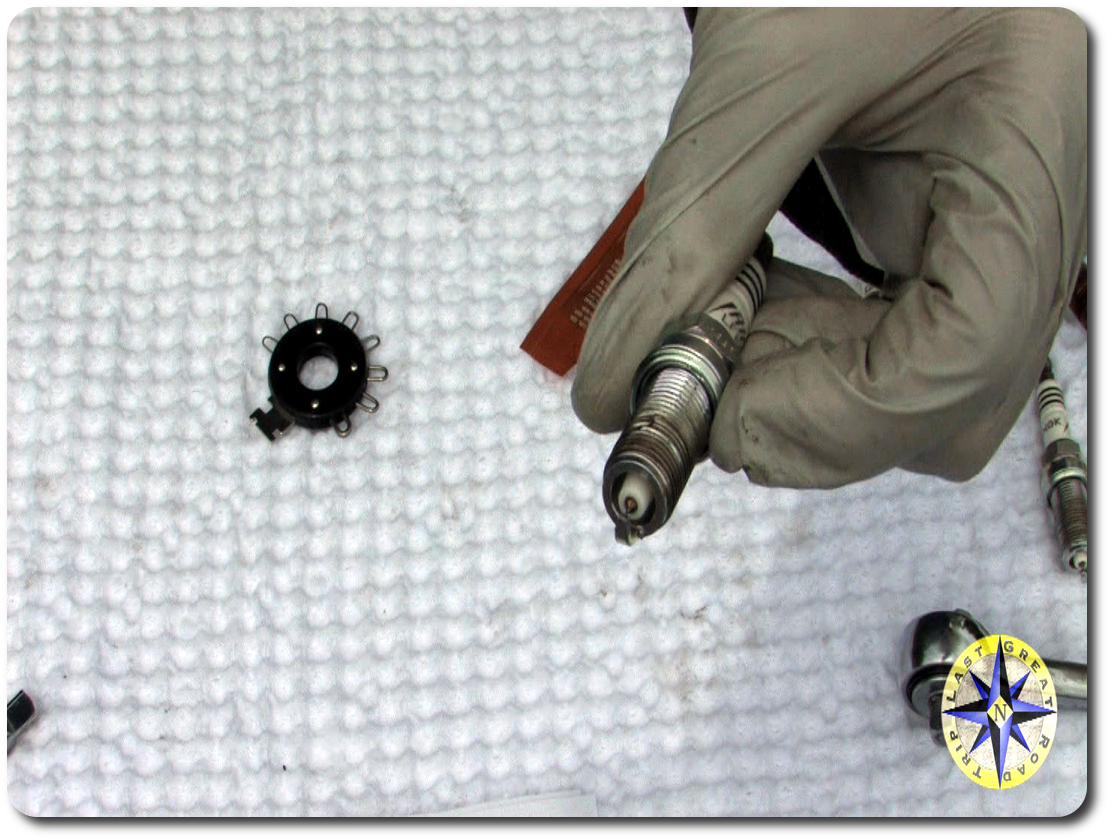
Never take for granted that your new spark plugs are properly gapped. Before you tear into the engine check the spark plug gaps and set them to the factory spec. For our 2007 Toyota FJ Cruiser the gap needs to be .039″ to .043″. After you have ensured the gaps are correct it is the time to apply a little (it doesn’t take much) anti-seize to the spark plug threads, if you want.
You will want the engine to be cold before you start so the metal in the heads is not expanded. To begin, disconnect the negative battery terminal cable. I know lots of folks balk at this step but resetting the stereo and compass after it is all done is a small price to pay for avoiding an electrical short and chasing down a burned fuse. After all you will be disconnecting the ignition coils on your rig.
Before starting you may want to take a look at this fj cruiser Ignition coil component replacement Toyota bulletin showing you how to remove the ignition coils. Getting to the spark plugs on your rig will require that you pull a few bits from the engine including the:
- V-Bank cover
- Air cleaner assembly
- Surge tank stay and oil stay plate (little brackets)
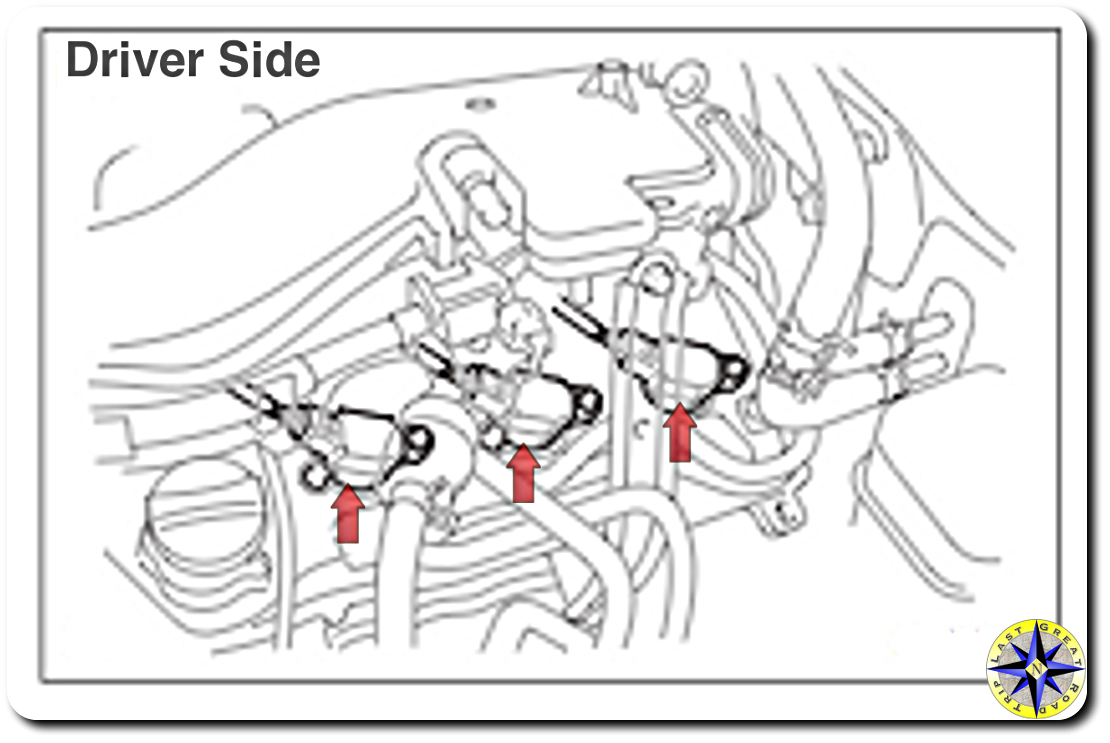
You will also need to unplug the hoses and electrical connections to the air cleaner assembly. Once you have everything removed, the passenger side coils will be clearly visible. The driver side coils are visible too, once you look past the tangle of hoses. These hoses can be moved aside when you need.
If this is your first time… changing spark plugs… get your mind out of the gutter and back on task… start on the passenger side. Trust me you’ll thank me later.
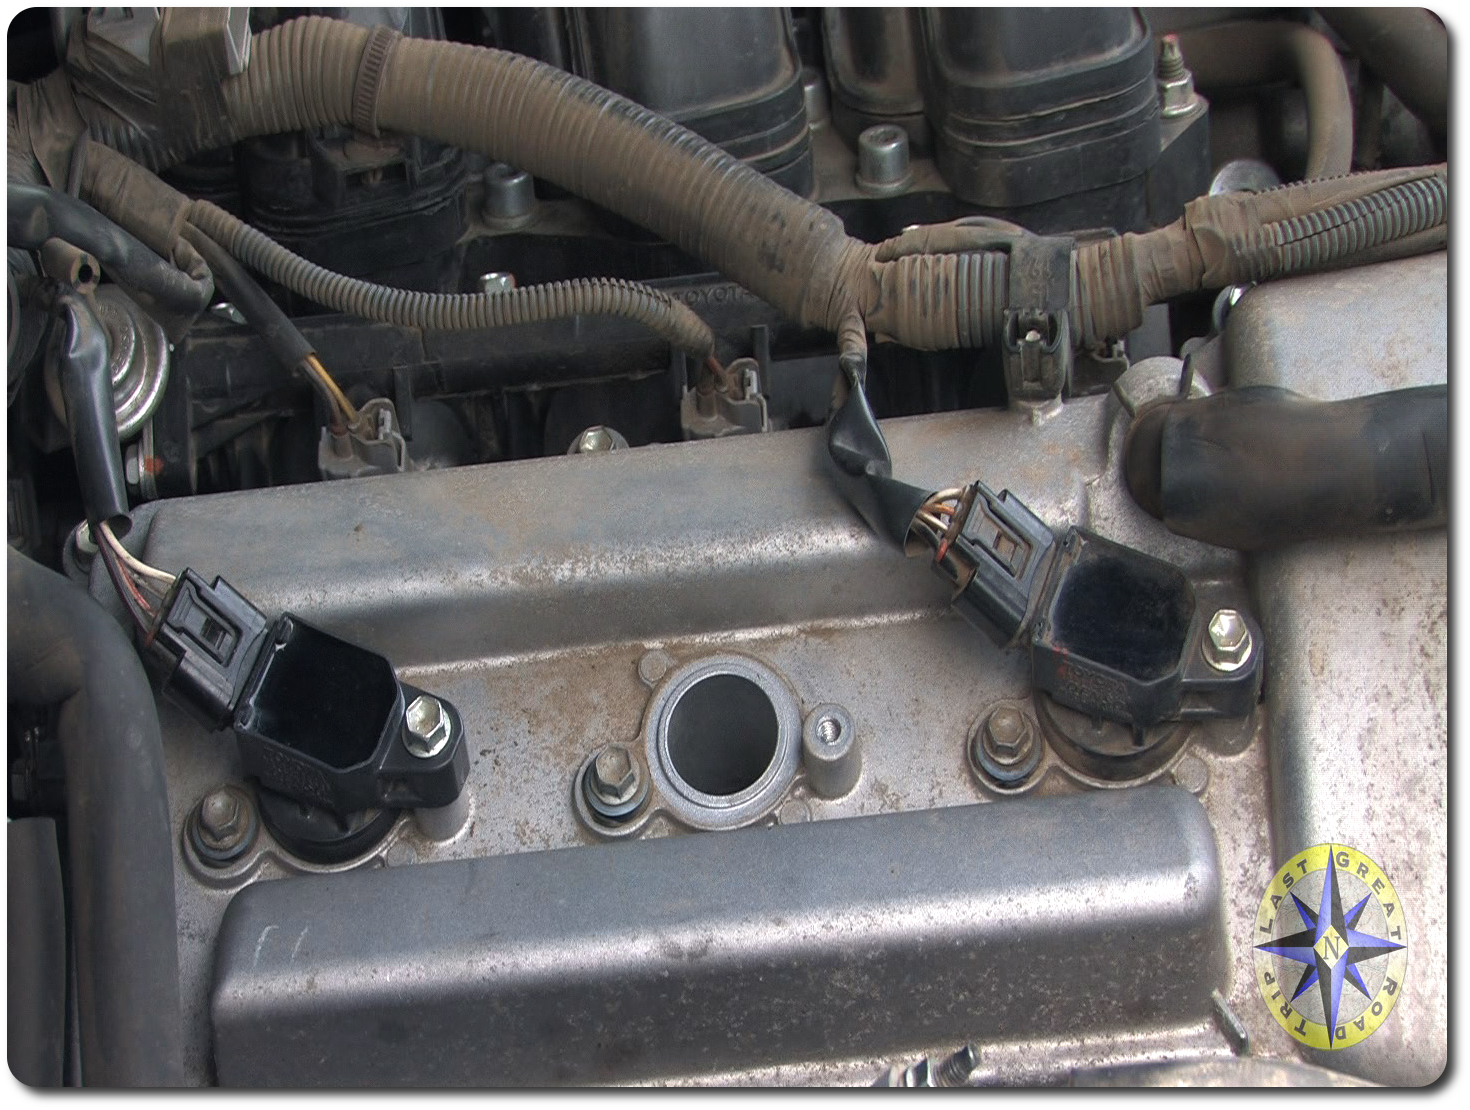 The Toyota FJ Cruiser has an individual ignition coil attached to each spark plug. Disconnect the electrical connector to the ignition coil followed by removing the bolt holding the ignition coil to the engine. With the connector and bolt removed, lift the coil out. This is a good time to take a look at the ignition coil and check for cracks in the housing or tears in the terminal boots.
To remove the plug from its hole you will need your ratchet, spark plug socket and an extension. When you are on the driver’s side you’ll need two extensions connected together to reach in through the hoses you didn’t remove. It may take a little muscle but the plugs will release their grip and can be lifted out once they are unscrewed.
Now grab one of the new spark plugs you prepared earlier. The spark plug socket has a rubber insert designed to hold the spark plug while you lower it into the hole and thread it. You will want to carefully thread the spark plug by hand so not to cross thread it. Once the spark plug is hand tightened, brake out the torque wrench and tighten the plug down to 15 ft/lbs (factory spec for our 2007 Toyota FJ Cruiser).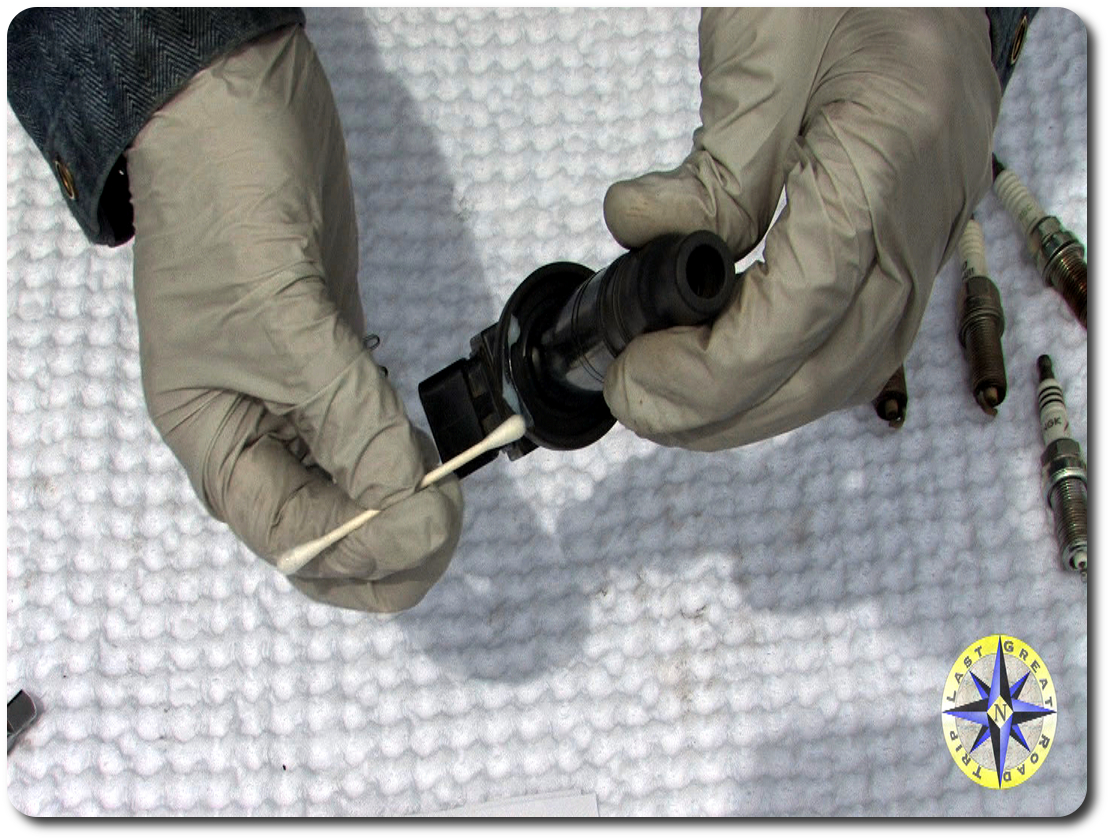
Before placing the ignition coil back into place over the spark plug, add a bit of silicone grease to the terminal boots to keep them conditioned and help form a tight dust seal. Replace the bolt holding the ignition coil in place. Remember this is a plastic housing so only torque down the bolt to its factory spec of 7.5 ft/lbs. Reattach the electrical connector to the ignition coil and your done. Now rinse and repeat with the other five spark plugs.
Before starting on the drivers side you may want to practice a little yoga and limber up. The driver’s side plug procedure is the same but there are a few helpful hints.
- Small hands are a benefit.
- Two screwdrivers may be needed to release the connector from the ignition coil. One screwdriver holds down the clip while the other gently pushes the connector off the ignition coil.
- Two ratchet extensions will improve the access to the spark plug allowing you better leverage.
Once you have all the spark plugs replaced, the ignition coils in and the connectors reattached, it is time to button it back up. This is a good time to wipe down all the parts and remove the trail dirt and grim before reassembly.
Start by replacing the surge tank and oil stay followed by any hoses and electrical clips you may have undone on the drivers side to ease access. Next place the air cleaner assembly back where it belongs and connect the hoses and electrical connector. Don’t forget the little vacuum tube in the rear. Cover it all up with the V-Bank cover and reattach the negative ground to the battery.
Turn the key, listen to your engine come to life and enjoy your success!
New spark plugs about $45, time involved about 30 minutes, the feeling that you get from knowing your rig a little better…
Pretty nice post. I just stumbled upon your blog and wanted to say that I have really enjoyed browsing your blog posts. In any case I’ll be subscribing to your feed and I hope you write again soon!
As always a very clear straight forward and informative video production. Nice job Paul!
Michael thanks… glad you liked it. Hula Betty does her best.
I enjoyed reading your blog nice write up.
Are you using Iridiums over the stock Coppers and if so are there any driveability issues ?
Merci Beaucoup
David, Thanks for the note. Yes we used NGK Iridium plugs. They are the ones Toyota now uses in the 2010 FJ Cruisers. Not sure they are worth the extra cost but they are supposed to last 100K. We’ll see.
Hey Paul, I swapped out to the NGK Iridiums this morning on my daughters 4Runner, by the way, your post on this made the job really easy and gave me a sense of confidence that I didn’t need to pay 150 USD to have someone else do it. To add to your swap out, my pops years ago used a piece of fuel line that slips over the ceramic allows you to install unrestricted and will also slip when the plug bottoms out inside the head, works really nice ! Thanks again for your assistance and keep up the good posts ! Au Revoir !
Really glad you were able to change out the plugs, save a little money and get to know your rig a little better. Thank you for letting us know about the fuel line trick. I’ve heard about it but never tried. Good to know it works.
A half hour job ONLY if you have done it a few dozen times before, in a heated shop, with something to stand on to get up into the engine compartment of this beast (and I am 6’ tall’). So far, over 2 hours into it doing passenger side. Getting air cleaner unit back on took 1/2 hour. I preferred working on my old Volvo. Simple tractor engine.
Sorry to hear it’s causing you trouble. BTW: I miss my old Baja Bug… 4 bolts and engine comes out all on it’s own 🙂
Thanks to this video, I was able to change my own plugs on my 2008 FJ. It only took about a half hour and saves me lots of money.
The last time I forgot to unplug the hose connected to the back of the air cleaner assembly and broke off the little plastic nipple. Do you have any suggestions on how to reconnect the hose to the air cleaner assembly?
Thanks again for making this video.
Thanks a bunch! This video is still helping n00bs like me today in 2019!
Thanks for letting us know and glad it helped you out!