

 Today’s sophisticated computer controlled fuel injected engines squeeze a significant amount of horse power out of each combustion chamber. In order to achieve their maximum output, they need precise input. That precision involves 14.7 parts air for every 1 part fuel or 14.7:1.
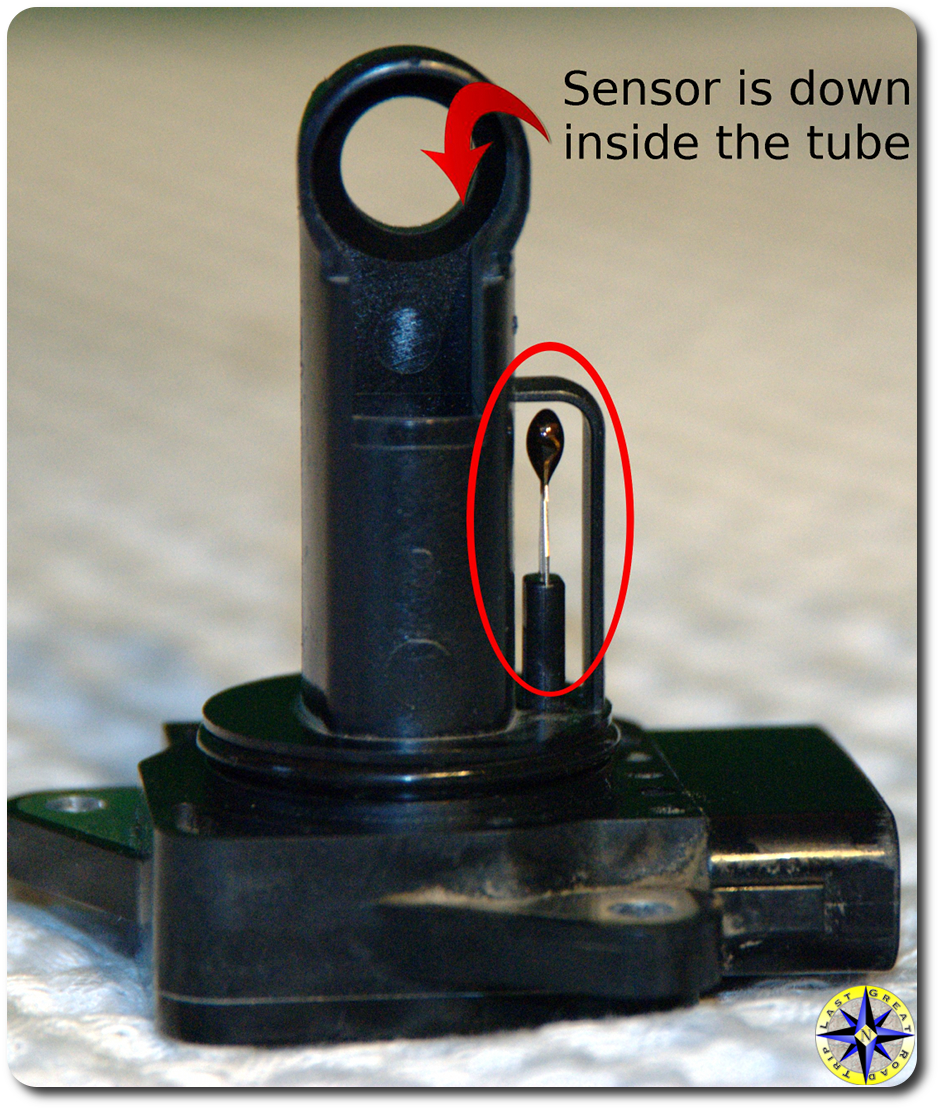
In order to know the correct amount of fuel to pump, the engine must know how much air is coming in. Air flow is not a constant. As the rig drives down the trail, through the hot and cold as well as humid or dry conditions air volumes change. Enter the Mass Air Flow (MAF ) sensor. The technical jargon behind the acronym MAF involves a constant voltage passed over two heated wires placed into the airflow. As the air flows across the the wires, they cool down creating a positive temperature coefficient (PTC). In other words by measuring the drop in temperature of the wires (or increase in current passing through them) the engine’s computer can calculate the airflow. To ensure a correct reading the engine’s computer takes into account temperature and humidity as well.
Eventually, dirt and oily film can cook on the wire creating a thin insulating layer of muck. Periodically, there’s a cleaning cycle where the wires are heated to a very high temperature to burn off deposits. If the deposits remain and engine’s computer sees an air mass value out of range, it sets an error code… and the dash board lights up like a Christmas tree.
 Manufacturers of MAF sensors recommend replacing the sensor, after all they are in the business of selling them. If you have a few garage tools and about twenty minutes you can clean the MAF sensor, which may solve the issue, if the wires are mucky between cleaning cycles.
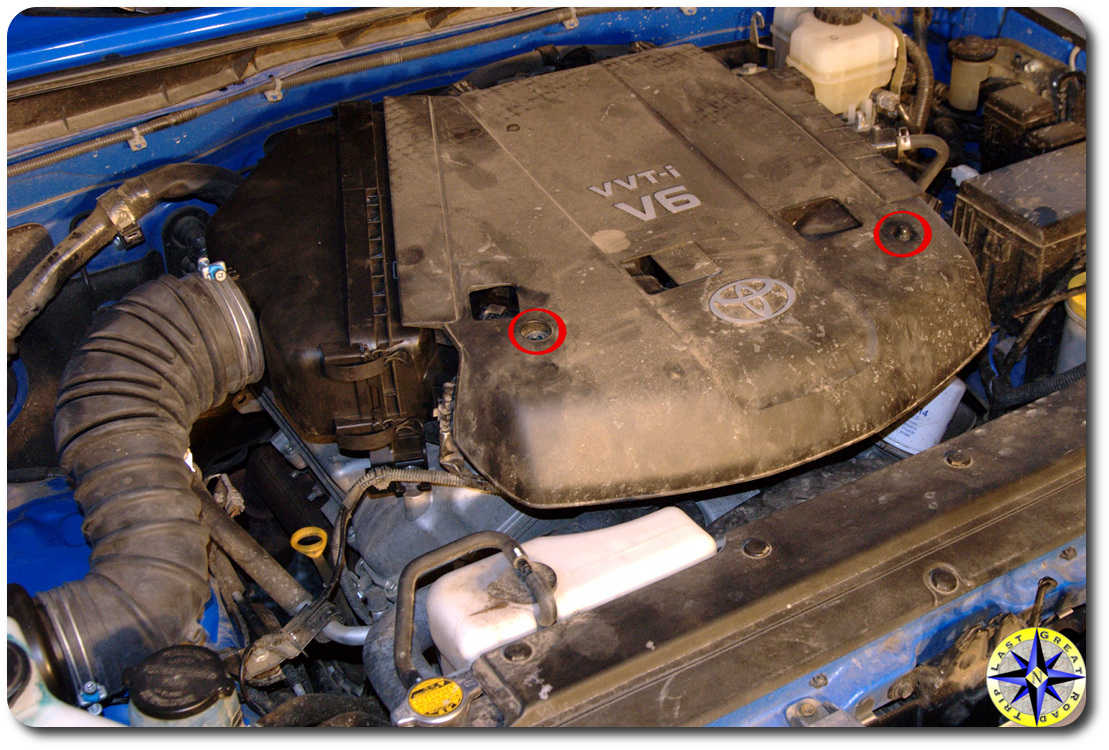
Removing the FJ Cruiser’s MAF sensor for a visual inspection and cleaning is a simple procedure. The first step is to remove the plastic engine cover, by loosening the two nuts up front and lifting the cover off it’s hinge.
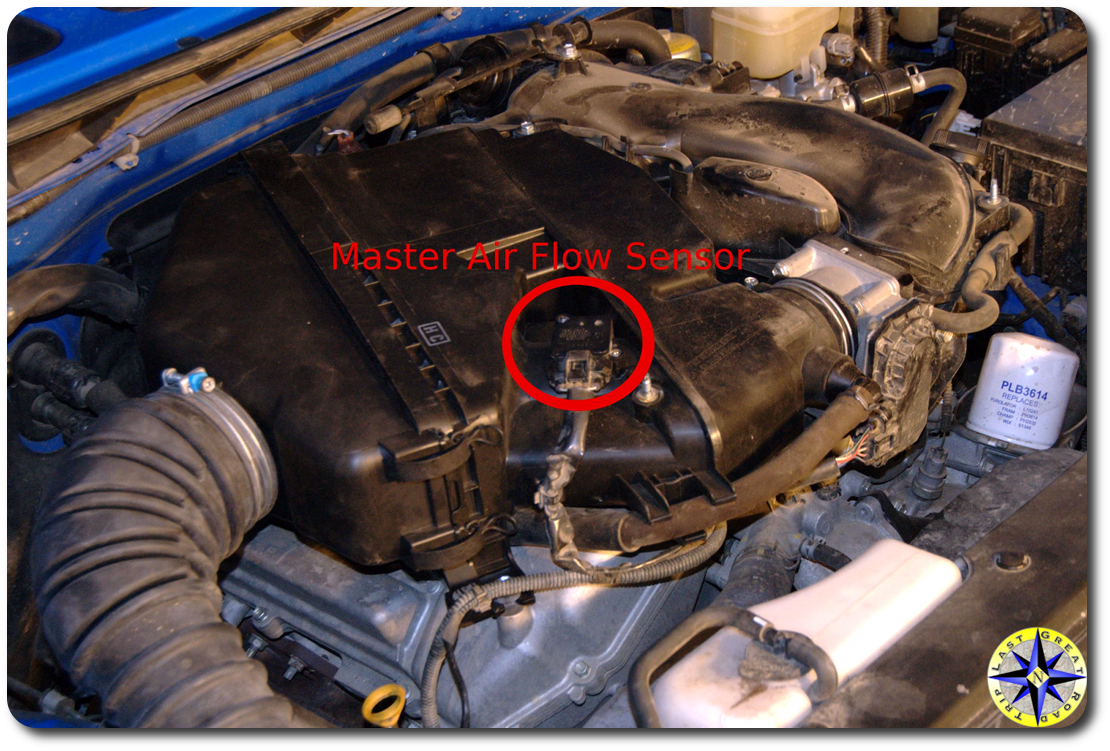 Once cover is removed, the MAF is exposed in the front of the secondary air flow box. Carefully, unhook the wire harness connecting the MAF to the engine’s computer. To remove the wire harness, depress the clip and give a snug pull on the sides of the connector. Do not pull on the wires. If the connector refuses to release its grip, try holding the clip down while sliding a screw driver between the connector and MAF, gently prying the two apart, careful not to apply too much force (remember plastic exposed to heat, over time can become brittle).
With the harness disconnected, remove the two screws holding the MAF in place and lift the sensor out of the the air flow box. You can cover the opening with a shop towel to prevent any dirt, bugs or stray bird poop from falling in while you clean the sensor.
With the MAF sensor removed inspect the hot wires for muck. In order to clean the hot wires we picked up “contact cleaner” from Radio Shack and following the directions, really read the directions… sprayed the hot wires with cleaner.
The contact cleaner we used drys in about 10 minutes and does not leave a film. After the cleaner has done it’s job, slide the MAF back into place. You will hear a click as it seats past the O ring on the sensor’s collar. Screw it into place, connect the wire harness and reattach the engine cover. Your done.
If you have an Intelligent Tester, you can ensure the mass air flow sensor is operating within spec following the Toyota mass air flow check service bulletin. We simply made sure the dash board lights didn’t go into hyper-drive when we started the rig and let it warm up.
Write up was good. Only thing I would add is that CRC now offers a product specifically for cleaning MAF sensors..They say typical electronic cleaners are not up to the task of cleaning components as sensitive as the MAF and could damage them. I used the CRC product and was pleased..cost about $6.oo. My thinking was better safe than sorry…replacing the MAF ain’t cheap.
Great post!
I drive a 1992 Hyundai Sonata GL, 4 cylinder,2.0 liter engine.I believe I have to clean the MAF,a the idle is rough and the mileage very poor.A new MAF costs way too much.Can I use the same spray we use to clea the throttle body?Or what do you recommend?
Can I use the same spray used to clean the throttle body to clean the MAF?.I drive a 1992 Hyundai Sonata GL,4 cylinders,2.0 liter engine.What do you think?
Jerry,
thanks for the question… Check with the parts store or manufacture to find out if the throttle body cleaner will harm electronic parts and if they recommend it for MAF. The parts store (NAPA, PEP Boys, …) can recommend a spray specifically designed for that purpose. good luck to you.
I have FJC 2008, I want to clean the throttle body, how and what should be used to clean it?
Great video and write up, keep it up 🙂
Thanks.
Thanks I’m glad you like the info… Check at your local NAPA or auto parts store for throttle body spray cleaner… you will have to remove the air intake system to get to it but that is pretty easy… The throttle body it easily accessible and you should be able to do the whole project in under an hour. Good luck to you.
how often i have to clean my maf sensor. for info i allredy change my air filter to K&N
@Charlie,
You really should not have to clean your MAF sensor unless you have gone through a lot of dusty trails and too much oil from the K&N filter has muck up the sensor. MAF sensor on most vehicles are self cleaning these days… What they do is supper heat the little temperature wires to burn off the muck. However when that fails it is time to give it a little assist.
I think thats the temperature sensor, not the MAF sensor. the MAF is down inside the tube and also needs to be cleaned.
I did a pigtail plug replacement on 2008 fj cruiser camshaft position sensor bank 1 . I bought the plug from eBay it fits fine ,but all three wires are black . Would you know what color wires go where . When it’s plugged in top down its a two color wire , than green in the middle and red on the lowest point . How did I do ?