Changing the front differential oil on your Toyota truck is an easy maintenance activity! Although there is not a lot of room to work, we have a couple tricks that will make changing the gear oil in your FJ Cruiser, 4Runner or GX470’s front differential much simpler.
Before you begin, fill a buck with about 8″ of hot water and set your gear oil containers in the hot water. This will heat up the oil and allow it to flow more easily.
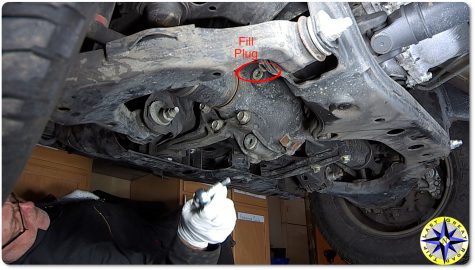
To get to the front differential you will need to remove the factory gravel guard. Remove the four bolts holding the OEM gravel guard to the frame and set aside. This is a good time to look everything over and check for any leaks or damage that may exist.
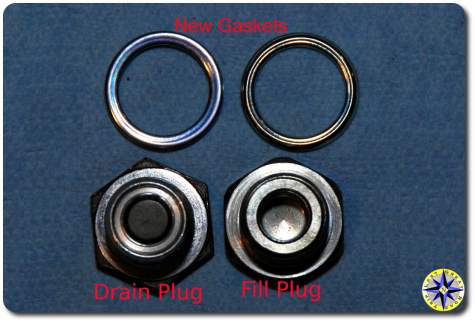
Using the 10mm hex socket remove the fill plug. Why the fill plug? This ensures the fill plug isn’t stuck and you’re left with an empty differential case and no way to fill it.
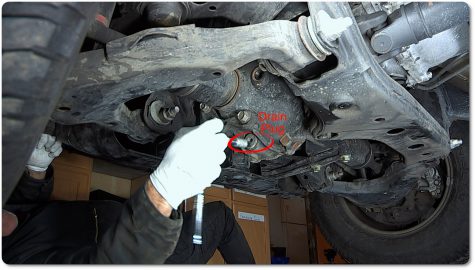
Now using the 10mm hex socket, remove the drain plug and allow all the gear oil to drain into the catch pan.
Once all the differential oil is drained, reinstall the drain plug using a new gasket. The Toyota specifications call for 48 ft/lbs of torque to ensure the plug and gasket are seated correctly and wont come loose on the trail.
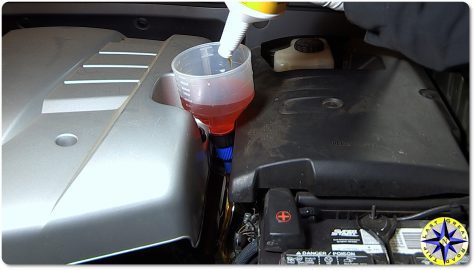
Filling the front differential can be tough. There is very little room so I recommend the top down funnel method. Grab a funnel and attach about 2 – 3′ length of hose (I find clear aquarium hose works great) to the end of the funnel. Feed the hose down the through the engine compartment and place the end of the hose into the fill opening.
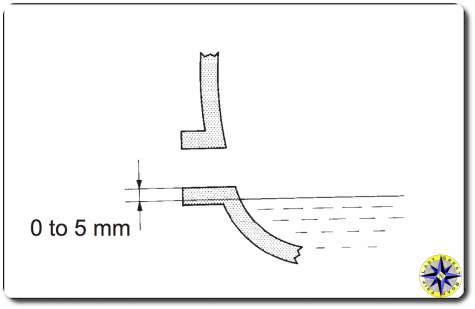
The gear oil that has been sitting in the hot water should now flow easily down the funnel, through the tube and into your front differential. Your owner’s manual will specify how much oil is required. You can verify you’ve reached full when the gear oil just begins to spill out of the fill hole.
Using a new gasket, tight the fill plug to 29 ft/lbs, wipe down any gear oil and reattach the factory gravel guard.
Maintaining the front differential of your Toyota FJ Cruiser, 4Runner, Prado or Lexus GX470 is easy and the care you give it will go a long way to ensuring your 4WD continues to operate correctly on all your overland adventures.
This step by step procedure for changing the gear oil in your rear differential works for a Lexus GX470, FJ Cruiser, 4Runner and most modern Toyota trucks.
The gear oil in your truck keeps friction to a minimum and ensures the long life of your differential gears. Proper maintenance by changing the differential oil is simple and keeps your off-road truck working as designed and saves money. Changing the differential oil yourself allows you to learn a little more about your overland vehicle (you never know when hat knowledge will come in handy on the trail).
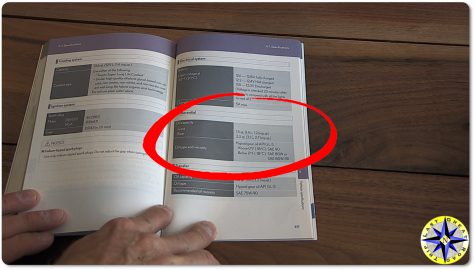
The first big decision is what oil to use. It is important to consult your owners manual. Toyota lists the quantity, type and viscosity of oil required. For our 2008 Lexus GX470 the manual lists:
Capacity: 3.3 quarts
Type: Hypoid gear oil APL GL-5
Viscosity: SAE 80w-90
Other item to pick up before you start include new drain and fill plug gaskets. Unless your on the trail working a field repair, don’t try save a few pennies by reusing these little items. (Get a complete set of differential and transfer case gaskets they will also fit your FJ Cruiser and 4Runner)
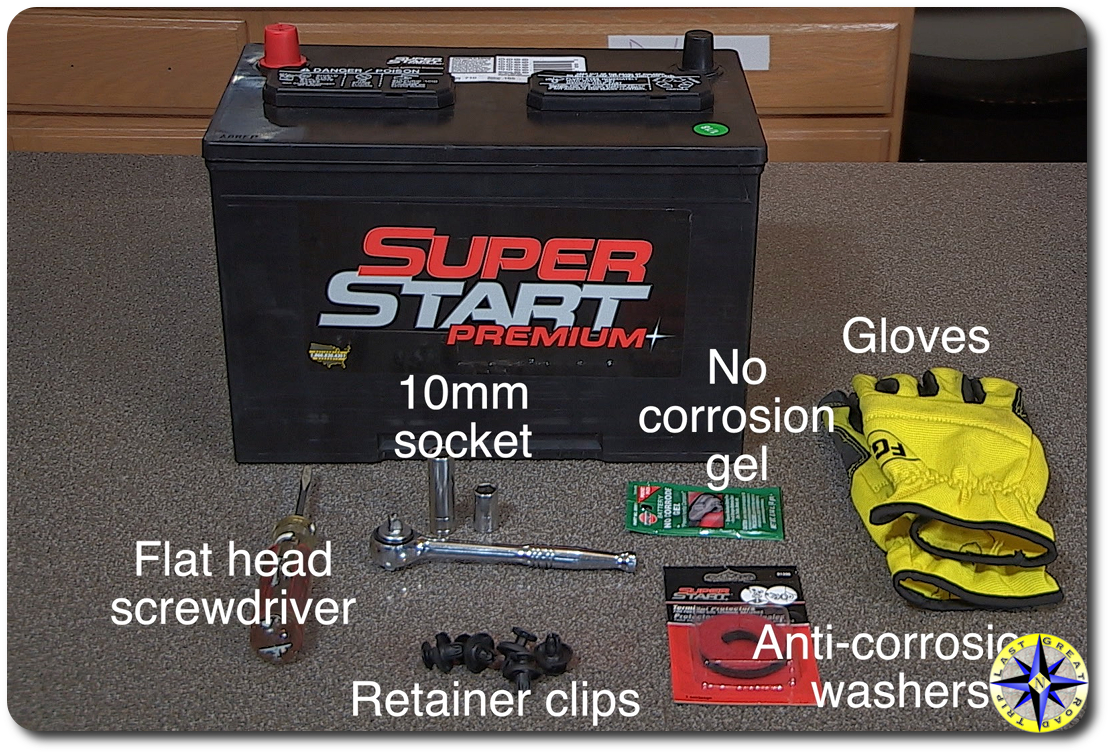
Most back yard mechanics will have the tools required to perform this simple activity. The tools you will need include:
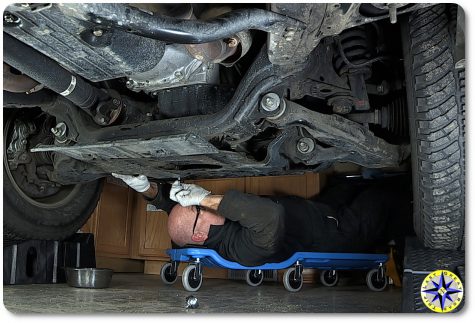
Start by placing your GX470 on flat level ground to ensure good draining and proper refill. Tip: clean the axle housing with soapy water and a scrub brush to remove the road and trail gunk. This will prevent any dirt from falling in to the differential while changing the oil.
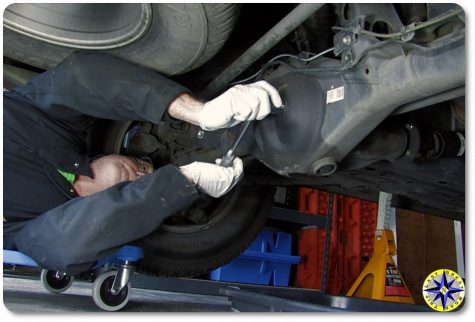
Remove the fill plug using a 24mm socket . The fill plug located in the middle(ish) of the rear axle housing. By removing the fill plug first the housing you ensure you can refill the differential before draining all the oil out.
With the oil catch pan in place remove the drain plug, located on the bottom of the rear axle housing, using a 24mm socket. If your going to use gloves, this is the time to wear them.
The drain plug has a magnetic insert designed to attract and hold tiny metal shavings that become suspended in the oil. Yes these are little bits of your gears. Inspect the drain plug checking for any chunks and observe how much has accumulated. This will give you an idea of what has been going on inside your differential.
While the oil completely drains, grab the shop rags and clean the fill and drain plugs, removing all the gunk and accumulated metal shavings. When your done the plugs should be clean and dry. Don’t forget which is which.
After the oil is fully drained, wipe the area clean and re-insert the drain plug with a new gasket and hand tighten. Remember the drain plug has the magnetic insert. Now set your torque wrench and tighten down the drain plug. Toyota states the torque specifications for both the drain and fill plugs as 36 foot pounds for our 2008 Lexus GX470. This torque setting is the same for the Toyota FJ Cruiser and 4Runner.
Remember that funnel with flexible tube? Getting the oil out of the bottle or can and into the axle housing through that little hole can be tricky. One of the advantages of the Hopkins FloTool 10704 Spill Saver Measu-Funnel is that the flexible tube funnel cap will screw directly on to some quart bottles. Another tip is to place the unopened gear oil containers in some hot water for five to ten minutes. This will warm up the thick gear lube and allow it to flow more easily.
Squeezing out three plus quarts of thick 90 weight through the tube and into the axle housing will take awhile so get comfortable.
Checking the fill level on flat ground is easy. The oil should barely begin to run out or just about to run out (within 5mm of the fill opening).
Hand tighten the fill plug and new gasket followed by torquing down the plug to Toyota specifications.
Wipe down the housing and check for leaks. Drive around the block a couple of times and check for drips when the test drive is complete.
Like all trucks your Toyota or Lexus requires the differential oil to be changed in order to keep the gears turning smoothly. Changing the rear differential oil on a GX470 (or FJ Cruiser, or 4Runner) is a simple maintenance job anyone can do with a little know how and about 60 minutes.
Own a overland truck long enough and you will need to replace the battery. In this article we use our Lexus GX470 as the demo truck but the same procedures will work for all vehicles, although access to the battery will be different.
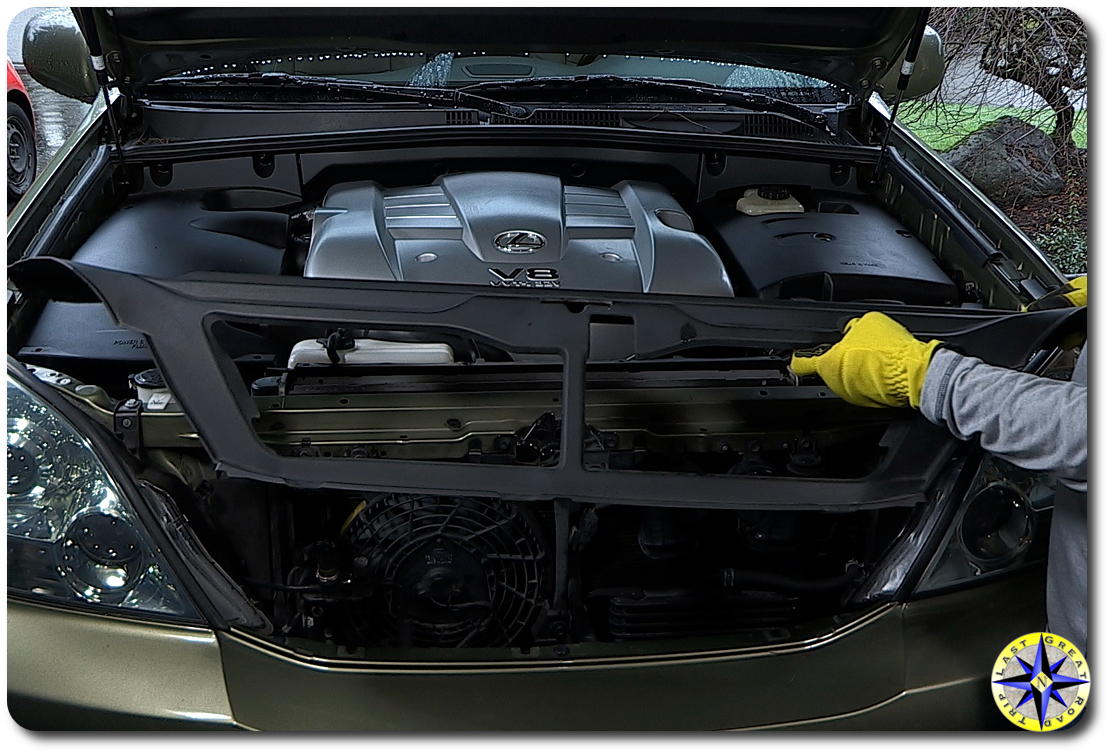
The trend these days is for truck manufacturers to value esthetics over function under the hood. Engine bays with plastic covers look great but that sleek, clean look costs time (translate to dollars at a dealership or local garage) when it comes to working under the hood.
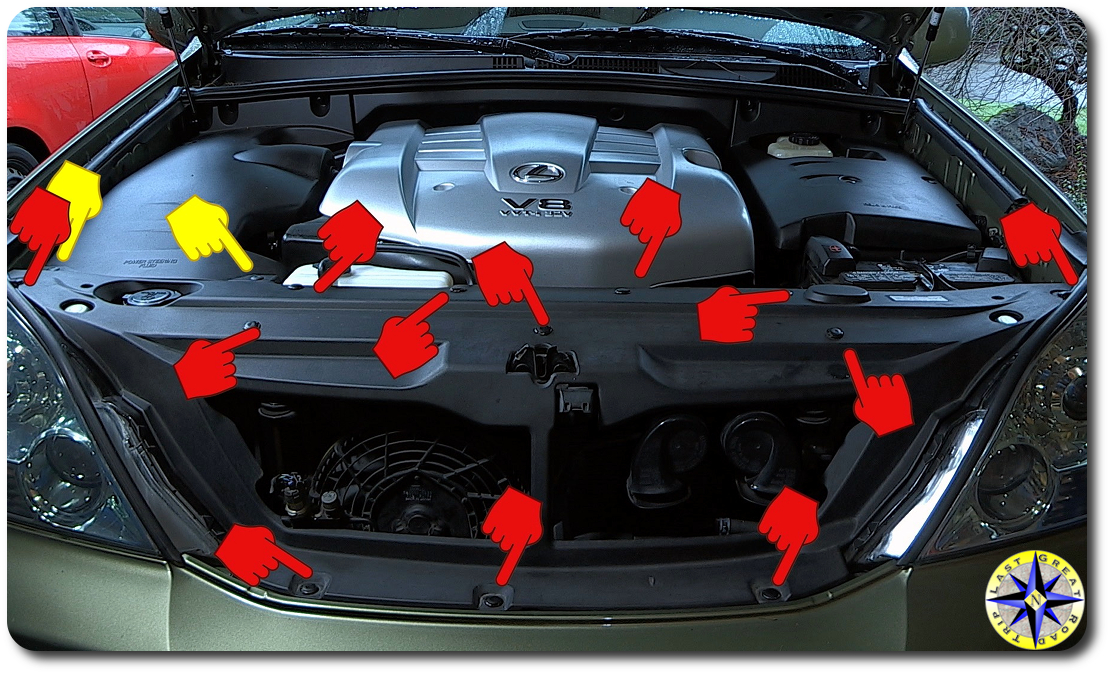
On a Lexus GX470 about half of your time will be spent removing the front plastic engine cover in order to gain full access to your truck’s battery.
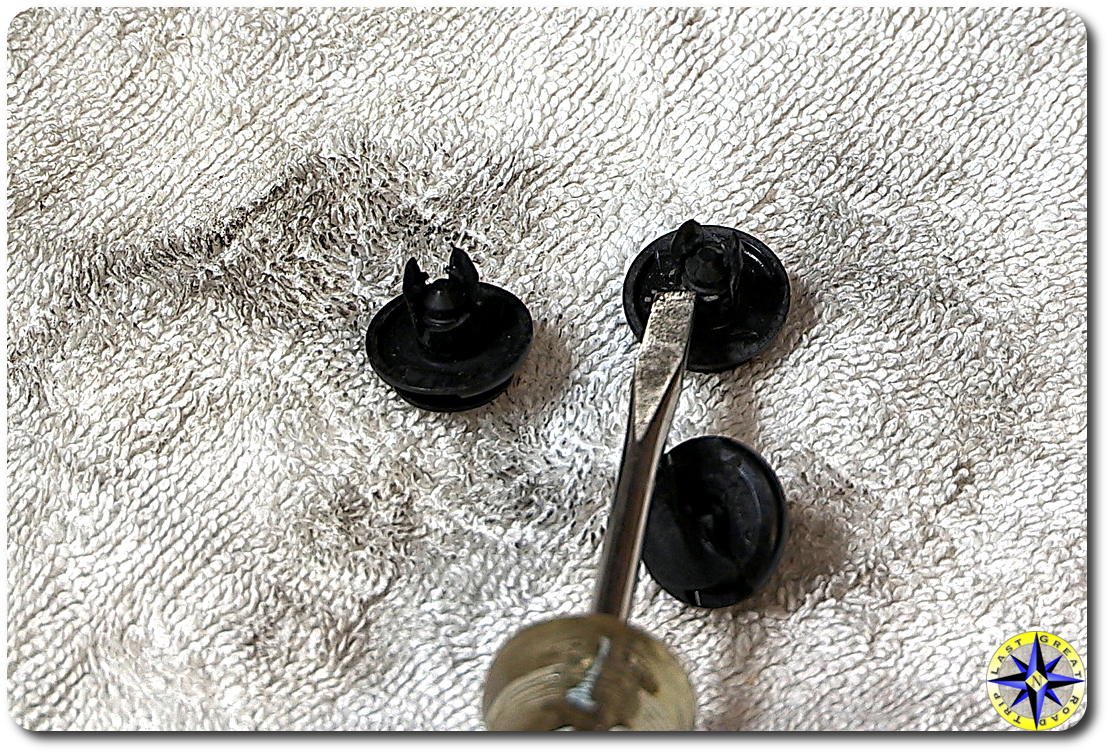
The plastic cover retainer clips (buttons) are intended to be reusable. Be prepared to replace several plastic retainer clips. I find that many dealership technicians are focused on speed often at the expense of broken retainer clips. Reusing damaged clips may save you a few dollars but this is the start of the down hill slide to those little rattles that drive me nuts. I always keep a handful of various retainer clips around knowing it is a small price to pay for peace and quiet.
The steps to replacing the battery in a Lexus GX470 are easy:
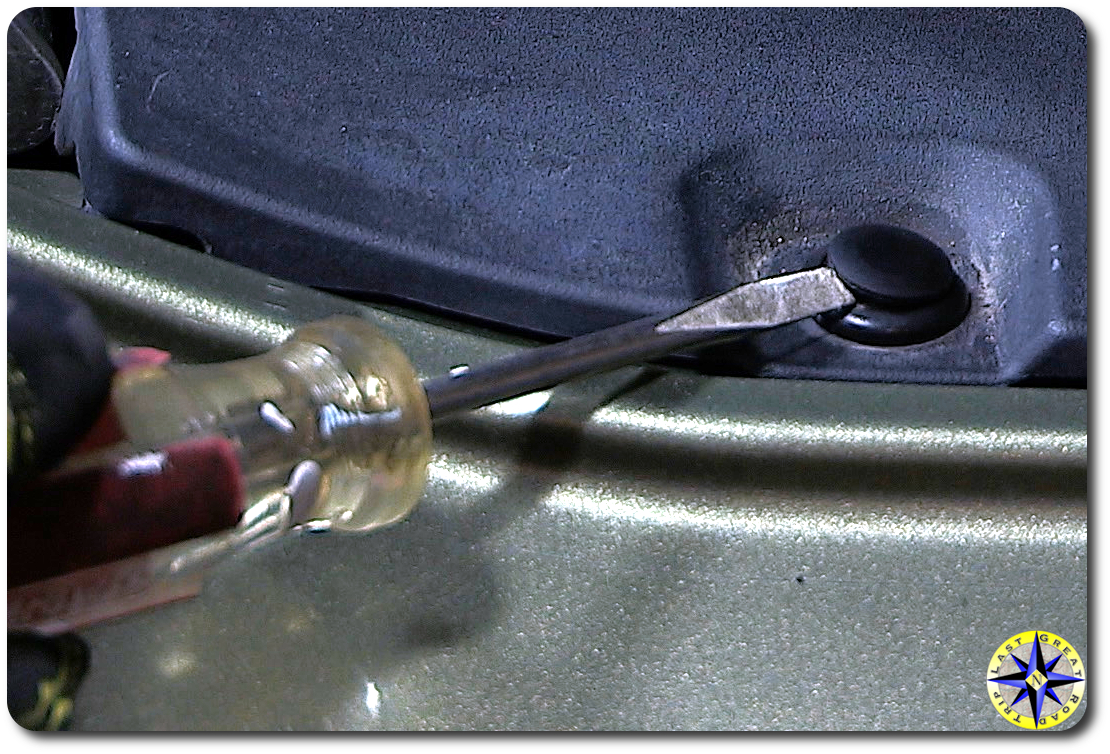
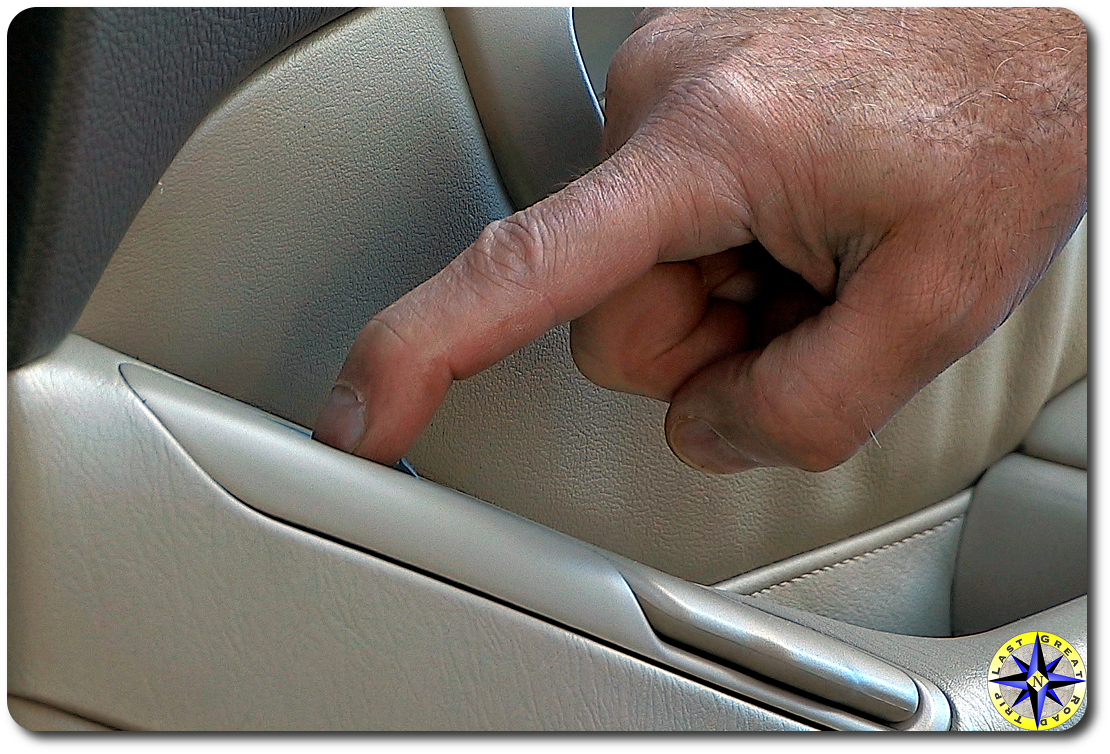
Remove the 12 (or so) retainer clips on the front plastic engine (radiator) cover. These retainers release their grip by sliding a flat head screwdriver in the channel then gently lift the button head of the retainer.
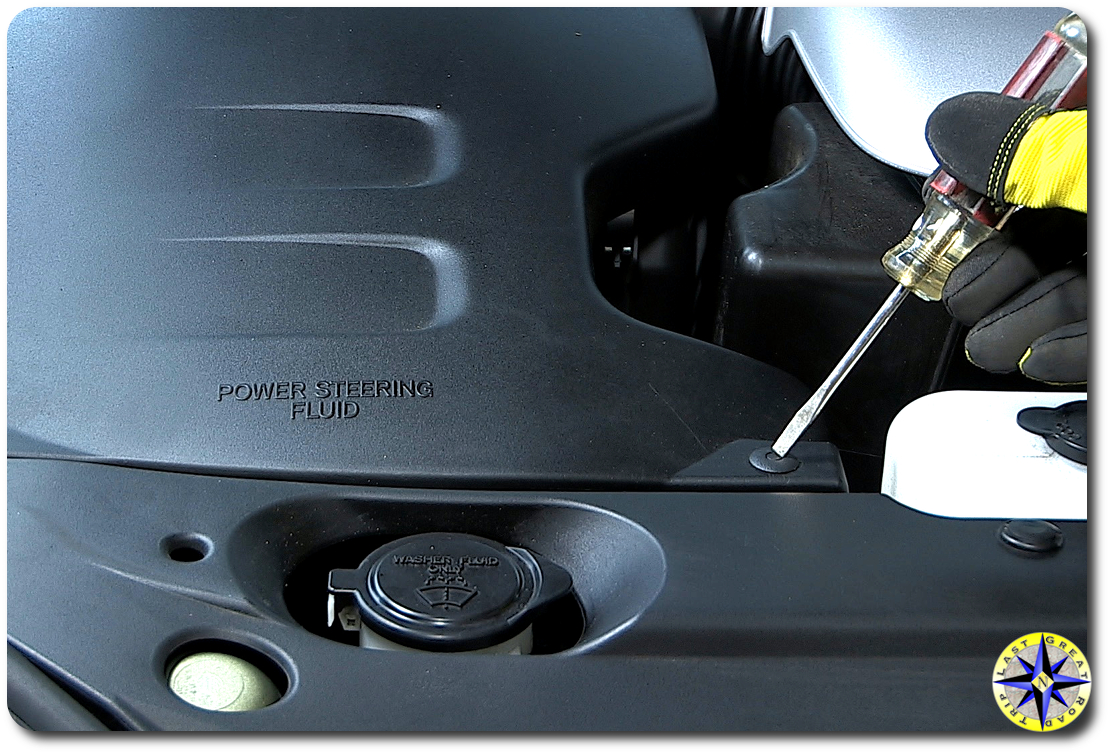
Remove the 2 retainers that hold the front plastic cover to the power steering cover, located toward the front on the passenger side of your Lexus GX470. These retainers will release their grip by pressing down on the center button with a screw driver.
Lift the positive lead cap (usually marked with “+” sign) from the battery terminal (some will tell you to remove the negative ground first). A 10mm socket will quickly loosen the clamp. Carefully lift the wire lead and tuck the wire lead out of the way ensuring it does not fall back onto the battery’s terminal.
Remove the negative lead cap (referred to as the ground and usually marked with a “-” sign) and lead wire from the battery terminal. Tuck the lead out of the way.
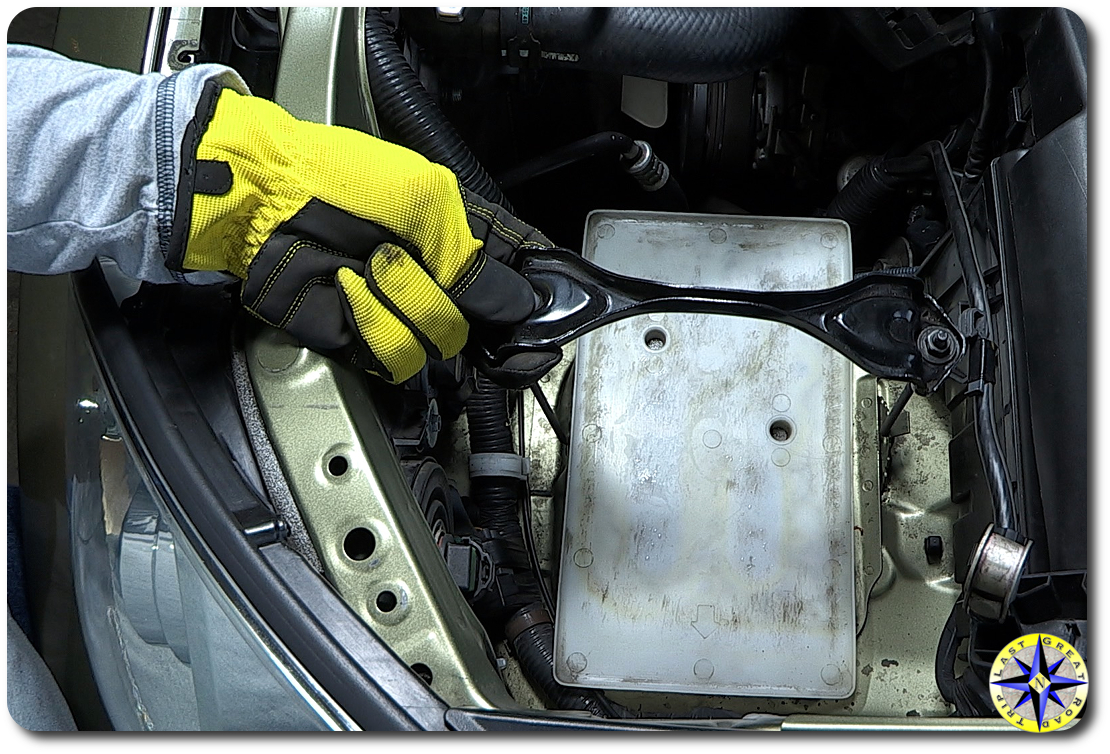
The battery hold-down comes off next. A 10mm deep socket will loosening the nuts. The rear hold-down hook should have a clip holding the ground wire (it did when it came from the factory) that will need to be unhooked.
Carefully lift the battery out of your truck. Use care not to strain yourself, the battery is heavy and awkward.
This is a good time to clean out the area of any dirt and debris. Check the tray for cracks and replace if needed, before setting the new battery into place.
Attach the battery hold-down. The shorter of the two hook rods attaches in the rear. Remember to re-clip the ground wire to the hold-down rod.
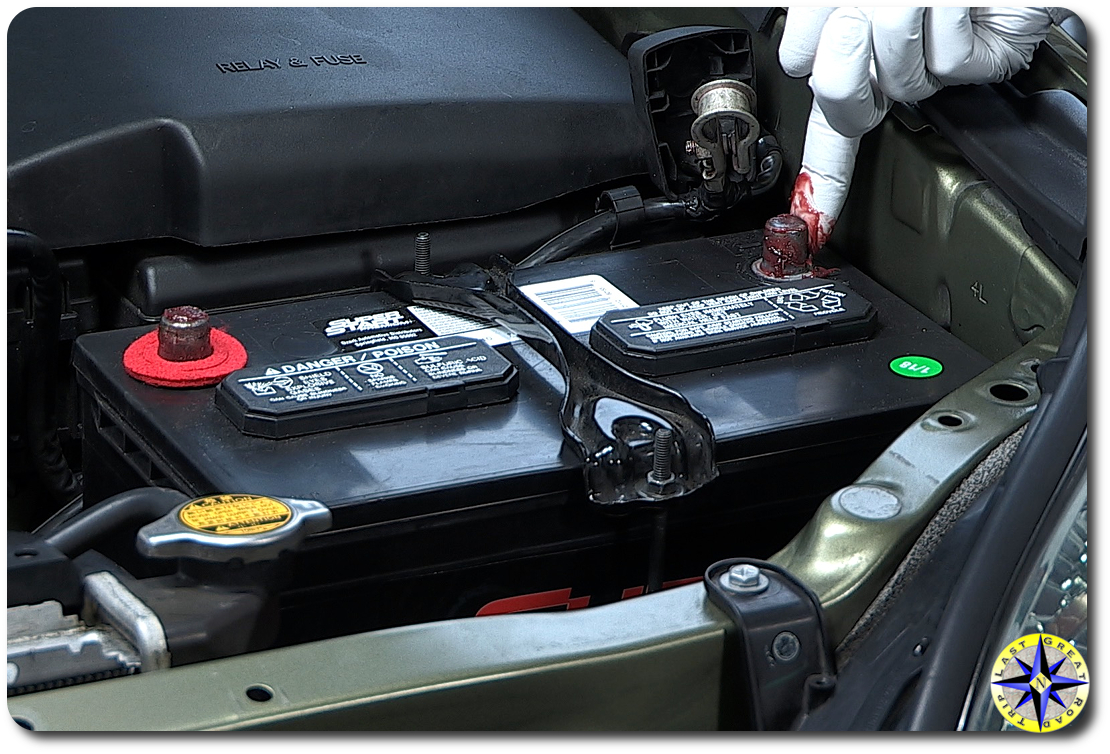
Before connecting the battery, smear a thin coat of no corrode gel (available at most parts stores) on the battery terminal and slide on anti-corrosion fiber washers.
Connect your leads to the battery terminal. Avoid touching your tool against both terminals or other metal on the truck.
Make sure to fully tighten the wire lead connection to the terminals. Lose connections can cause corrosion and hard to find electrical issues down the road. Reattach the terminal lead caps.
With the battery securely connected, set the front plastic engine cover back into place and secure it with plastic retainers. To avoid breaking retainer clips, ensure the button is lifted allowing the bottom prongs to come together. You may want to gently press the prongs together so they easily slide through the lined up holes. Press down on the button top gently locking the retain into place.
Don’t for get the two retainers holding the front cover to the power steering cover. For these retainers pull the center pin up allowing the retainer to slide in, then press it back down flush with the button top to secure it in place.
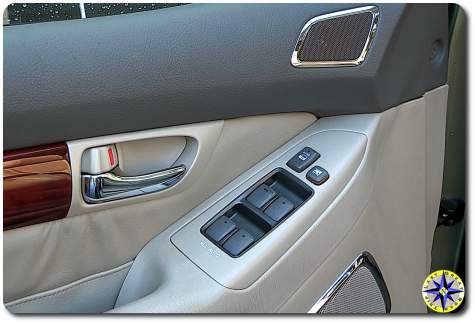
If you have had reason to disconnect or replace the battery on your Lexus GX470, you probably found that the drive’s remote window console controls on the door no longer work for the passenger or rear windows. Luckily there is an easy fix.
Turn the key to the on position
At the remote window press and hold down the window button until the window is completely down. Continue to hold the button down for two (2) seconds.
Remaining at the remote window’s control button, lift the window button and hold it up until the window is fully up. Continue to hold the button up for two (2) seconds.
Repeat steps 2 and 3 at all the other windows.
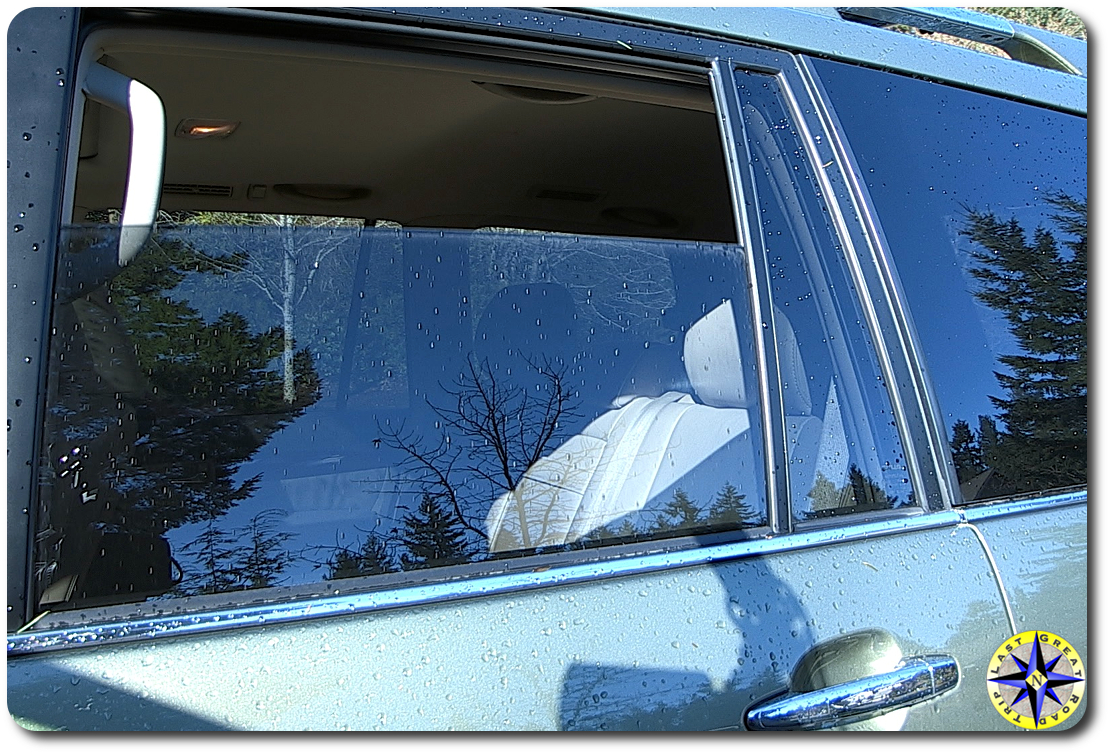
Test that your remote window control console on the driver’s door. The remote console has re-learned it’s role and can now fully operate all the remote windows. If any of the remote window controls don’t work, go to that window and repeat steps 2 and 3.
This window console reset will also work on most Toyota, Lexus, Honda or Acura vehicles with similar remote window controls.
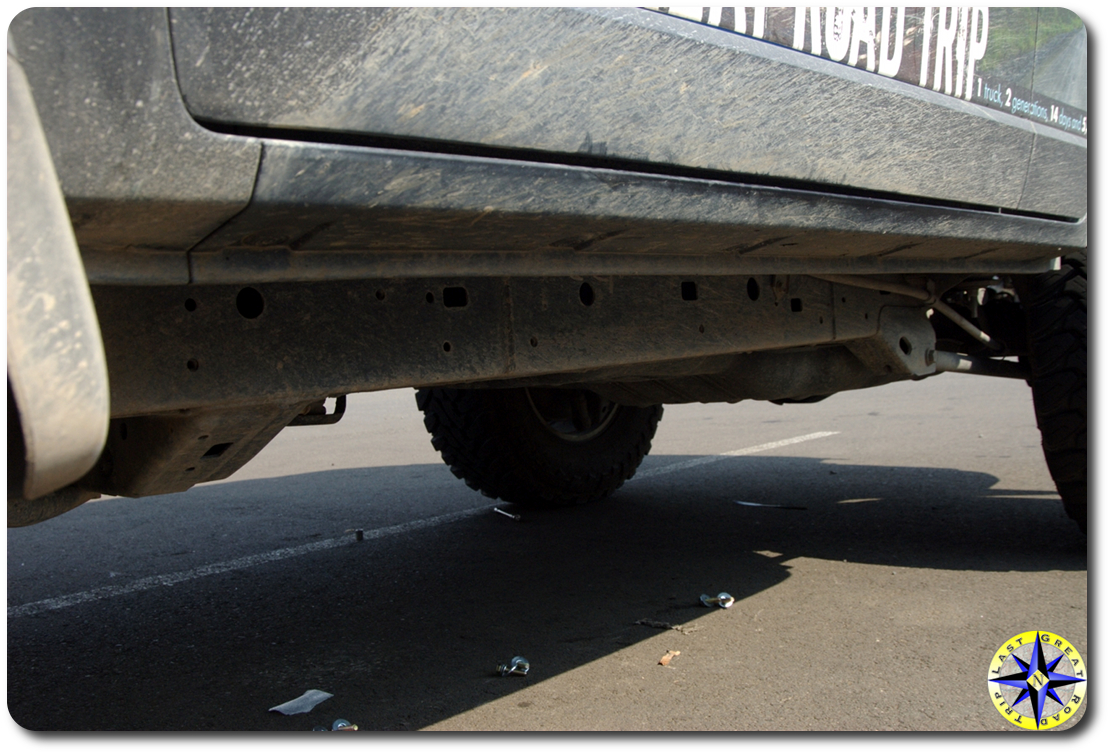
Off-road adventures put a lot of stress on your rock rails as they work to protect your door sills. Over time your sliders will start to show their age as road grim, rocks and dirt take their tole. Rocks and road salt eat away the paint and rust attacks any exposed steel. To keep your slides at their best every year or two you need to show them a little love.
Start by removing your rock rails from the truck. Scrub them down with soap and water removing all the dirt, loose paint and grime. Work the nooks and crannies where gunk may have accumulated. Rinse them off and while they dry wash the truck’s frame and clean it up.
If your rock rails are like ours there is some rust that needs to be knocked it down with a wire brush. You can also sand (or grind) down to bring back a smooth finish. After you have them cleaned, spray a rust reformer over any spots showing rust. A rust reformer will convert the rust to an inert material that can be painted with several costs rust proofing paint. Don’t forget to perform the same rust proofing on your trucks frame.
This is one of those activities that is easy but will take time. This literally is watching paint dry. Take advantage of this down time to run to the hardware store and purchase new hardened bolts and washers (grade 10.9). Your sliders often carry the weight of your truck and the last thing you want are those old bolts to sheer off because you weren’t willing to replace $20.00 worth of hardware.
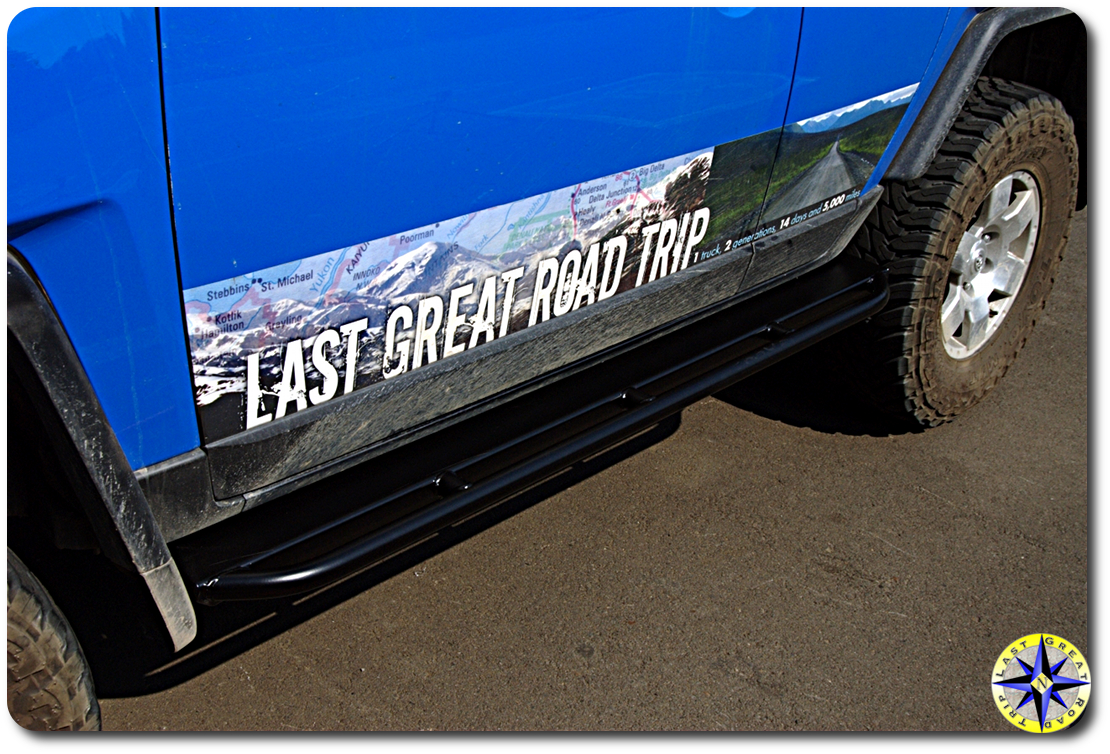
Before you bolt your rock rails back on, give the threads in the frame a good spray with WD-40 and chase the bolt through to ensure their is no sand or grit in there. Finally position your sliders and bolt them up to your frame ensuring they are aligned.
Now your sliders should look almost as good as new and continue to protect your truck on lots of off-road adventure.
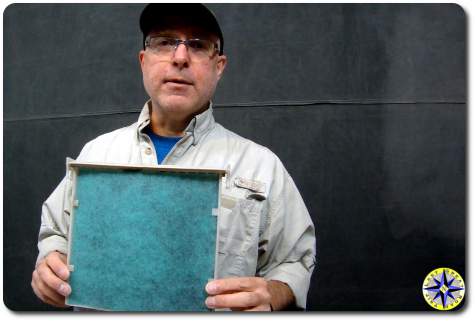
Toyota OEM cabin filters (and knockoffs) cost between $15 and $20 on the Internet depending on the brand, shipping and who you purchase from. You can make your own for as low as $2.00? It’s crazy but true, you can make your own cabin air filter in minutes with easily available materials.
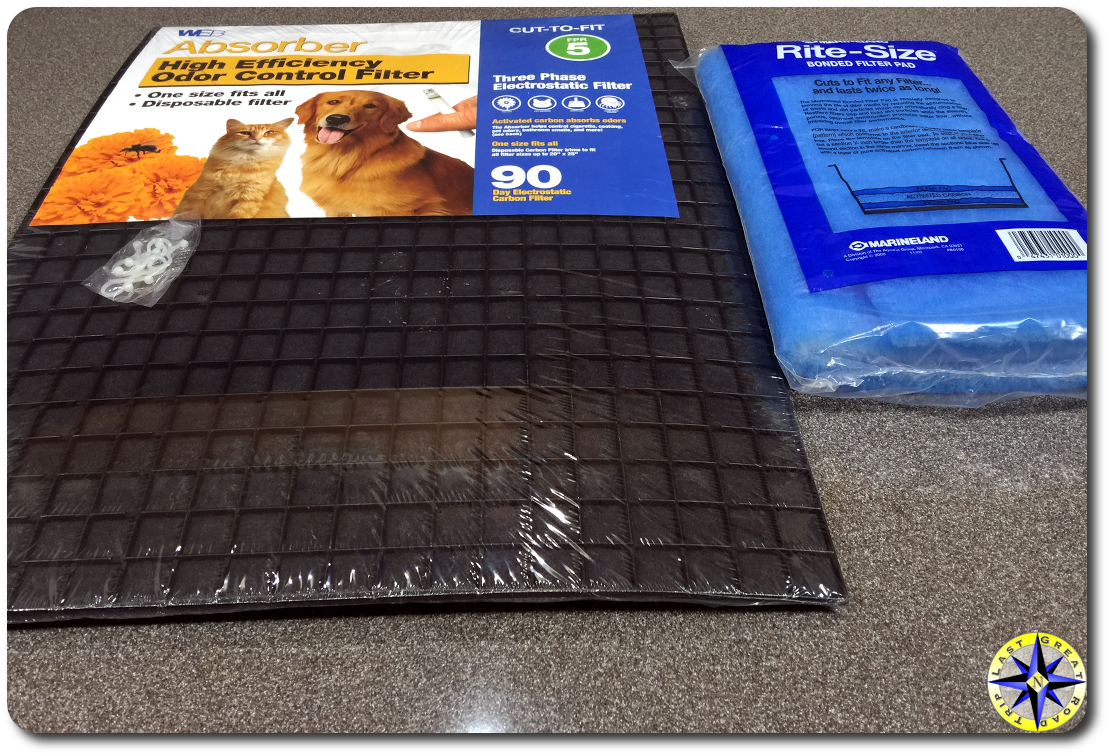
Stop by the pet store and pick up aquarium filter material, the polyester cut to fit stuff that runs around $6.00 a sheet. You will get a couple of filters from a single package of aquarium filter material. We like using a furnace filter called “Web Absorber”. This statically charged material includes a layer of carbon covered fiber that absorbs odors. While the Absorber will cost between $10 and $20, you will get four of five cabin air filters from one 20″x25″ furnace filter.
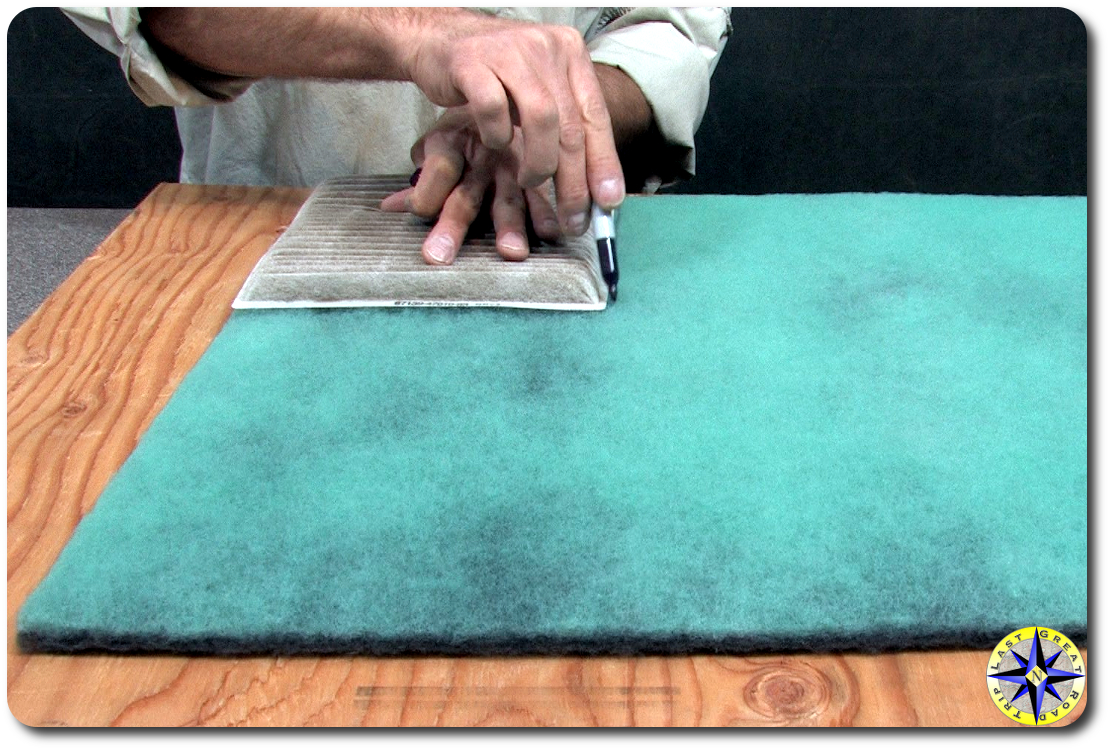
Lay out the material on a flat surface you can cut on. Using your old OEM cabin filter as a template, trace it out with a Sharpy onto your filter material and then cut out along your traced lines.
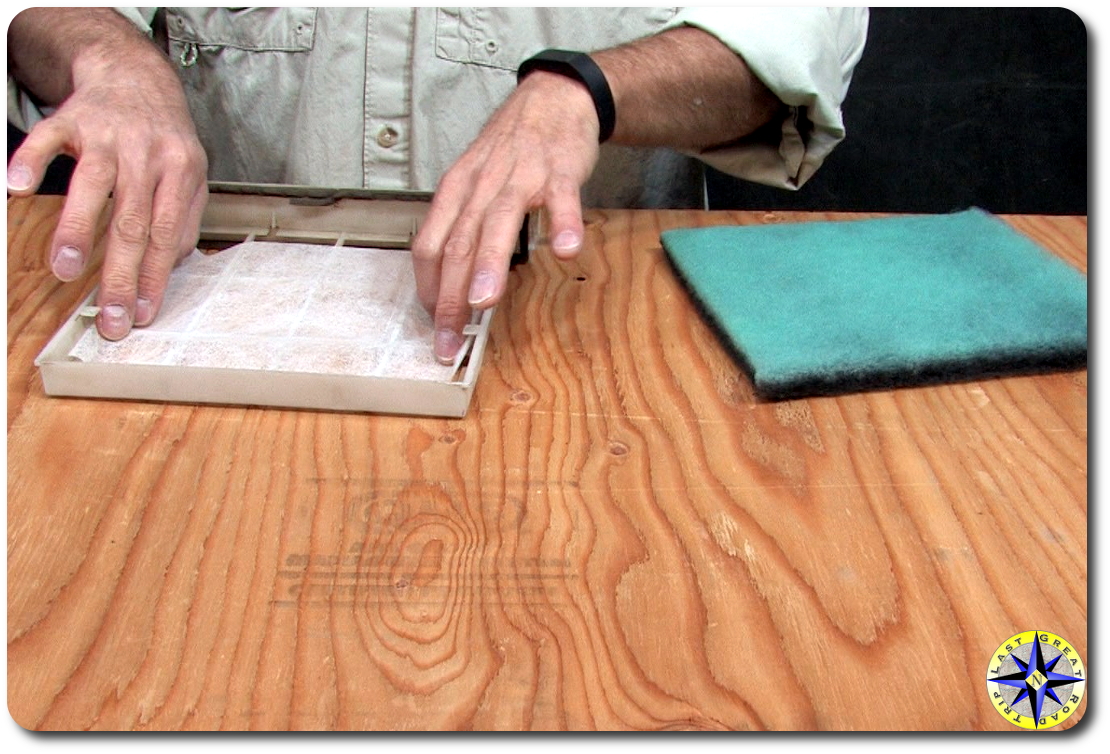
To assemble it, I like to start by laying a dryer sheet into the cabin filter holder. This will add a fresh scent to the air. On top of the dryer sheet lay in the filter material you cut out. If you sized your material right it will fit snugly into filter holder on all sides. Be sure to tuck the filter material under the top tabs of the filter holder.
That is all there is too it. Slide your cabin filter holder back into place and you’re done. You should have plenty of material left over for the next time you need to replace you cabin air filter.
It started out as oil appearing on the inside of rear wheel. Hum, that can’t be good. Ok, a blown oil seal, that is easy enough and just a couple of bucks for a new seal. After changing the seal out it was much better, but not perfect and in a few days it was clear something wasn’t exactly right. Did I screw up the seal when I put it in? Is the breather clogged and building up pressure that blows the seal? God I hope it’s not the bearing.
After checking the breather to ensure good air flow and changing the seal one more time for good measure, it was clear we’d need a little professional help and turned to our friends at Auburn Car Repair & Offroad to replace the wheel bearing.
In order to change the rear wheel bearing, you need to pull the axle, apply 20+ tons of pressure to separate the bearing from the axle and than push the new bearing on. But aside from machinist magic of replacing the bearing, most folks can perform a majority of the work involved.
After getting the axle in the air and removing the wheel, start by unplugging the the ABS sensor wire. Remove the bolts that hold the disk brakes housing and carefully set it aside. Tip: if you cut the top of the clip holding the brake hose in place you can slide the hose out without disconnecting it from the hardline and avoid having to bleed the brakes later.
Pulling the brake disk (rotor) may take a few soft raps with a plastic mallet to loosen rust’s grip in order to slide if off. With the disk removed the parking brake is exposed. There are springs top and bottom that hold everything together. The top springs are under a good deal to tension and will require work to lift them off of the stud. Once the springs are released, the shoe hold down springs can be removed along with the brake shoes and other parts. The best advice here, slow down, take your time and ensure you keep track of all the parts.
The parking brake cable needs to be removed before the #1 shoe can be completely removed.
Remove are four nuts holding the axle (the wheel bearing housing actually) to the axle housing. Grab a shop rag and slide the axle straight out from the housing.
Remove the axle seal and drape a shop towel over the opening to keep the dust out. If you’re simply replacing a blown seal, you can jump to the re-install.
The ABS sensor is attached to the wheel bearing housing. A small bolt holds it in place and needs to be removed before you proceed.
This is where the magic happens. If you don’t have a 40 ton hydraulic press in your garage you’re going to need to head down to a machine shop / auto shop for a little love. The machinist will remove the retaining clip, set up the axle in their hydraulic press, and pull the wheel bearing housing off of the axle. She will then set up the new wheel bearing housing so it can be pushed into place on the axle and replace the retaining clip. Done.
When you get the axle back, be sure to reinstall your ABS senor. Add a little grease to the outside of your new axle seal and tap it into place. This is also the time to replace the O-ring.
Carefully slide the axle into the housing. Avoid banging against the seal. You may need to turn the axle a little in order for the splines to line up and fully slide into the housing. Tighten up the nuts that hold the axle to the housing.
The tricky part for me was reassembling the parking brakes. Although the guys at Auburn Care Repair & Offroad completed it in a few minutes, it took me about 30 minutes to get the parking brake shoes back in place when I replaced the seal the first and second time. Install the #1 shoe first, reattach the parking brake cable, then install the #2 shoe. It is not all that complicated but there is limited room to work the parts into place and the springs take a little muscle so take your time and use the diagrams here to help.
After the parking brake shoes and brake cable are complete it is time to adjust the shoes so they will hold tight when the parking brake is engaged. Make small adjustments, put the brake disk in place and feel the rotation against the shoes. Once you feel the shoe begin to rub, back it off a bit so the disk rotates freely but quickly grabs the drum when the parking brake is engaged.
Put your disk brake housing back on (if you disconnected the break hardline you’ll need to bleed the brakes). Connect the ABS cable to the ABS sensor. Mount your wheel and your set.
No so hard right. If you want to do this work yourself you’ll need a few parts:
Rear Axle Hub and Bearing Assembly
Rear Axle Bearing Inner Retainer
Rear Axle Shaft Snap Ring
Rear Axle Shaft Oil Seal
O-Ring
Although you may not be able to perform all the work, you can certainly perform a good portion of the work and let a machine shop do the heavy lifting on your rear wheel bearing replacement.
Bonus: Here are the instructions Toyota has for removing and installing a rear axle on a Toyota FJ Cruiser:
Not that long ago on an off-road adventure we broke the tail light on our FJ Cruiser (Carnage on the trail). Now it is time to pay the piper and repair the damage.
Replacing a broken tail light is a simple fix anyone can perform with a few simple tools.
Although simple, plan on at least an hour to complete this repair. It is also time to throwout all child labor laws and enlist the help of your daughter or son or anyone else who has small hands.
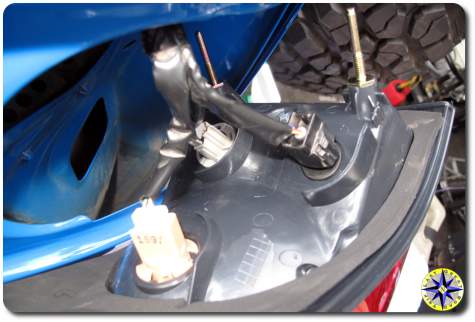
In order to remove the broken tail light assembly, pull back the small plastic access panel on the interior back corner of your FJ Cruiser. Since we replaced the driver’s side we also removed the bottle jack in order to reach the third hexnut that holds the tail light housing in place. If you are replacing the passenger side you will have to remove the base speaker and the access panel behind.
The tail light housing is held in place by three hexnuts on long screws that are attached to the tail light assembly. A 10mm wrench will loosen the hexnuts closest to the back door accessible through the small access portal. The third requires a 10mm deep socket (on a 1/4″ drive there really isn’t much room in there) and small hands. Reach back up into the cavity behind where the bottle jack is stored. You cannot see the long screw or hexnut so you (or your small handed assistant) will need to feel your way in order to slide the socket on and loosen the hexnut.
With the hexnuts removed, gently slide the old light housing off and carefully remove the wire clip connections to the light sockets. After you have the housing off remove and transfer the light sockets (with bulbs) onto the new housing.
Now simply reverse the process to attach the new tail light housing assembly to your FJ Cruiser. Once you have the hexnuts hand tightened, test that the brake, reverse light and turn signal are operating correctly. When tightening the hexnuts, be careful not to over tighten. The screws are attached to plastic and can crack the plastic housing if over tightened. You want to a apply just enough torque to hold the tail light housing to your FJ Cruiser securely.
Think you might need additional instructions? How about the Toyota FJ Cruiser rear light assembly instructions manual pages? They do make it more difficult but it will provide details you might want to consider.
Because this repair is so simple, we are not a fan of tail light guards. The guards attach using the three tail light housings screws with the guard’s attachment points sitting between the metal body and the plastic tail light assembly. When the guard comes in contact with an immovable object the guard is pushed in causing body damage and most likely cracks to the tail light housing. We prefer braking the tail light housing over body damage.
On an off-road adventure, spare parts are great but if you don’t have the tools or the know-how to complete the repair… those parts aren’t going to change themselves.
You’ve heard us preach: “If the rig you drive off-road has independent front suspension (IFS) carry a spare drive-shaft”, can I get an AMEN. The CV Joint provides a great deal of movement over a wide range of angles but it is a weak link that we don’t do any favors for when we add larger tires, re-gear our differentials and provide additional articulation with suspension lifts. The problem occurs as you put large amounts of torque on the joint when it is at a maximum angle. A classic case is where the wheels are spinning and the driver turns them to gain traction to climb a rock. As the tires catch traction all that spinning force is thrown directly into the CV which usually explodes under the immediate transition of force.
Some folks have opted for beefier CV joints. Our philosophy is a little different. When driving off-road you will always have weak links. We prefer to keep those weak links where they can be repaired in the field. Beef up your CV and now the differential gears have to absorb all the torque that the CV was previously protecting them from. A drive-shaft replacement in the field (or just pulling the axle and limping in 3WD) is manageable, replacing differential gears in the field not so much.
We recently had a CV boot on one of our drive-shafts start oozing lube while on the Utah backcountry discovery route (UTBDR). We managed to bandage it up with zip ties and duct tape in the field but upon arriving back in the garage it was time to make a proper repair by swapping out the damaged drive-shaft.
The process of swapping a drive-shaft is pretty straight forward with the right tools and a little planning. The old Toyota Trails Team used to brag about changing out a drive-shaft in under 30 minutes. For us mere mortals it can be accomplished in about an hour or so with a few basic tools under reasonable conditions. But who breaks anything under reasonable conditions?
Most of us carry a small assortment of tools when we wheel. You will most likely need to add a couple of items to your tool bag if you are going to complete this repair. Here is the list of bits and bobble to have on hand.
1/2” socket wrench
12mm, 14mm, 17mm, 19mm sockets
35mm socket (for the axle nut. This repair lacks entertainment value without a 35mm socket)
Big flat head screwdriver
Pliers
Slide hammer (not something we carry) or small crowbar
Small mallet
Breaker bar (or a pipe that fits over your socket wrench to get leverage on that axle nut)
brass bar
Torque wrench that will go to 175 ft/lbs (if you want to do it right)
Gear oil (some is going to spill out)
Funnel hose (have you seen where the front diff fill is located)
Shop rags, tarp or plastic sheet, trash bags (you’ll be making a mess)
Gloves, hand cleaner, baby wipes (unless you’re ok with grease all over your steer wheel on the drive home)
Flashlight (always carry a good flashlight)
The parts:
Preassembled spare drive-shaft (sort of the point)
Steering knuckle oil seal – recommended but optional
Hub dust cover (Toyota calls it a hub grease cap) – recommended but optional
On the optional parts, you can be careful and reuse the dust cover and seal but it’s hardly worth the frustration when your in the field. It will save you time and trouble if you carry these extras.
The method we’ll describe here is with field repair in mind. It may not be pretty but if we could get by on our good looks, we’d have a chase truck and a team of mechanics on our off-road adventures.
First and foremost, secure the rig. Try to limp to a flat, dry spot. Chock the other wheels to keep the rig from moving. This repair is much easier with a floor jack and a couple of jack stands. In the field we carry a bottle jack and a hi-lift.
Grab your spare drive-shaft and give it a look. Double check for cracks or leaks in the boots or assemblies… You really don’t want to put in a broken part. And if your spare is bad, begin considering your options.
Start by removing your spare tire (yes, the spare tire) and set it aside for a moment. Now loosen the lugs on the wheel with the bad drive-shaft before raising the rig with the Hi-lift. Once you have the wheel off, lay it flat, slide it under the rig and stack the spare on top. You are creating a jack stand out of the two tires so position them under the frame toward the front of the rig and lower the rig off the hi-lift onto the tire stack. You will need to put lot of torque on some of the nuts and you don’t want to have a hi-lift holding the rig in the air as you’re pushing an pulling things around. Now throw down a tarp or plastic sheet to catch the gear oil that will seep out from the front differential as we move to the meat of this repair.
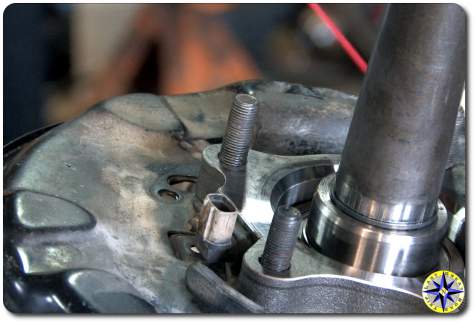
Pry off the hub dust cover. Toyota says you can pry the cover loose… We just punch through it with a big screwdriver and tug at it, but then again, we carry a spare cap. Remove the cotter pin and locking nut cap setting them is a safe place. Removing the axle nut takes that 35mm socket, a breaker bar and a little muscle. Have the rig in 4W-Lo to keep the axle from turning as you wrench off the nut.
Remove the nut and cotter pin holding the steering tie rod in place and wiggle the tie rod free from the steering knuckle. It might take a light wrap or two with the mallet to free the tie rod.
Free the two bolts holding the lower ball joint to the steering knuckle. These bolts are a bit tight so put some muscle into it and take care to set them in a safe place… finding a lost bolt, a nut or god forbid a cotter pin in the dirt can be harder than any field repair.
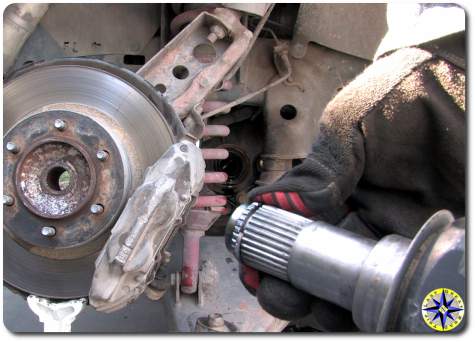
At this point the steering knuckle and wheel hub can be swung out of the way and you can slide it off the outboard side of the drive-shaft. Be careful not to pull on or stress the ABS sensor plug, its wire or the brake line. Once the shaft is pulled out, rest the hub back down on the lower ball joint attachment.
To remove the inner portion of the drive-shaft from the differential, Toyota recommends using a slide hammer and hook to pull the drive-shaft free. A slide hammer is not in our tool kit on the trail, and we’ve found a small crowbar works well to pry (really more of a pop) it out. In either case you are putting enough force on the drive-shaft cup to pop the snap ring free. Be careful not to damage the transfer case’s oil seal. As the drive-shaft comes free, gear oil will start to leak out and you will want to catch it in a tin can, bucket or what ever is handy in order to protect the environment.
Ok… take a breath, grab a few swigs of water and relax, you’re half way through the repair.
Take a look at the steering knuckle oil seal on the inside of the steering knuckle. There is a good chance it is chewed up, dirty and worn out which is why we carry the spare. Replacing the seal involves pulling the old one out with a pair of pliers and then working the new one into the steering knuckle. Tap the new seal in using a soft touch with the mallet, hammer or rock on a brass rod working your way around and tapping it into place. The seal is a tight fit so take your time until it is snugged into place and flush against the knuckle.
On the FJ Cruiser a single drive-shaft will fit either passenger or driver side, but there is a clear inboard and outboard side to the drive-shaft shaft. As you prepare to install the new drive-shaft notice the snap ring on the inboard side. An extra set of hands will make this much easier if they can swing out the hub holding it out of the way while you install the drive-shaft. In order to install the drive-shaft align the shaft splines with the differential and have the snap ring open side facing down. Slide the shaft into the differential. It will take some force to get the snap ring that holds the drive-shaft in the differential into place. If after a couple of strong nudges the drive-shaft does not pop in, take the mallet and brass rod and drive it into place using the notches on the inboard CV cup.
Once the inboard side of the drive-shaft is in place you can slide the outboard side through the wheel hub and start buttoning everything back up and hand tighten the axle hub nut, snugging it up to hold the drive-shaft and hub together. You’ll be torquing it tight later.
Torque down the front lower ball joint attachment that holds the knuckle to the lower arm. Reassemble the tie rod torquing the nut and replacing the cotter pin. And now torque up tight the front axle nut with the required 175 ft/lb. Slide the nut locking cap over the axle nut and put the cotter pin back in. Tap the hub’s dust cover (grease cap) into place and your just about done.
Before putting the wheel back on, look over the whole IFS. We will put a bottle jack under the lower control arm and raise it a bit to simulate how it will sit when the tire is back on and the drive-shaft is relatively horizontal. Tug, pull and push on everything to make sure the entire assembly is snug and fit. If your not sure about the play in a part, check it against the other side. Remember your other side is under weight and will react a bit different but you will understand what parts have play in them and what do not.
You will want to top off your front differential with gear oil to make up for what has seeped out through the repair. The easiest way we’ve found to fill the front differential on an FJ Cruiser is with a funnel and long hose run from the differential fill port up to a location where the gear oil can be pored into the funnel and run down to the differential. The amount of oil required depends on the angle your rig was at during this repair and the amount of oil that leaked out.
Once you’ve topped off the oil and reinstalled the fill plug, the final step is to put the wheel back on, clean up your mess and continue on your way.
No… those parts aren’t going to change themselves but with the right parts and tools, there is no reason you can’t make a field repair and continue your off-road adventure.
Bonus resources: You might want to print these off, put them is a zip lock freezer bag and tape to your spare drive shaft.
Spring is in the air, the sun is shining, and the last thing on your mind is your windshield wipers. But this is exactly the time when you should be thinking about replacing your windshield wipers.
Throughout the winter, your windshield wipers worked their little blades off, clearing snow, rain, hail and road gunk off your windshield. And now they are probably a little tired and worn out, leaving streaks and no longer able to give you that crystal clear vision they once did. As we get ready for summer wheeling (and who isn’t excited about that), changing out our windshield wipers is one of those maintenance items on our check list.
A quick Google search will return you lots of choices, so we turned to our friend Beau Jaramillo over at Amsoil and he sent us Trico’s Neoform Beam Blade. These are their highest-performing blades with single beam construction offering an infinite number of blade pressure points that keeps a constant, even pressure across the entire length of the wiper. All that pressure translates into a smoother, more consistent wipe across the windshield. They even have a Teflon coating for longer life. The NeoForm blades’ aerodynamic spoiler design helps keep the blade on the windshield, even in high wind or vehicle speeds… Not that our FJ Cruiser is breaking the sound barrier.
Our FJ Cruiser requires three windshield wipers, one 16″ blade in front of the driver and two smaller 14″ blades keeping the center and passenger side of the windshield clean. The windshield blades connect to the arms using a hook style attachment (other rigs my use a different attachment style). Changing your windshield wipers is easy and can be done rain or shine in about five minutes.
Remove the old windshield wiper. It should have a small tab that will release it from the arm and allow you to slide the old wiper off the arm.
Push the Trico wiper adapter latch open, lifting it up.
Slide the arm end through the latch opening and pull the blade back onto the arm’s hook to lock it in place.
Close the adapter latch and you done.
Sound complicated? Here is a 60 second video that will show you how easy it is: Trico Install Video
Now when we run into rain, mud or trail dust, our new blades will wipe it clean, instead of just pushing the water back and forth.
We live in the northwest so of course it rained within a few hours of installing the new wipers… And how did they perform? Highway driving in a good downpour, no streaks or wet spots. The view remained crystal clear!
Travel & Adventure – an overlanding, off road, camping and road trip website dedicated to helping others explore the road less traveled.


 Because this repair is so simple, we are not a fan of tail light guards. The guards attach using the three tail light housings screws with the guard’s attachment points sitting between the metal body and the plastic tail light assembly. When the guard comes in contact with an immovable object the guard is pushed in causing body damage and most likely cracks to the tail light housing. We prefer braking the tail light housing over body damage.