Category Archives: How To Modification Info

Step by step instructions on how to perform modifications on your 4×4 truck in order to prepare it for off road adventures.

Improved Lexut GX470 rear doot strut connect

Improved Lexus GX470 Rear Door Gas Strut Modification

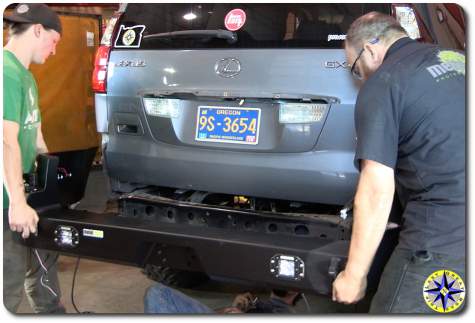
The other day, Hula Betty, in her most sportive, I get to work on her truck, but she wants this fixed now voice,  announced it was time for me to replace the clunky Lexus GX470 rear door stopper with a gas assisted strut that will allow the door to glide open, stay open and easily close.

A common complaint about the Lexus GX470 and Toyota Prado 120 is their rear door stopper mechanism’s poor design.  Even in a slight breeze the rear door becomes randomly self-closing if you forget to lock it open.  And opening the door with an arm full of gear can be overly challenging on an angle.  Changing out the original door stopper mechanism with a gas strut solves both problems as well as adding a smooth glide on opening or closing the door.

Changing out the Lexus GX470 or Toyota Prado 120’s OEM door stopper with a gas strut and door reinforcement plate is a simple mod that anyone can perform in no time at all.

You will need a couple of tools:

  • Felt tip marker
  • Flat head screw driver
  • 10mm box wrench
  • 12mm box wrench
  • Small grinder
  • Electric drill
  • 5/16″ drill bit

The parts required are:

Step 1 -Using a flat head screwdriver, pry off the little round cap covering the bolt holding the OEM door stopper to rear frame of your Lexus GX470.

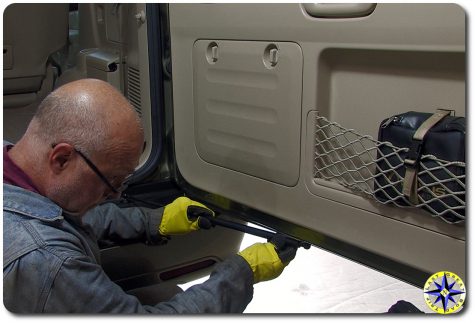
Step 2 – Remove the  old clunky door stopper mechanism.  Start with the bolt you just exposed on the bumper.  Then remove the two bolts on the underside of the rear door.  To avoid scratches, support the door stopper with one hand while you remove the bolts with the other.Improved Lexut GX470 rear doot strut bracket bolts

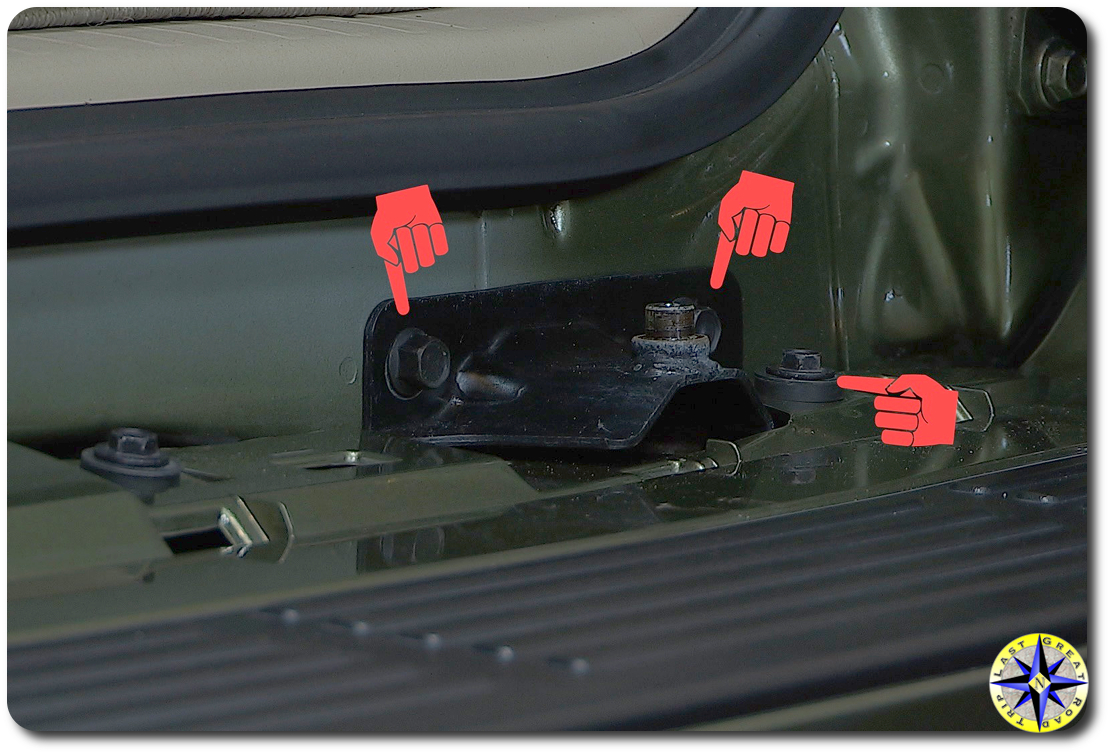
Step 3 – Remove the long thin plastic cover over the gap between the truck and the bumper.  The Lexus GX470 has a portal on the cover for sliding in the jack handle to lower the spare tire.  If you remove that little portal cover you can get a better grip to remove the long cover running the length of the bumper body gap.

Step 4 –  After the cover is removed you will see the bracket that the old door stopper mechanism on your Lexus GX470 or Toyota Prado 120 attached to.  Using a 10mm wrench, start by removing the bolt on the bracket that is attached to the bumper.

Step 5 – A 12mm wrench will remove the two bolts holding the bracket to the back of the truck frame.Improved Lexut GX470 rear doot strut cut

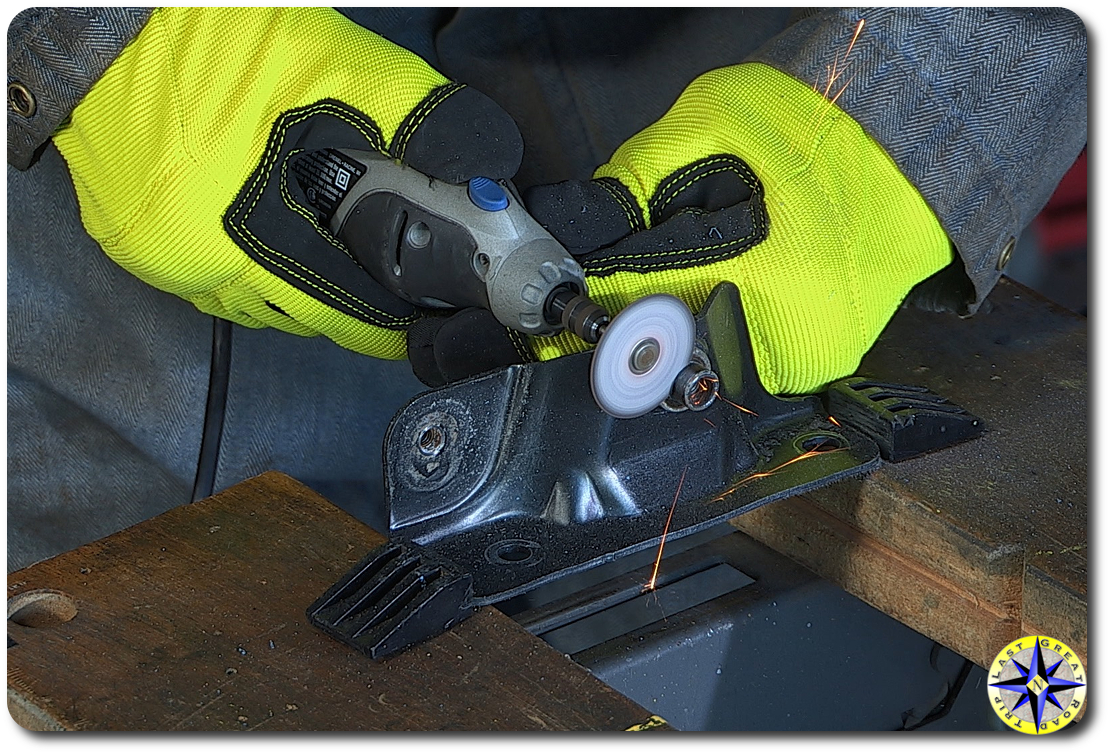
Step 6 – With a cutting disk attached to a small grinder, cut away the portion of the bracket that the OEM door stopper slide onto.  This is just above the point at which the threads begin.  After completing your cut, smooth down any high points and rough edges with a grinding disk.

Step 7 – Throw a little rattle-can paint on the bracket to keep everything looking good and prevent rust from developing.

Step 8 – To fabricate a rear door reinforcement plate you will use the OEM door stopper as a template.  Place the door stopper on the aluminum flat bar arranging as if the flat bar was the rear door and the door stopper would be attaching to it.  Trace the edges and bolt holes onto the flat bar with a marker.Improved Lexut GX470 rear doot strut flat bar

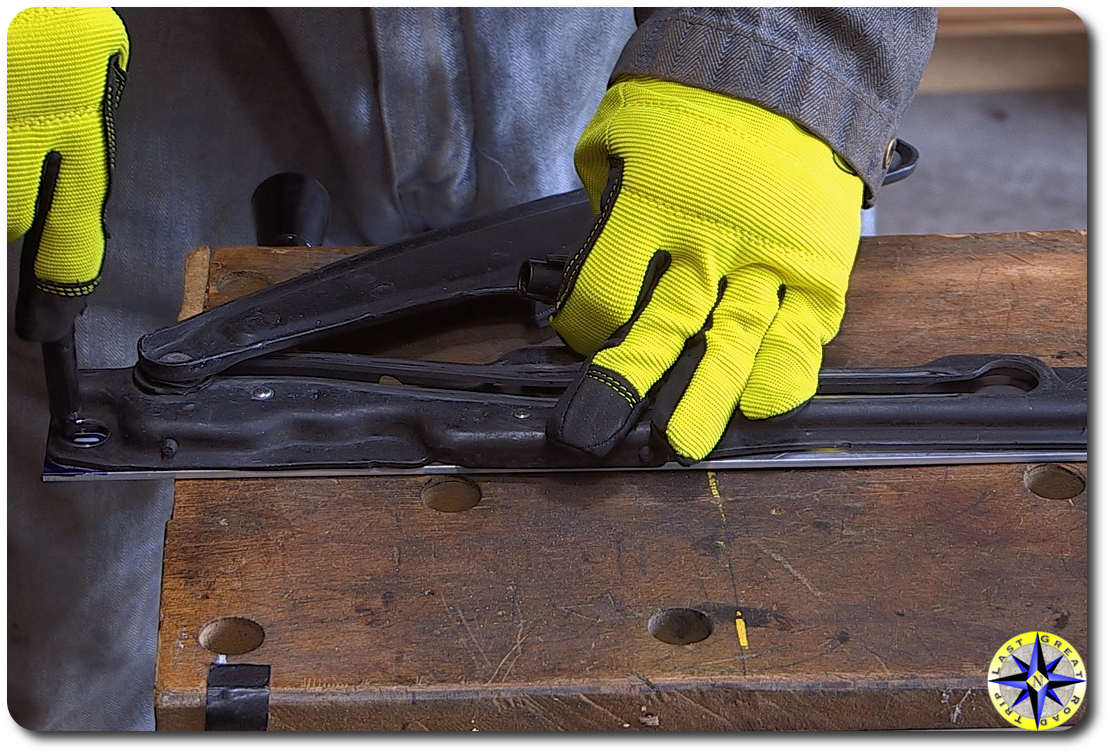
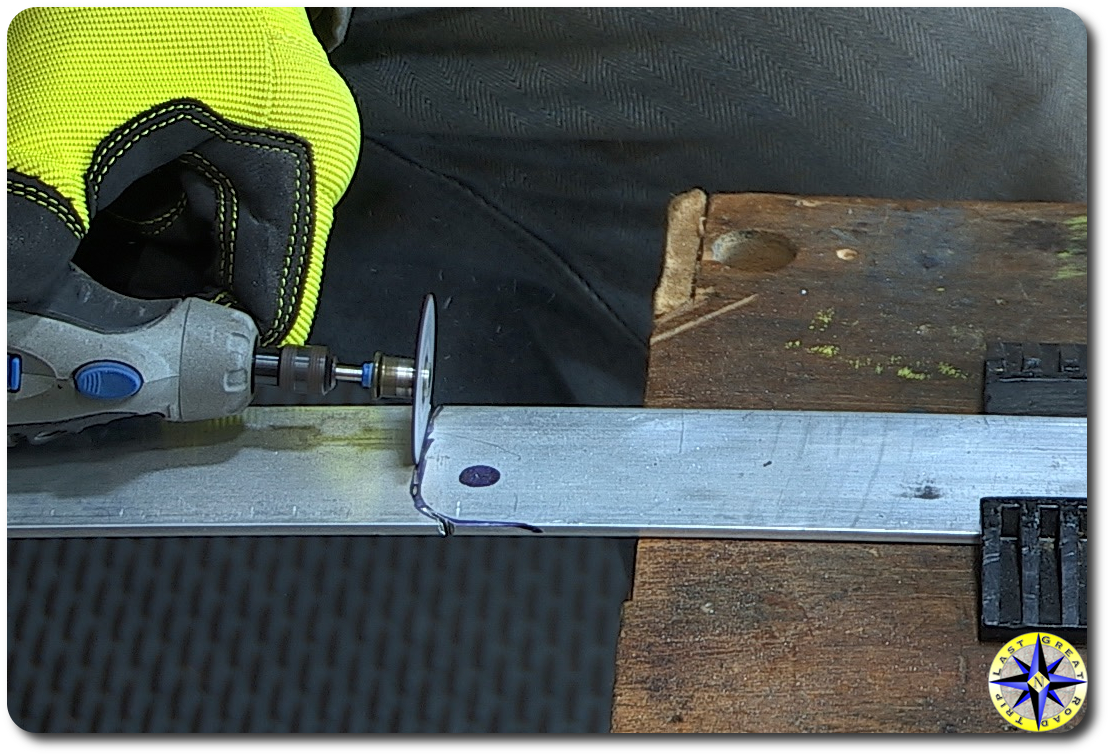
Step 9 – Cut the aluminum flat bar along the traced lines using  your small grinder with a cutting disk.

Step 10 – Drill out the two holes for the bolts to pass through.  Notice that one of the bolt holes is a bit elongated to allow for slit adjustments.

Step 11 – Sand  or grind down any rough burrs or sharp edges.  If you want a professional look,  lightly sand the entire flat bar to give it a brushed finish.

Improved Lexut GX470 rear doot strut flat barYou are now ready to assemble everything back together.

Step 12 – Reattach the bracket to the back of your Lexus GX470 with the three OEM bolts you removed.

Step 13 – Press the plastic bumper gap cover back into place. Don’t forget to put the spare tire portal cover in place as well.Improved Lexut GX470 rear doot strut flat bar

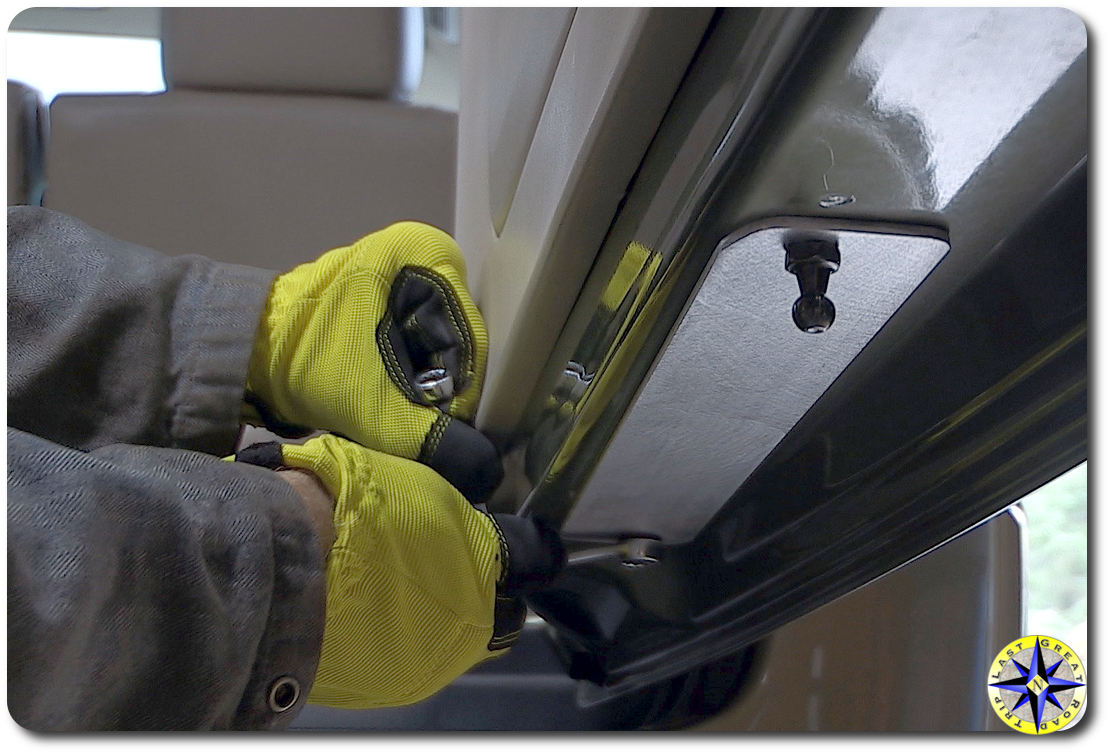
Step 14 – Screw one of the 10mm ball studs into the bracket you just attached.

Step 15 – Mount the door reinforcement plate you fabricated to the underside of your Lexus GX470’s rear door using one of the OEM bolts that held the door stopper in place and the second 10mm ball stud.  The 10mm ball stud should mount into the original recessed nut hole on the underside of the door furthest away from the bumper.  The OEM bolt screws into the original recessed nut hole closest to the bumper on the underside of the rear door.

Step 16 – Snap the gas strut onto the  10mm ball stud at the bumper first then to the 10mm ball stud on the rear door.Improved Lexut GX470 rear doot strut connect

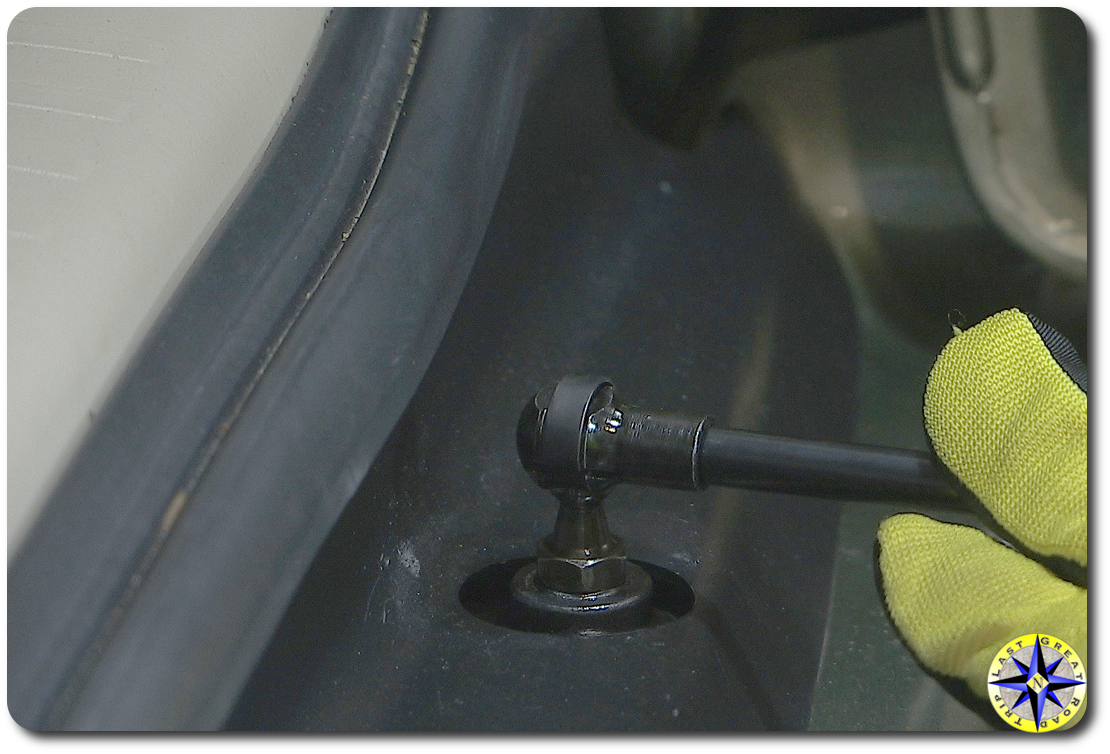
Step 17- Give everything a good tug to ensure it’s securely attached and your ready to test your new, smooth gliding Lexus GX470 rear door.

Note: Since your Lexus GX470 rear door will open and close tens of thousands of times, get in the habit of touching the door lightly and slowing it just before it fully opens in order to avoid any stress build up over time on the strut.

If you find yourself down under you can get a really cool complete rear door strut kit for the Pardo 120.

And in case you were curious, Hula Betty loves this mod!

install lexus gx470 rear bumper

Installing Lexus GX470 Swing-Out Bumper

lexus gx470 rear swing-out bumperSo you may have noticed some Lexus GX470 discussions from us here and out in the forums…   Yes we did it, we added a Lexus GX470 to the fleet.  Just not this one.

Why you ask?  It’s built on the same J120 Toyota Prado Land Cruiser platform as our FJ Cruiser but with four doors, a bit more room, a whole lot more luxury and a V8 engine.  Our new Lexus GX470, affectionately named (by Hula Betty) Fat Girl, will be primarily used for overland adventures and as a daily driver for Hula Betty.  She wont get the massive mods we have on the Blue Bunny but she will be getting some upgrades to her suspension and armor.

While Fat Girl will remain stock for now, that doesn’t mean we haven’t started to consider options.  One option is the Metal Tech 4×4 rear swing-out bumper known as the Pegasus.  Mark over at Metal Tech 4×4 put all their Toyota Land Cruiser experience into creating this bumper.  No cutting, no welding, this swing-out bumper fits right into the design of the Lexus GX470 and allows you to carry larger spare tire, fuel cans and your Hi-Lift jack.

And when it comes to installation…  Well see for yourself.  We put together an installation video to help folks install their Metal Tech 4×4 swing-out bumper on the Lexus GX470 and give us an excuse to get an up close look at the Pegasus.

If you just want the highlights about this bumper than give this introduction video a look.  It walks you through some of the key features of this overland bumper.

What do you think?

man talking on CB radio

Cobra 75 wx st CB Radio Install

Installing a CB Radio in a Toyota FJ Cruiser is an easy do it yourself project.  Several years back we installed a Cobra 75 wt CB radio in our truck.  Unfortunately back then we didn’t take the time to create a how to video.  So when Voodoo Brad asked us to help him install his CB radio we jumped at the chance.

If you follow our step by step instruction for installing a Cobra 75 wt CB radio in a Toyota FJ Cruiser you will need a few other components to install a complete CB system.  Below is the parts list we have used on both our Toyota FJ Cruiser CB radio installs:

  • Cobra 75 wt CB Radio
  • Firestik MU8R18 18′ EZ-Install CB Coaxial Cable
  • Firestik II 4′ fiberglass CB antenna
  • All Pro Bandi Mount
  • Firestik K1A CB Antenna Quick Disconnect
  • Firestik K4R CB Antenna Stud Mount
  • Firestik SS3H CB Antenna Spring Heavy Duty
  • SWR meter

And if you need help Tuning Your CB Radio we have help for that.

It really is this easy to install a CB yourself and have professional results.

bright LED dome light

FJ Cruiser LED Dome Light Swap

fj cruiser dome light bulb and LED chip comparisonEvery try to read a map at night by your dome light?  How about trying to find something in your console at night?  The Toyota FJ Cruiser OEM dome light may give you a warm glow, but bright light you can read by is not its strength.

One of the easiest FJ Cruiser modifications  you can perform that pays big dividends is to replace the interior dome lights with new bright white LED chip-sets.

fj cruiser dome light cover removal drawingWe picked up a Putco LED Lighting “980018 premium interior dome light kit”.  The kit included a pair (one for the front and one for the rear) of LED white light chip-sets.  The chip-set fits the original dome light fixture and is designed as a direct bulb replacement.  With three LEDs on the chip-set, it puts out approximately 18 times more light than the original bulb, an increase that you can definitely notice.fj cruiser dome light cover removal

  • Start by removing the cover.  Using a screwdriver with its tip wrapped in tape, disengage the 4 claws and remove the light’s lens cover.
  • Remove the old bulb from the socket.
  • Press the LED chip-set into the bulb socket
  • Replace the cover.

LED dome light installedIt really is that easy.  Your new dome light(s) will be significantly brighter, use less energy and provide a whiter light.

No this mod wont help you climb over rocks or pull you through gumbo thick mud but it will help you find that last handful of nuts you dropped on the floor of the cab before the three second rule kicks in.

comeup winch

Off-Road Winch Installation

comeup winch fj cruiserAnyone who explores the backcountry knows, a winch is one of the best recovery tools to have on your 4×4 truck when you’re on an off-road adventure.

Recently we received a new DV 9s Comeup winch.  The DV 9s has a pull line rated at 9,000 lbs, 3-stage planetary 156:1 gear train, an automatic full load Cone Brake Structure (CBS) and comes loaded with a 100’ of 3/8″ synthetic rope as well as a Hawse fairlead and mounting hardware.

Mounting the Comeup winch on most 4×4 aftermarket bumpers is relatively straight forward (Comeup winch installation manual).  Comeup includes a footprint template to locate the hole position for the winch’s four mounting bolts.  Once you have the the four holes marked, grab an 11mm bit and drill them out.

We’re installing our Comeup winch on a Metal Tech 4×4 tube bumper’s winch mount.  While Metal Tech’s winch mounting plate is pre-drilled, the holes will need to be increased in size to account for Comeup’s larger mounting bolts.  Once the holes are drilled out, a little shot of spay paint on the holes will protect your bumper against rust as you take on the elements.

Start the installation by inserting the mounting nuts into the slots on the winch’s feet.  Carefully lift your Comeup winch into place aligning it with the mounting holes.  From below, attach the winch using the 8.8 grade bolts that come with the kit.

Metal Tech 4×4 provides a set of brackets designed to mount Comeup’s solenoid pack to their tube bumper.  Attach one of the brackets to the back of the solenoid pack using the supplied hardware.  The bracket should remain loose in order to make any final adjustments when it is attached into place.  The other bracket can be firmly attached to the Metal Tech tube bumper.

Attach the solenoid pack’s “F1”, “F2” and “A” leads to their matching terminal on the winch’s motor. Using two wrenches hold the lower nut steady as you tighten the upper nut over the lead.

Next attach the thinner “green” lead from the solenoid pack and black ground cable to the bottom of the winch motor.  Now attach the motor’s lead using its pre-wired connector to it’s mate from the solenoid pack.

Work the solenoid pack into place where it will attach to the bumper.  Before screwing the two plates together ensure the leads remain untangled and can be tucked out of the way than tighten all the nuts to secure the solenoid pack in place.

Route the black ground and red power cables to engine compartment and attach them directly to the battery posts starting with the black ground cable.

Once the winch is installed and wired it’s time to run a few tests.  Prior to using your Comeup winch ensure you have read and fully understands the Comeup winch operating instruction manual.  Test that the winch free spools, then engage the clutch in order to test both power out and power in.

A properly installed winch is a powerful tool for self recovery on any off-road adventure.  If properly maintained your Comeup winch should provide years of service on your off-road adventures.

metal tech 4x4 red eye bumper toyota fj cruiser

Installing Metal Tech’s Red Eye Bumper

Toyota may have plans to end production of the FJ Cruiser but the aftermarket continues to bring out new off-road products for the FJ Cruiser.  Metal Tech’s Red Eye rear bumper is one of the latest rear expedition bumpers available for the Toyota FJ Cruiser and your off-road adventure.

The Red Eye bumper debuts after more than a year in development where CAD technology was used to remove weight were possible and strengthen areas where necessary.  Metal Tech used advanced engineering principles, modular design and a deep knowledge of metal fabrication to create a swing-out expedition bumper that does not require welding or drilling into the frame.  All parts have been engineered to work with Toyota’s structural design.

The Metal Tech 4×4 Red Eye rear bumper is one of the most innovative expedition style rear bumpers to come out for Toyota’s FJ Cruiser in years. Features include:

  • swing-out spare tire
  • hi-lift jack mount
  • dual fuel-can carrier
  • modular integrated design

As this video shows, installation is simple and straightforward allowing any FJ Cruiser owner with a few wrenches and a little time to install it themselves.

For more information on the Metal Tech 4×4 Red Eye bumper for the Toyota FJ Cruiser contact Metal Tech 4×4 and let them know you heard about it here on Last Great Road Trip.

fj cruiser RAM mount laptop

Putting The Mobile Into Mobile PC

fj cruiser RAM Mount baseWhen we last left our off-road adventure heroine, Hula Betty had just put together a mobile GPS command center. For a test run, throwing the laptop on the front seat was fine but having the brains of the navigation center bouncing around on the trail is no way to go through life.  Turns out for my birthday, Hula Betty came up with a solution.

A local northwest company called RAM Mounts makes all sorts of cool gadget attaching stuff…  and by attaching stuff we mean just about anything to anything.  The anything that caught our eye was the vehicle based laptop mount, although the articulating, swivel beer can mount for kayaks is pretty cool too.

RAM Vehicle Laptop Mounts are designed to install quickly without drilling any holes.  They accomplish this feat of marvel by having a unique base plate for each vehicle that ties into the bolt pattern of the front seat.  The rest of the mounting uses common components letting you mix and match or move from one rig to the next (provided you have base plates for each).fj cruiser RAM mount components

Installing the RAM Mounts is just as easy as they say.  Remove the two front bolts holding the passenger seat in place, bolt in the RAM Mounts base with the new bolts than together the rest of the components.

These guys make a number of different components for holding your laptop in place and we decided to keep it pretty basic.  We can always add the map light, note pad try or power caddy down the road.  Our base set up included:

  • Universal laptop mount tray
  • 8″ telescoping pole top
  • Telescoping pole base
  • Double swing arm with socket arm
  • Toyota FJ vehicle base

RAM mounts accessoryTo keep thing stable and secure when the rig is off camber or bombing down a washboard dirt road we added:

  • Laptop screen support
  • 24″ support leg

When its all together our laptop is held securely in place and manages to take the bumps in stride although it doesn’t leave much room for a passenger.  However when not in use, pull the laptop mount try and the swing arm folds out of the way allowing for a passenger to stretch out.

The 17″ laptop we built our mobile GPS command center around is heavy but the RAM Mount keeps it in place.  The double swing arm allows us to adjust the laptop’s location and angle to ensure proper placement.

Perched up at dash level you can easily glance over and see position, speed, and altitude.  Adjust the position for quick reach to move between maps  or lower the laptop screen when not in use.

When we first set the laptop in place we found  the larger 17″ screen had a tendency to block the view of the passenger side mirror.  A couple of adjustments swinging the arms around and the laptop seemed to settle in a spot that kept the mirror and system in view.

Simple, strong and a nice finish make our new laptop mount a nice addition to our rig and we’re sure to be putting it to the real test soon.

Tango software Install

Adventures Are Not On Any Map (but a good GPS doesn’t hurt)

map and compassI like maps!  I’ll spend hours in map stores, looking, touching, smelling maps, planning off-road adventures.  Maps are great!

I like maps… But I love technology.  Now before you scream about technology on an off-road adventure failing, breaking, getting dusty and wet or  how the battery can die off, I always carry hard copies of maps stored water tight with a compass…  and I know how to use them.

In order to get a technology fix we decided to build our own mobile satellite GPS tracking command center that can be loaded up with high quality maps of areas we want to explore.  Sure we have Brenda our Garmin GPS (or a close facsimile of her following the 2009 abduction incident), but we wanted something we could load trail routes into, create tracks, pin point ourselves on multiple maps and display higher resolution of 4×4 trails.  Turns out it is not that hard to take an old lap top, some open source software along with a few bits and turn it into GPS Central.

When we set out to build our GPS system we had a few requirements for this build:

  1. has to be cheap or better yet… free
  2. must work with maps from several sources
  3. maps must be free and unencumbered by copyrights
  4. needs to be capable of working on-line or off line (sure the internet is in Chicken, AK. but some of these places are still passing messages by carrier pigeons)
  5. easy to use, easy to read, easy to zoom in tight, easy to zoom out big, easy, easy, easy

With our requirements in hand the first thing to do was decide how to make it all happen.  This is where we insert a big thank you to Jeff Baker from the NWFJCC.  We rode his technical coattails all the way on this mod.

Following Jeff’s lead we made a list of needed stuff:

  • old laptop
  • Operating system
  • GPS software
  • Waterproof GPS Receiver

The old laptop:  You would be surprised at how easy it is to scrounge an old laptop. Now you’re not going to end up with a 3.4 GHz Hyper-Threading quad proc, quad core, with 32 Gigs of ram, dual 10,000 rpm raid five disk set, HD graphics advanced video engine, or 7.1-channel Dolby audio but check with your techie friends.  You don’t need much for this build and tech guys are always cycling through the latest and greatest, discarding leftovers in their path.  We ended up with an old HP Pavilion.

ubuntu linux osOperating system: the open source movement really began with Linux, a Unix like operating system that came into the world in 1991 and spread through the Internet faster than a leveraged buyout rumor on Wall Street’s trading floor.  While Linux will fly on butch hardware it was designed to run on more modest equipment and is perfect for use on an old recycled laptop. There are several Linux flavors available: RedHat, SUSE, Debian, Fedora, Ubuntu…  you get the picture.  All the distributions use the same basic Linux kernel and than add their own set of libraries, tools and software, packaging it all up under their brand name.  Some of the distributions are commercial but many are free.  In a past life as a software developer, I’ve used many of the different distributions and it is amazing how far they have come with ease of installation, rock solid updates, intuitive desktops, do anything software and geeky cool factor.  Today there are really good distributions that are community supported and free.  Remember requirement number one.

The Ubuntu distribution is simple and quick to install with a desktop that is intuitive.  The interweb (that is for all our Corner Gas Canadian friends) is full of helpful forums and instructions on installing and using Ubuntu so answers to questions are everywhere.  Installing software packages like web browsers, games, DVD players, email, word processing, spreadsheets, picture editors or instant messaging chat,  is just as easy.  Ubuntu is the distribution I always suggest to non-technical folks looking to try Linux.

tango trip mapUbuntu took about 30 minutes to install. Really that was it.  Next task, the gps software that would be the cornerstone of the operations.

GPS software: there are a number of free mapping software packages available out there.  We decided to go with tangoGPS since it was one of the easier ones to work with.  It wont do everything some of the other packages will but it does all the stuff on our list.  A big selling point for us was the ability to work with open source maps (OSM) as well as Google Maps, Opencyclemap and others.  As new map sources become available you can configure tangGPS to use them.  Jeff found one source that takes OSM maps and layers them over GIS Topo maps.  Simply add a new map type in the tangoGPS configuration tab and point to its URI (uniform resource identifier).  In this case it was: “http://mobilemap.petschge.de/topomirror.php?z=%d&x=%d&y=%d”

Each mapping project tends to focus on different aspects when creating their maps such as roads, businesses, trails or what not.  With the ability to use multiple maps you can see your location from different perspectives and verify the information across multiple sources.

When you are connected to the Internet, tangoGPS can automatically down load map tiles (fancy term for little picture) as needed.  These same cached map tiles are than available to you when you are off line.  If you’re not sure of exactly where you will be exploring in a particular area you can zoom out and down load all the tiles of that area.  We downloaded all the map tiles for the Olympia Mountains (about a 1,000 square mile area)…  it took 22 hours and we have a fast connection!  There is are several levels of detail and you can choose to down load some or all of them.

Tango software InstalltangoGPS is one of the applications in the Ubuntu App Manager which means installation is simply clicking on the install button, making it extremely easy to install or remove.  Navigation within and Configuration of tangoGPS are straightforward as well.

There is even a “Friends” option which, if you have an Internet connection, will allow you to publish your location and leave a message to a website letting friends know you’re OK.

When you install tangoGPS, the App Manager also downloads the GPS demon (Unix speak for program) known appropriately as gpsd.  This little demon allows you to hook up and integrate a GPS satellite receiver with tangoGPS.  By integrate I mean plug-in, tangoGPS takes it from there.  With a GPS satellite receiver (or two) tangoGPS locates you on the maps, allowing you to track your movements, create bread crumb trails (record way-points) and view information such as your longitude, latitude, heading, elevation and speed.

It is at this point we hit the wall with free.

usb gps recieverGPS Receiver: Obtaining a GPS receiver required us to crack the piggy bank. If we were going to get the most out of our system this was a must have item.  Fortunately for the little piggy a GlobalSat BU-353 Waterproof USB GPS Receiver was only $37.50.   Certainly there are more expensive receivers, but this little unit worked great.  And with it’s USB connector, integrating it with our laptop couldn’t be simpler.

The GlobalSat receiver came with a little suction cup and has a magnet in its base so you can attach it just about anywhere.

xgps screensAfter plugging in the GPS receiver and starting up tangoGPS everything should just work.  Last great software lie right.  Well it did for us.  If you run into any problems with your receiver or want a view of what is going on with it you can peer into the black hole and eaily test it.  Plug in the GPS receiver and start the GPS demon with the following command: gpsd /dev/ttyUSB0 Than start up the simple viewer called xgps.  You may need to add this program using the Ubuntu app manager if you did not add it when installing the tangoGPS package.  To start the viewer type xgps on the command line.  xgps will display a window showing the satellites available to the receiver, their signal strength and location.  It will also show you the information that gpsd is parsing out.

Getting this all to work sitting on the back deck is one thing, having it work while driving 70 mph down the highway is another.  To put our new GPS system through its paces we decided to drag it with us on a recent off-road camping and fishing adventure .  We loaded the maps from Seattle, WA to Eugene, OR and the areas surrounding the north fork of the Willamette River. The system worked better than expected.  In our test we stuck the lap top in the passenger’s seat with the GPS receiver tossed up on the dash.  The system tracked our every movement, keeping our position centered in the screen, clearly showing details that are lost on the smaller GPS units.  The GPS and maps lined up exactly and with a single mouse click we could zoom in or out without missing a beat.

There is one small issue to get used to with a system like this.  Driving at night, a 17 monitor will illuminate everything around it and more often than not as we passed others on the highway, heads turned as they noticed the glow emanating from the passengers seat.  At the rest stops, several folks would wonder over to get a better look at the system, ask about it and inquire where we were heading.  But this is a small price to pay for a GPS system that can do so much and cost so little.  Now to try it out on a worthy adventure.

fj cruiser walker evens beadlock wheels dirt road

The Wheels On The Rig Go Round And Round

new walker evens beadlock wheelsYup, I’m talking beadlock wheels.  IHRA Pro Stock cars, CORR trophy trucks and vertical wall scaling rock crawlers all use them.  But how exactly do they work and what does it take to install them.

When an IHRA Pro Stock car travels down the quarter-mile in under eight seconds or an off-road truck airs down real low certain physics take over causing a tire to loose its grip on the wheel often resulting in the tire falling right off the rim.  Beadlocks over come this physics problem with a separate ring bolted to the wheel, holding the tire tightly in place.  Air pressure is replaced by bolt torque to hold the wheel on tight… in less than ideal conditions.

When it comes to beadlock wheels you’ll need to choose a manufactured wheel or cut up a steel wheel and build your own.  For our rig we decided to go with Walker Evens 17″ beadlock wheels.  Born out of desert racing, with 30 years of off-road racing experience, and more than 140 off-road racing victories we figured Walker Evens knows a thing or two about wheels.  The Walker Evens beadlocks are cut from cast aluminum rated at 3,800 lbs with grade 8 bolts and holes for valve stems that have been set back out of harms way.  Walker Evens beadlock wheels are cut to order and available with custom back spacing.  We opted for a 3.75″ back spacing.pile of old wheels and tires

The items required to mount the tires onto our beadlocks and balance them isn’t a long list but requires a couple of inexpensive specialized tool:

  • Valve stem tool
  • Valve core tool
  • Torque wrench
  • 1/2” Socket
  • 19mm and 21mm Socket (lugs)
  • Ratchet strap
  • Air source
  • Rubber mallet
  • Valve Stems (.453 rim hole, 1 ¼” long)
  • 8 ounces  per tire of Dyna Beads in easy open bag (how to balance off-road tires with Dyna Beads)
  • Valve core w/ filter (keeps Dyna Beads out of the valve stem)
  • New lug nutstire on walker evens beadlock wheel

This mod is about as hard as changing a tire on the difficult scale but it is time consuming.  Plan for about one hour per tire, bring a stool.

  1. In our case step one… get the tires off the old stock rims.  You pull the valve stem core to empty the tire and use a hi-lift to push the tire off the wheel.  We punked out and took them down to Les Schwab, paid the $4 per tire and called it good.  After all this is how to mount tires on beadlocks, not how to take tires off a stock rim.
  2. Grab one of the new valve stems and using the valve core tool, remove the core than insert the new core fitted with the filter.  This step ensures the beads we will use to balance the tire don’t clump up in the valve stem. The core simply screws in and out.
  3. Insert the valve stem through the wheel and using the valve stem tool, pull the valve stem through until it seats in the wheel.
  4. Place your wheel flat on the ground and work the tire’s inner bead over the wheel.  Sounds simple enough doesn’t it.  This involves setting one side of the tire’s bead over the lip and than hurling yourself through the air and landing on the tire forcing the remainder of the tire over the wheel’s lip…  This may take a couple of times… and it isn’t pretty.torque bolts on beadlock wheels
  5. Now that tire is on the wheel, open the bag of Dyna Beads and place the beads, bag and all, inside the tire…  that is all there is too it.
  6. Stop!  Are you sure the valve stem is inserted? Are the Dyna Beads in side? You really don’t want to find you forgot to insert them after you’ve bolted up the ring…  It could happen.
  7. Take your rubber mallet and knock the outer tire bead onto the lip the wheel so it sits on the wheel snugly and the locker ring will fit on top.
  8. Place the locker ring on the wheel and hand tighten all 24 the bolts. Use a crisscross pattern and ensure you don’t cross thread any of the bolts.ratchet strap to set tire bead
  9. Grab your torque wrench and start tightening the bolts in a circular pattern.  Walker Evens recommends first torquing the bolts to 10 ft/lbs than 15 ft/lbs and finally 18-20 ft/lbs.  Get comfortable this is going to take awhile.  My advice here is to really chase the bolts around at the 10 ft/lbs setting until they all are torqued…  It will take going round and round and round… and around but the work here pays off on the next two setting which will torque up much more quickly.  No matter how you do this, it is going to take time…  I’ve had dates that took less time than it took to get all 24 bolts torqued up correctly.
  10. Ever wonder how to re-inflate a tire if you roll a bead on the trail? Well here is your chance to practice. Take a ratchet strap, wrap it around the tire and tighten it down.  You will have a large gap between the back of the wheel and the tire bead but the tire should be pressing down against the wheel. Using your air source begin to air up the tire normally.  Caution! Unless you have a crush on a doctor or nurse at the emergency room and want a reason to visit them, keep your fingers out of that gap between the tire anddifferent lug nuts on scale wheel. As you inflate the tire, it will slide out closing the gap between the wheel and tire.  You will get a loud pop when the tire bead finally seats itself on the wheel.  When tire does seat itself, stop inflating, remove the ratchet strap and finish airing up to the tire manufactures recommended setting.
  11. Rinse and repeat for the rest of the wheels.

When you select your wheels, check which type of lug nut is required.  Our stock FJC wheels used a flat mag style lug nut and bushing.  The Walker Evens require a cone style lug nut…  of course.  We opted for the titanium colored aluminum voodoo blue fj cruiser walker evens beadlock wheelsracing lug nuts from Gorilla Automotive.  They are strong, super light and high on cool factor.

With the tires mounted and balances, it was simply a matter getting them onto the rig.  Since you have the torque wrench out be sure to use it…  According to the Toyota manual, lug nut should be torqued to 85 ft/lbs.

After care:

  • After 25 miles, re-torque all your lug nutstoyota fj cruiser metal tech tube bumper total chaos long travel
  • Walker Evens says to re-torque the beadlock ring bolts every other week for the next six months.  No one said cool was maintenance free.

With the extra back spacing and our 2″ long travel kit our rig’s front stance is now 82″ wide…  great for stable speed, bomb down desert roads and play in the off camber stuff…  not so much for squeezing through gate keeps.  Every thing is a trade off…

sliver fj cruiser driving rubicon trail

Get The Lead Out (it is all about balance)

dyna beads ez open bag of wheel balancing beadsNo more shakes and shimmies, better gas mileage and longer tire life what’s not to like…

Spinning tires wobble if they’re not perfectly balanced.  To avoid having your off-road truck shimmy and shake while bombing down the back roads, usually means taping lead weights on the sides of the wheel until a bubble level reads top dead center.  The trouble with lead weights is that they are difficult to  place exactly right, they can fall off on an off-road adventure when wheels and rocks meet.  Additionally as the tire wears the weights are no longer in the right spot. Heavy mud terrain tires require a lot of weight in order to achieve balance.

We recently installed our Toyo Open Country M/T on new beadlock wheels and instead of the usual lead weights we decided on tiny high-density ceramic Dyna Beads from Innovative Balancing…  So how can a few ounces of tiny ceramic beads balance a 75 lbs tire?  Well for those of you who where eating pizza in Mr. Hand’s physics class when he covered centrifugal force, here is how the tiny beads dynamically balance a spinning tire:how centrifugal force works to balance tire

  1. beads are placed inside the tire (big space filled with air…  not inside the rubber…  just want to be clear) and sit at the bottom tire when the rig is at rest
  2. as the rig begins to move the wheel starts to roll and centrifugal force distributes the beads all around
  3. every time a heavy spot on the tire goes up on the rotation it pushes the beads down and away from the heavy portion of the tire
  4. quickly the oscillation frequency reduces and the beads move less and less
  5. when the wheel achieves perfect balance centrifugal force holds all the beads in place

These little beads will work on 18 wheelers, RVs, trucks, cars, motorcycles.  If it has wheels, the laws of physics hold true… Ok that’s enough but this will be on the test.

Checking the charts, our 295/70R17 E rated tires required between 6 and 8 ounces of Dyna Beads for each tire. Innovative Balancing sells pre measured bags so we order up a bunch of 8 ounce bags.  The beads themselves come in two sizes, standard and bigger…  we went with the standard size since they offer a couple of installation options but you do need to install their filtered valve stem core.

Since we were mount tires onto new wheels, once the tire was on the wheel we place one 8 ounce EZ Open bag of beads inside the tire cavity and than set the tire and aired up…  yeah that is it.  The EZ Open Bag is designed to open and release the beads the first time the wheel starts to spin.  Your other option is to remove the valve stem core and pore the beads in.  A clear plastic break-bleed hose works well  to guide the beads into the valve stem or you can buy Innovative Balance’s applicator (little bottle w/ clear plastic hose).  Just keep tapping the hose and valve stem  (or tape a pocket rocket to the valve stem) to keep the beads flowing.

tire valve stem coreRegardless of how the beads get in, you will want to install a new filtered valve stem core, unless you have a tire pressure monitoring system(TPMS), to keep the beads from clumping in the valve stem.  If you do have a TPMS, Innovative Balance said the TPMS will block out the beads without a filtered valve stem core…  but it also means you wont be poring the beads down the core…  You win some you loose some.

One safety tip from the Dyna Bead guys…  if you use tire bead soap avoid getting any inside the tire or on the Dyna Beads.  We did not use any tire soap so no worries.

So the million dollar question is…  do they work?  We took the rig out on the highway to see if there was any wobble.  We did not notice any wobble or shaking as we drove the back roads tooling along at 35 mph, starting out or stopping.  And at 70 mph the ride was smooth as a Ken Doll.  Not a jitter or shimmy from the steering wheel as we sailed down I5.  Big heavy tires are notoriously difficult to keep in balance sending them into a death spiral – Tire out of balance leads to uneven wear which leads to the tire becoming more out of balance, leading to more wear…  These beads dynamically balance the tire each and every time reducing wear, increasing mileage and ensuring a smooth ride.

So the next time Boy ask “when am I ever going to use physics in the real world”…  I have the answer and a smooth ride.

Update: after tens of thousands of miles and a second set of tires using the Dyna Beads we can tell you that we are very pleased with performance and will continue to use them to balance tires for our off-road adventure truck.