Category Archives: trail talk

What happens off-road stays off-road… But we’ll tell you anyway. We cover cooking, why we installed certain mods or discuss first aid for wilderness adventures and more. This is life on the road less traveled after the driving is done.

race truck parts currie axel fj cruiser springs ford 9 inch

Thoughts Behind The Change

fj cruiser flexingThe second universal truth of the Buddha, and off-road adventures, is that everything is continuously changing. Our rig has been going through immense change.  Sure the changes are very bad ass…  but what is important, is to understand why we’re making these changes.

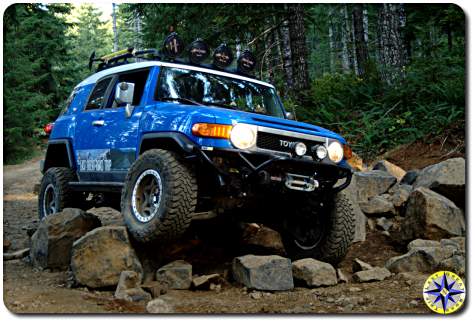
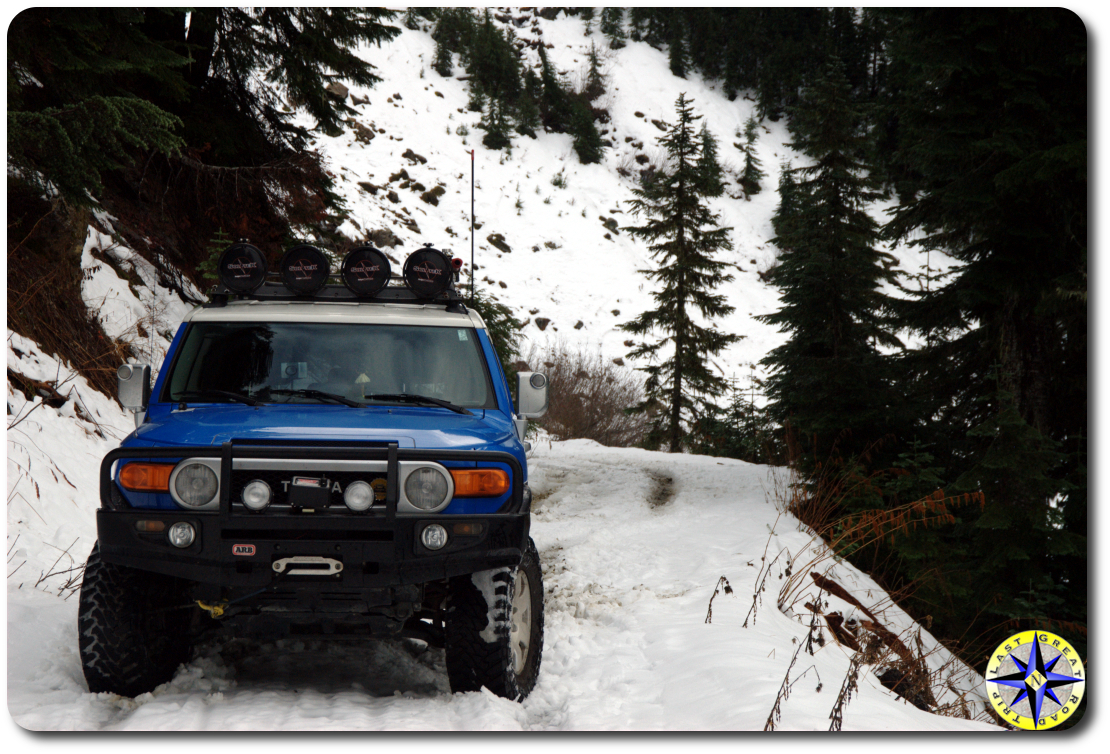
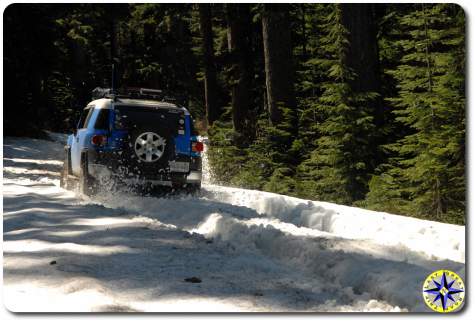
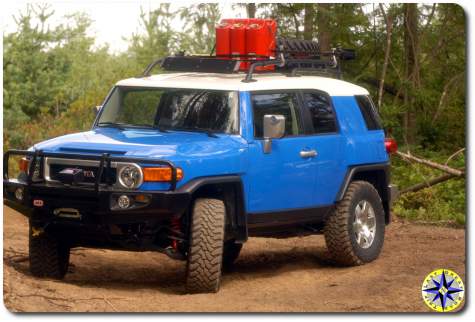
Read through our website (go ahead, we’ll wait) and you will see our rig, the Blue Bunny, has successfully taken us on many amazing off-road adventures so why would we change it.  Seven years ago, in order to go to the North Slope, AK we upgraded the suspension with a three inch lift relying on Sway-A-Way (SAW) coil-overs, rear shocks and springs.  We needed a suspension that could provide lift for larger tires, take constant jarring and improve the handling of our FJ Cruiser. These changes fit the bill for driving over 2,000 miles of nasty unpaved roads. But we wanted more travel to soak up the endless jarring of long off-road adventures.

currie axle with ford 9"Chasing our desire for more travel and a smoother ride we upgraded to a  Total Chaos long travel kit and bigger set of SAWs coil-overs that extended the front travel from eight  to about 12 inches.  This upgrade made a huge difference as we crawled the Rubicon, bombed down Baja and wound our way on the Utah Backcountry Discovery Route or any number of local NW 4×4 trails.  But this front suspension upgrade left us wanting more for the rear.  While the front remained confident in everything we threw at it, the rear just couldn’t keep up.  That is when we turned to LT from Metal Tech 4×4 and arranged for them to build a custom rear suspension that was worthy of our adventures.

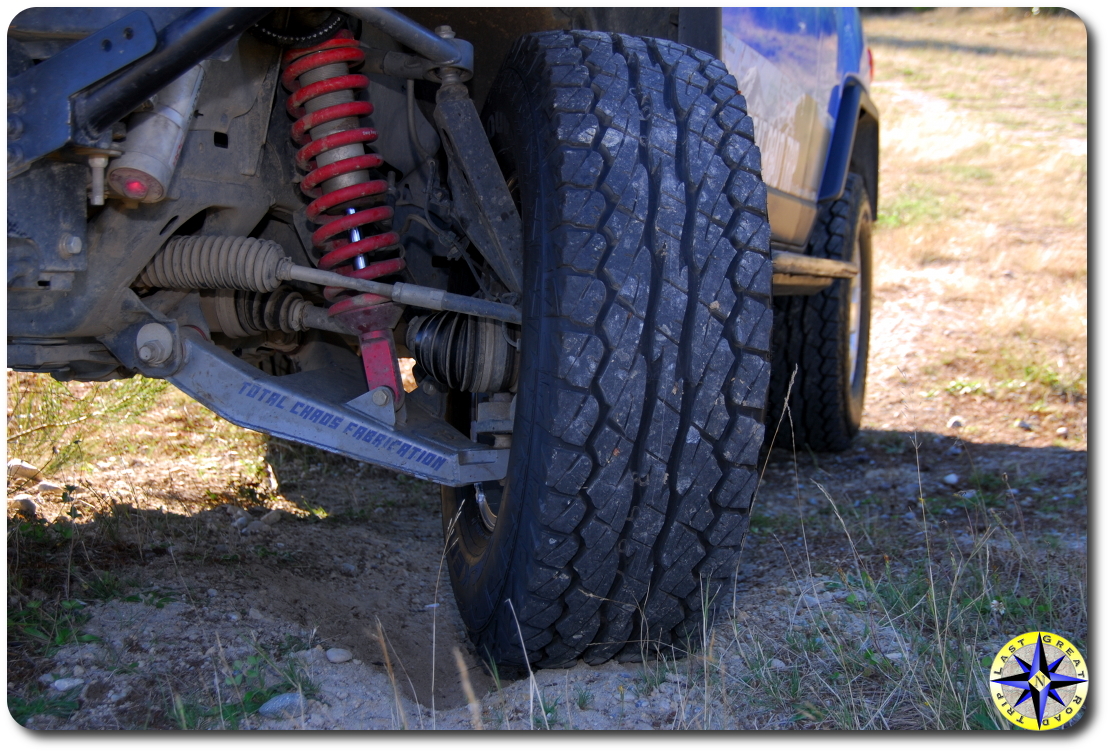
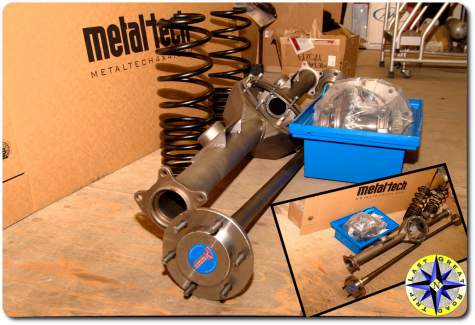
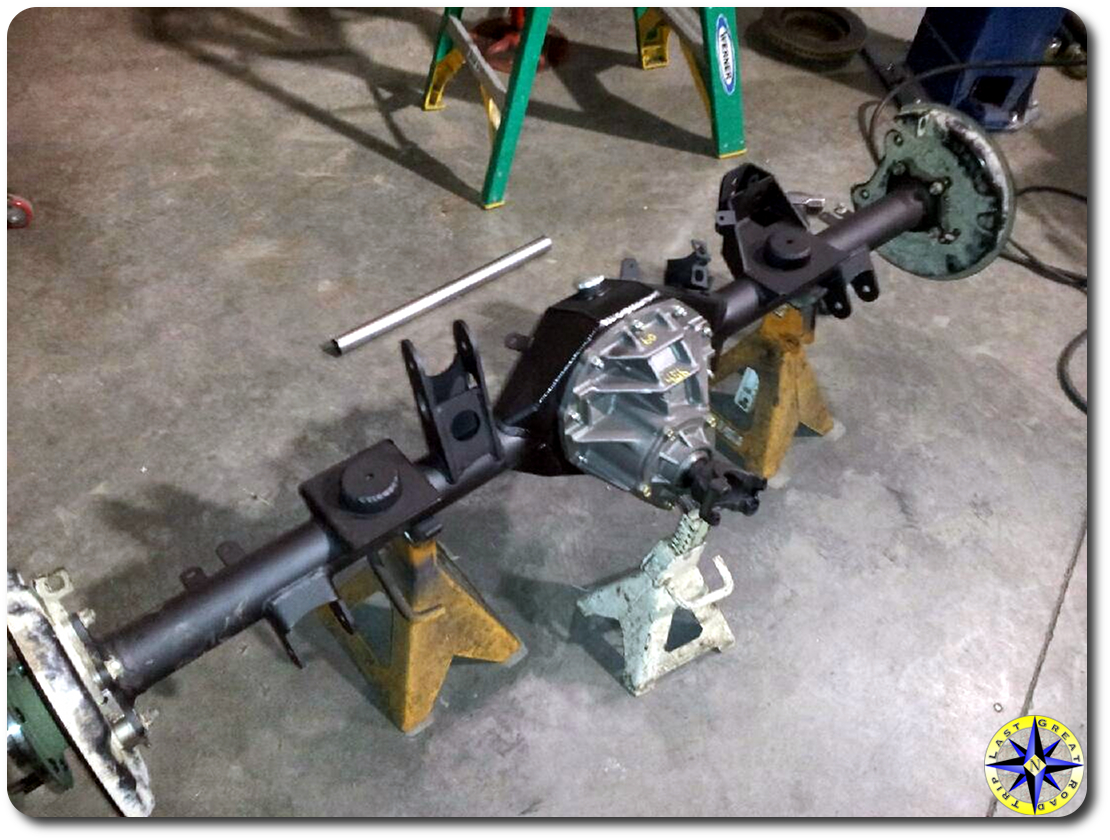
LT went to work replacing our original axle with a Currie that was four inches wider than stock so it would match the width of our extended long travel front end.  The Curie is a bullet proof housing with huge axles that we will be hard pressed to damage.  A Ford 9″ third member  with 4.56:1 ring and pinion gears was mated up to the Currie.  We needed the gearing to gain back the power that has been lost with the bigger tires, armor and all the gear needed for long expeditions. A Ford 9″ is used extensively in desert racers because of it dependability and parts are readily available throughout the world.  An ARB air locker replaced the stock E-locker that was left behind in the stock third member. A custom rear drive shaft to direct power back to the new rear end completed the circuit.  All these changes were in response to our request for rock solid dependability.  But what about the suspension.Atlas transfer case

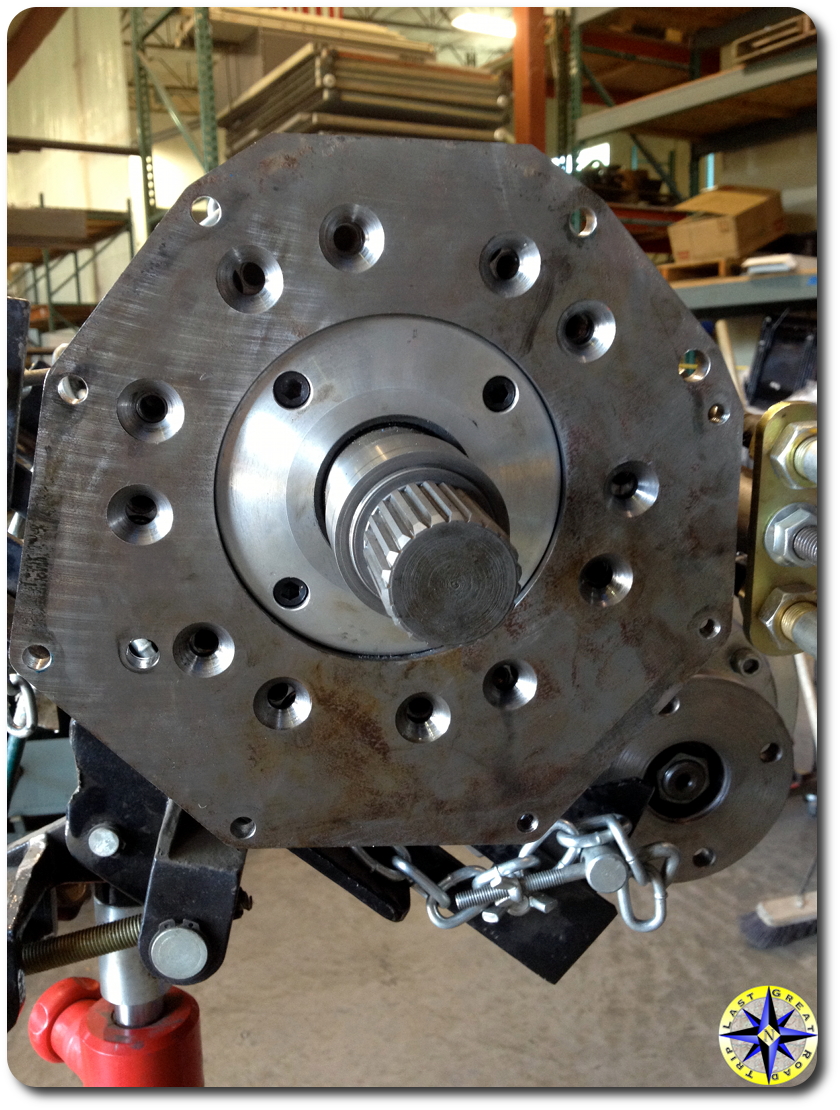
Stock FJ Cruisers come with a 4-link rear suspension and nine inches of travel.  LT replaced this with a custom 3-link.  Starting with Metal Tech’s long travel lower link design, LT lengthened the design for our setup while still retaining all the engineering that has gone into Metal Tech’s original design.  Our links incorporate 2 1/2″ forged Johny Joints® with 1 1/4″ threaded studs and tube steal capable of supporting the weight of the rig if it is drug over a rock, ensuring the lower links will remain true regardless of where we go.  The links were paired with Metal Tech long travel progressive springs and bump-stop off sets to maintain proper positioning as the rear axle travels the entire arc.  When it came to shocks we knew we needed both length and girth to give us the travel we desired and the stamina for endless rough dirt roads without fading.

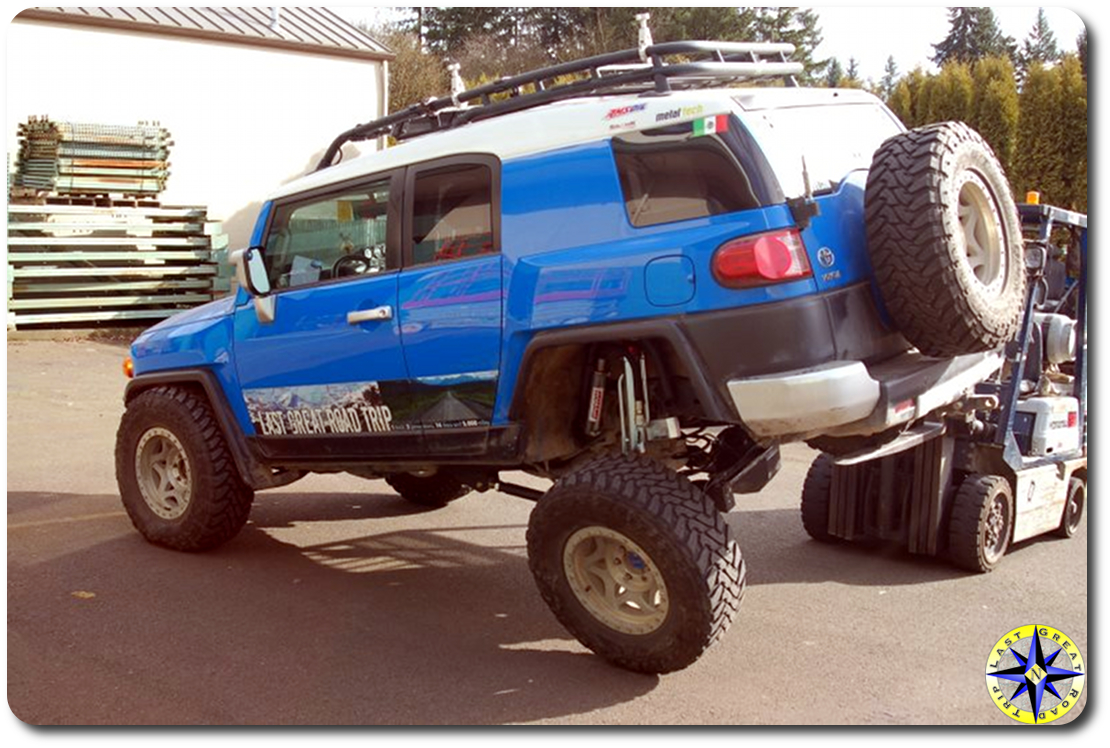
With the extra width of the Currie, LT add outboard shock hoops to hold 2 1/2″ triple by-pass, remote reserve shocks from Sway-A-Way that are capable of 12″ of travel. Sway-a-way triple bypass shocks 
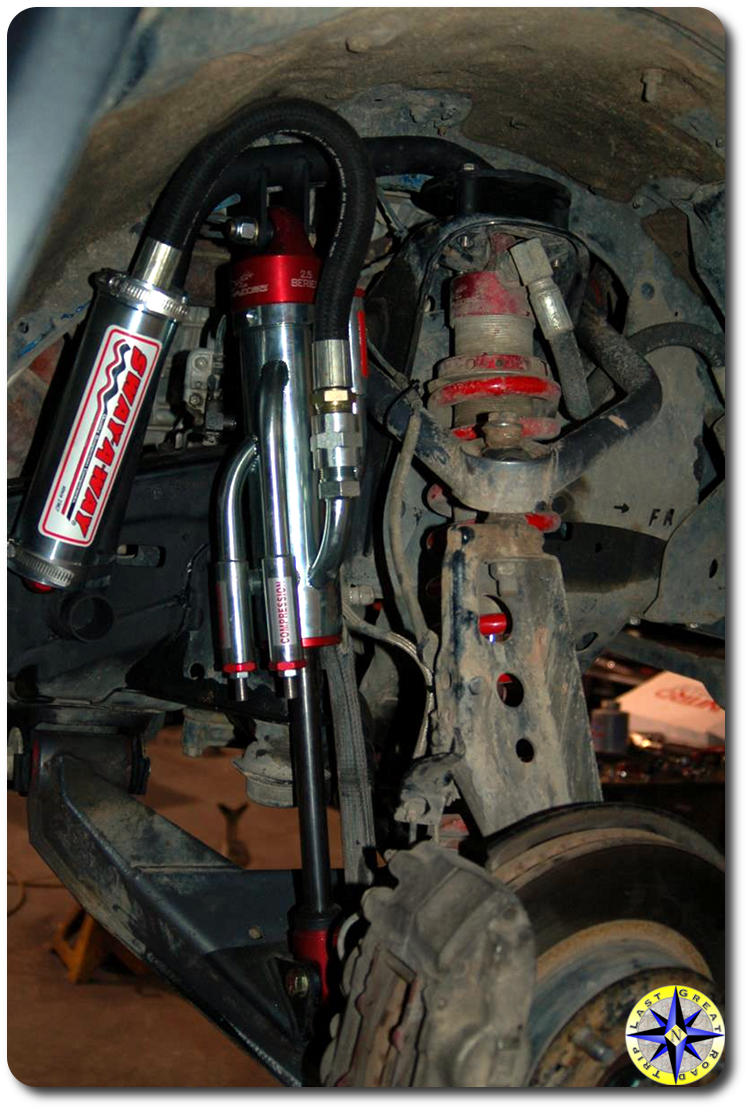
By increasing the shock diameter from the 2″ to 2 1/2″ we equaled the dampening power of two, 2″ shocks and effectively doubling our previous setup’s stamina. The by-pass feature will let us dial in both the rebound and compression dampening to match the terrain we are traveling on.  And what is good for the rear…

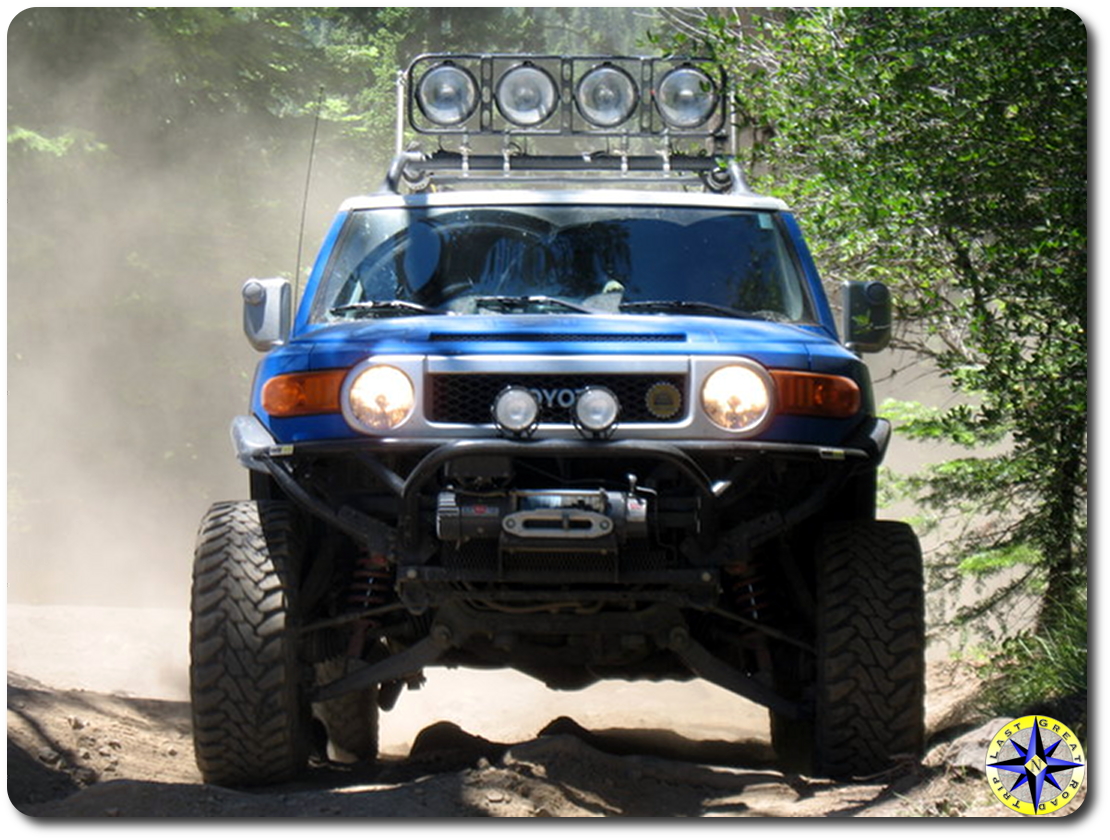
Up front we added another set of 2 1/2″ triple by-pass, remote reserve Sway-A-Way axillary shocks to our Total Chaos long travel so we can tune the front and share the load with the coil-overs.  And since the front transfer case was going to be pulled apart to match the gears in the rear, LT added an ARB locker up front giving us complete wheel locking capability front and rear if needed.

new gear shifts
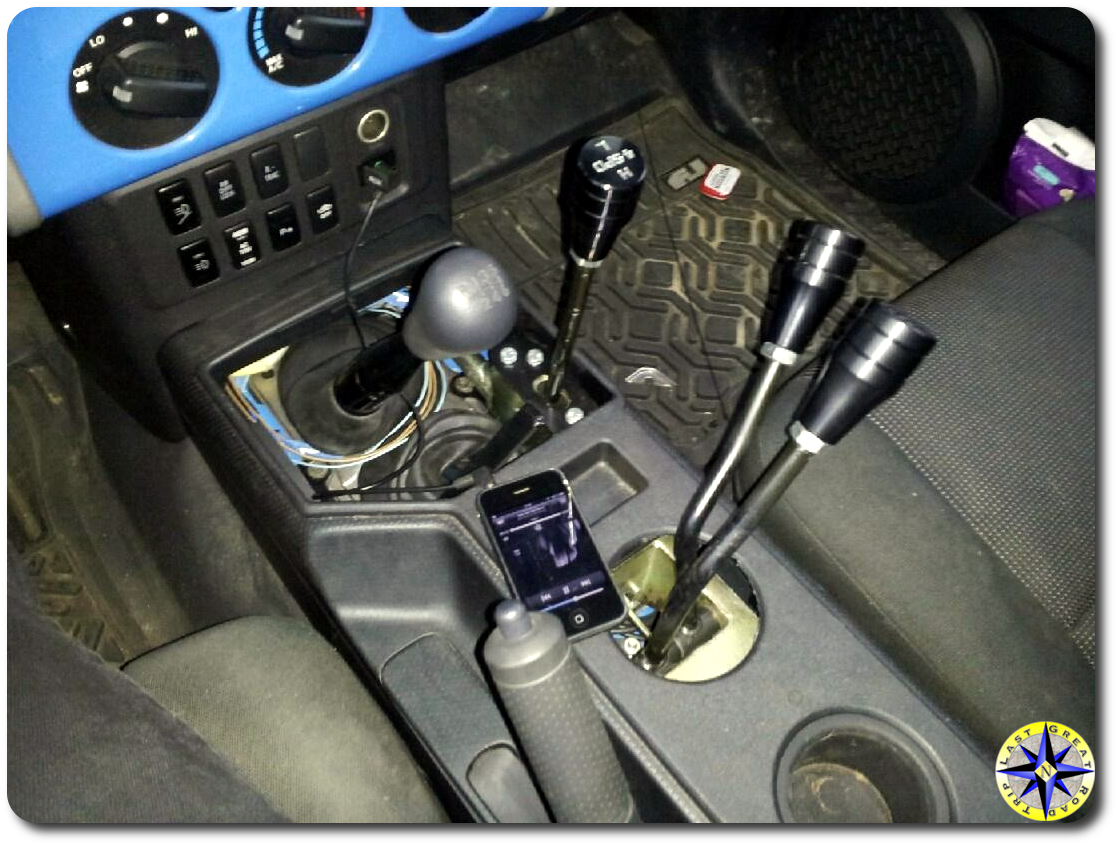
The Blue Bunny is a six speed manual and driving a manual off-road is all about having options in the gears.  We’d been thinking about changing out the transfer case for a number of years and since we had everything pulled apart it was time to make a decision.  High and low are pretty standard transfer case options and we could choose some crawler gears to improve control over gnarly trails but that is still a compromise since we face mud, sand and crawling over rock on our off-road adventures.  In order to ensure we can crawl slow, pull a load up a steep hill and still run with speed where we want, we chose an Atlas 4 speed.  The Atlas’ planetary 2.72:1 reduction gear along with the 3.8:1 low range gear provides all sorts of options: H-H, H-L, L-H and L-L along with the ability to engage front or rear independently. You can do the math with all the gears involved to figure out our final crawl ratios but what it comes down to is we can now ooze slower than molasses over rocks, climb a tree fully loaded, sail over sand dunes and still drive to work.

There is a price for all these high end off-road modifications.atlas transfer case mounted

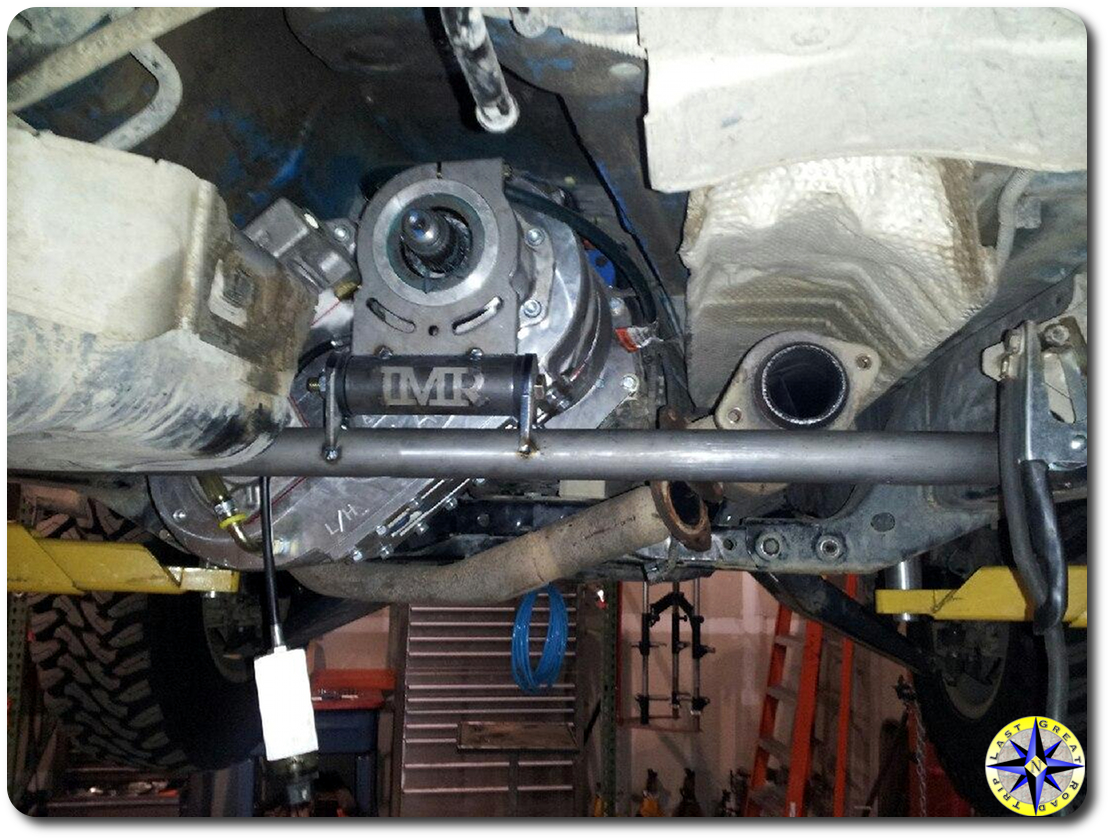
  • You’re running with mods that take adjusting to get right and tune it all in.  These are not just drop in and forget it components.  But get it all right…  and wow!
  • No parts store has spare parts on the self for any of the custom work.  You are running a one of a kind rig.
  • You need to know how it all fits together, comes apart and then goes back together because no one else will.
  • You need to learn your rig all over again…  it’s new sounds, feel and driving capabilities…  but that is half the fun.

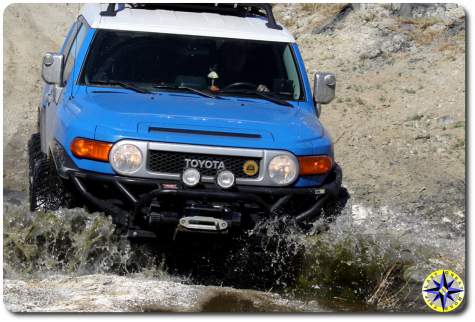
When it comes to our off-road adventures we aren’t satisfied with one style of wheeling, we love it all. Sure you can put together a purpose built rig that will exceed the Blue Bunny’s capability on any one terrain but we think we’ve built a solid rig to conquer all terrains.  Of course there will be times when we’ll have to finesse a situation or let a faster rig pass but with the trade offs we’ve made (like IFS for the desert over straight axle for rocks, or a short wheel base for maneuverability over tons of room for expedition gear that comes with a longer wheel base), the Blue Bunny should get us through anything we encounter as we continue to look for the last great road trips left in the world.

voodoo blue fj cruiser rock pile tillamook forest

Constant Change in 4×4 Adventure Suspension

fj cruiser total chaos long travel falken rockie mountain tireChange is what Buddhism is all about.  But this is an off-road adventure not a centuries old philosophical approach to life…  Or is it.  What follows is an evolution in our quest for the perfect suspension.

Back in late 2006 we purchased the Blue Bunny, our early 2007 Toyota FJ Cruiser, one of the first to hit the west cost.  On a warm sunny fall day we drove it off the lot in Portland, headed back up to Seattle and fell in love… Thanks to the independent front suspension (IFS) the FJ Cruiser’s ride is smooth.  The 4.0-liter 1GR-FE DOHC V6 engine puts out loads of torque and horse power.  The 2 speed transfer case, rear locking differential and A-trac traction control system make the FJC a pack mule that will go up and down most 4×4 trails right out of the box.  But we don’t travel down most 4×4 trails… and so our quest began for a smooth riding mountain goat that will go just about anywhere and remain dependable enough to get us there and back without a team  of mechanics and a fleet of chase vehicles…  Not that we wouldn’t like a traveling pit crew…  we just don’t have it in the budget.

The first thing we needed for our adventures was added ground clearance and the ability to soak up miles and miles of washboard roads. A common misconception is that a lift kit gives you ground clearance.  That is not true.  A lift allows you room to put on larger tiers and it is the taller tiers that deliver ground clearance.  So our goal was to lift the rig as little as possible, keeping our center of gravity low, while allowing us to stuff 295x17x70 Toyo mud tires into the wheel-wells with enough space for travel up and down.  We considered our FJ Cruiser lift options and decided on a suspension lift that would maintain the smooth IFS front travel rather than swapping to a solid axle aimed for more purpose built rock crawling.

In order to reach our ground clearance goal we started out with a 3″ Sway-A-Way suspension lift front and back.   The Sway-A-Way coil-overs can be individually adjusted allowing us to dial in the pre-load to compensate for the added weight of bumper, winch and any winter weight the driver might be carrying.  The lift allowed us to stuff our tires into the wheel-well giving us the clearance we were looking to gain.  Over the next year and half we explored our way up to the Arctic Ocean and wheeled local trails working on off-road driving skills in order to take our adventures to the next level…  Through out this time our 3″ lift met all our needs.

fj cruiser baja racerAs our desire to explore further grew, ground clearance was no longer enough.  We wanted to add travel and increase the capabilities of our rig as it travels over washboard dirt roads and boulder filled trails.  In order to pick up the travel we were after, we choose a Total Chaos front long travel kit.  The kit achieves it’s additional travel by pushing the wheels out 2″ further on each side making room for longer coil-overs.  On our rig we kept the lift at about 3″ and took the gain in travel through droop (wheel falling down).  The additional droop keeps the wheels on the ground over all sorts of terrain as the rig rides smooth across it all.  The added travel proved invaluable when we tested it on our Rubicon off-road adventure.

While the front travel jumped from a stock 7.81″ up to about 12″ with the long travel kit, the rear with it’s 3″ lift was stuck at around 9″.  Although impressive numbers, running down the Baja it became clear that the rear end, with its 2″ diameter shocks and original factory geometry could not keep up with the front end or the demands of our Baja off-road adventure.  So here is where we are going in our evolution… Introducing the Metal Tech rear long travel.

The FJC comes from the factory with a five point rear suspension.  Metal Tech offers their FJ Cruiser Rear Long Travel Suspension Package – Stage 2 package which ups the shock travel to 11.5″ and allows the wheel to move 27″ from top to bottom.

Ask anyone and they will tell you Metal Tech makes great stuff and their kit is better than anything else on the market. But we’re looking for a bit more custom solution so we’ve asked Metal Tech to engineer a solution that will be able to take us to the top of the world.fj cruiser flexing suspension

We plan to start with Metal Tech’s progressive rear springs.  Their springs stand 19 1/4″ high but allow you to maintain a rig height the same as a standard 3″ lift.  Metal Tech has engineered a progressive rate into their spring that allows for soft supple expansion that gives more flex when needed while the stiffer section maintains lift and support.  Remember our goal, lots of travel while keeping the center of gravity as low as possible… Well we didn’t forget and neither did Metal Tech.

We are also going to utilize Metal Tech’s three link suspension system (although its is 4 when you count the pan-hard bar which we’ll maintain daily driving, although who knows…  LT is talking about swapping it for a torsion bar.  Metal Tech uses 2″ x 3/8″ wall DOM tubing for their links and then mounts them to the frame using 1/4″ and 3/8″ plate to protect the ends.  If you’ve ever bought anything from these guys you know it is all about the steel.  They specify that the steel their suppliers provide, meets their requirements for tensile strength and hardness to ensure its ability to take the punishment that wheeling delivers.

In order to control the up down oscillations as our rig bombs down the trails we’ll be installing 2 1/2″ diameter, 12″ travel, remote reserve, 3 tube by-pass Sway-A-Way shocks.  If you ask us why we are choosing these shocks we’d tell you… A single 2 1/2″ diameter shocks is comparable to the performance of dual 2″ diameter shocks.  The by-passes will let us fine tune our shocks’ compression and rebound in order to compensate for different terrains and loads as we go from daily driver, to 4×4 trails to all out expeditions.  Shocks benefit from a large external reservoir that offers the greatest oil of volume.  The oil flows freely between the shock body and reservoir through a flexible high pressure hose, providing excellent heat dissipation and preventing fad during a long, hard day on the trail.  To ensure we have enough room for the larger shocks we’ll be relocating them to outboard hoops that let us squeeze out every bit of the 12″ travel.  And why are we choosing Sway-A-Way?  We need to know we can count on our shocks through any terrain and Sway-A-Way has proven themselves to us since our initial 3″ lift…  It’s all we’ve run.  Their quality and toughness have performed when we needed them most.

Metal Tech has spent significant time working out the geometry to ensure our rig will have the proper squat and anti-squat needed to maintain proper handling.  LT has also worked out the spacing requirements for those bigger rear shocks and dialed in their springs to take advantage f all that travel.

The truth is…  there is no such thing as the perfect suspension.  The suspension set up we are working on is the best compromise between flex, stiffness, adjust-ability, maintainability, ride, and cost for our style of wheeling.  What works for us is not the best for a class I race rig or full time rock crawler…  But this is the best build in the evolution, for our needs…  A rig that can go just about anywhere, if we’re careful and willing to go around some stuff, driver forever over the nastiest back roads, at reasonable speeds, and still get us to work come Monday.  Over the next month or two the Blue Bunny will roll into Metal Tech’s shop and go under the torch to receive its new rear suspension.   As it’s evolution progresses, we’ll bring you lots of pictures and many more details…

But suspension is only part of the story…  we’ll also address the need to improve the transfer of horse power down to the wheels and keep them all turning.  We have plans for that as well…  but that’s another post.

toyota fj cruiser water crossing baja mexico

Crossing Over To The Other Side (aka Water Fording)

man sitting in cold riverCheck out off-road adventure photos and you’ll find 4×4 trucks splashing through the water, creating giant walls  of H2O that make you believe you are witness to the parting of the Red Sea. Yes we’re guilty of getting caught up in the moment, throwing caution to the wind and racing through a wet patch for a good photo…  We could hurt ourselves…  for your entertainment.

But experience says the best course of action is be cautious when it comes to Water crossings.

In the Northwest winter off-road means water and lots of it.  But you can find trails that require water fording just about anywhere depending on the time of year…  Even the deserts of Baja has its water crossings.  So how do you prepare for a swim.

fj cruiser wall of muddy water

A water crossing can be fatal to an engine or even worse to occupants of the vehicle if everything goes south.  Never underestimate the force of flowing water.  Water weighs in at about 62.4 pounds per cubic foot and for each foot the water flowing against a vehicle there can be 500 pounds of lateral force pushing against your rig.

Sure you can install a snorkelrelocate you differential breather and try to make your rig water proof. But in the end you cannot make an off-road adventure truck as water tight as a frogs ass. So want is a guy to do when you have to get to the other side.

The first and most important thing to do when coming up to a water crossing is to know what you’re in for.

  • How deep is the water?  Is it deeper than your air intake? How about your spark plugs or alternator?
  • Is the water just sitting there or flowing swiftly?
  • What is the bottom like?  Can you see the bottom?  Is it a mine field of boulders and tree branches?  Is it soft, sink to your axles muck?  Are their any deep holes that could swallow your rig?

If you come up to a water crossing and don’t know the answers to these questions…  Stop, get out and look.  Roll up your pants and walk through the water… grab your shovel, a wadding staff or stick, and poke at the bottom to feel what your tires will be grabbing.  Don’t be misled by what appears to be a shallow stretch of water, which is hiding a foot of deep stinky muck that will have you stuck, axle deep in a mud that refuses to release it’s grip.

fj cruiser baja swamp

Don’t forget to check out what the other side is like?  Will you have to try to drive up a steep muddy high bank or is it a soft sandy exit?  Look around for tire tracks to see if others have made it through… look for where they went in and where they came out.

While you’re scouting the water crossing, plan for any miss haps. Are there recovery points to winch off if need? If you’re traveling with other rigs are they prepared to get you unstuck in case you don’t make it?  Have a plan, just in case.

Driving through water is enough of an adrenaline rush without stomping on the skinny peddle.  By driving slow and steady your rig will create a bow wave in front of your rig, which creates and keeps a pocket of shallower water behind it where your rig is traveling.  This bow wave allows you to drive through water that might otherwise exceed your rigs crossing depth capability.  Of course if you loose that steady momentum, you loose that pocket and can quickly find your rig hydrolocked in the middle of a river.

fj cruiser baja swamp crossing

To cross water enter at the slow steady pace you will maintain throughout the crossing.  Hold your momentum and keep your splashing to a minimum.  Avoid bouncing around or quickly changing direction which can cause you to loose your bow wave. Follow through on your exit continuing your progress until your rig is high and dry.

If your facing a particularly deep water crossing, you can increase your rig’s ability to create a bow wave by duct taping plastic or a plank of wood across the front grill.  But if you’re considering how to exceed your rig’s capabilities for water fording, you may want to starting looking for another route across.

Water crossings are part of overlanding and is often what separates an off-road adventure from a mini-van road trip.  If you know your rigs capabilities. scout the crossing and motor through cautiously you’ll be able to go further down the road less traveled on your off-road adventures.

All I Want For Christmas

toyota fj cruiser ARB bumper snowy roadWhat would the holidays be without endless website and magazine Christmas gift lists to send Santa?  Since we take the road less traveled, we prefer to strategically slip our off-road adventure Christmas list into the pages of Hula Betty‘s Cosmo.  We also like to drop subtle  reminders to her about how all our off-road adventure skills and gear will save lives when a meteor the size of Kansas comes hurdling towards earth and we need to escape into the mountains to avoid Armageddon.  In case Bruce Willis fails to save the planet, we are prepared.

It’s not like Hula Betty took the hint last year, but in keeping with tradition here is our new Christmas wish list.

  1. pelican flashlightPelican Flex-Neck LED flashlight – This light has a magnetic base which allows the lite to attach to metal surfaces and 15″ flexible neck that directs bright LED light in any direction. Map reading, working under the hood, or helping you rummage through a duffel on a dark and stormy night this light will deliver 7 hours of burn time on two AA batteries.
  2. Winch line extension – Getting unstuck can sometimes mean running a line out beyond the length of your winch’s capacity.  Having an extra 50 foot extension handy can be the difference between continuing on with your adventure and a long hike out.
  3. metal tech land cruiserAnything Metal Tech – If you own a Toyota Land Cruiser, FJC, 4Runner or Tacoma these guys should be your new best friends. High quality products engineered from the ground up to protect your rig and service that never ends. Bumpers, sliders, tube doors and roll cages are just a few of signature Metal Tech items on the Christmas wish list.  (don’t tell Hula Betty, but there is growing pile of stuff at their shop with our name on it)
  4. LuxuryLite cot –  When your adventure keeps you on the trail for days and nights on end, a good night’s rest is a must. While the young Turks can sleep on the ground, old bulls know the value of a cot that keeps your tired bones off the rocks and supports you head to toe. The LuxuryLite cot is lite weight and compact enough for anyone to bring along regardless of how you travel.  This one really goes out to  our Dual sport bike friends where space is at a premium.
  5. ORTT wheel chockOff-road Trail Tools wheel chocks – When gravity isn’t your friend, you’ll want a good set of wheel chocks to keep your rig stead fast on pavement or dirt. Unlike most others, these chocks fold up into a very compact form factor to stow away neatly and then quickly deliver stability when needed on just about any surface.
  6. Contribution to BlueRibbon Coalition – Doing something for others is what Christmas is suppose to be about. The BlueRibbon Coalition (BRC) champions responsible use of public lands and waters for the benefit of all recreationists.  When others are trying to shut out motorized use of public lands, the BRC is working hard to secure, protect, and expand outdoor recreation access and use, for all.
  7. zarges casesZarges storage case – Being self sufficient on an off-road adventure requires a lot of gear that you need to store. Zarges aluminum containers allow you to organize and transport food, recovery gear, cameras, kitchen equipment, first aid supplies, clothing and everything else safely out of the elements. Their design, protects your gear from dirt, rain and grim when its traveling on the roof or pulled down next to your camp overnight for easy access in the morning.
  8. Subscription to Overland Journal –  If you’ve read our website top to bottom (you did right) and you’re still looking for inspiration for your next adventure, this is the magazine for you. The journal is about exploration. The journal covers long weekend trips, gear reviews and 10,000-mile expeditions across every continent in the world. And as a bonus the photographs filling their pages are worthy of placement in the finest main street galleries.
  9. magnetic spice tinsMagnetic spice tins – Meals on an off-road adventure are more than just calories. A good meal around a camp fire at the end of a day exploring is the thing culinary dreams are made of. A dash of Indian cumin, a pinch of pink sea salt, a bay leaf, a measure of rosemary, sage and just a hint of  Madagascar cinnamon will turn any meal into a gourmet dining experience. Magnetic tins keep all those spices securely at hand.
  10. Primus Power Ignitor 3 – A good lighter is a big advantage when it comes to starting a fire, camp stove or indulging in fine a cigar after a long day on the trail. This lighter burns at 1300°C  and is as close as you can get to weather proof.  And while the Primus ignitor will help you get your burn on. You might want to ask for water proof matches and a flint stick for back up.

Not sure whether I’ve been naughty or nice this year but come December 25th (Christmas morning, not Christmas eve) we’ll find out.  And regardless of what is under the tree, I’ve already received my present this year.  Back in January, Hula Betty didn’t blink an eye when I asked to go on our Baja Off-Road Adventure…  She just said “be careful, have fun and comeback in one piece.”  You can’t ask for a better present than that.

lgrt decal check mark

Off-Road Check List: Rig Inspection (aka Did I Break Anything)

Whats the difference between wheeling a local 4×4 trail and an epic off-road adventure?  You check your rig the day before you wheel a local trail and fix it when you get back home, on an epic off-road adventure you check your rig every morning and fix it every night.

OK, so Conan has nothing to worry about from my stand-up, but there is a lot of truth in that joke.  Pilots know that you live and die by your check lists: prior to take-off, during flight and prior to landing.  The same is true in wheeling, especially if you will be dependent on your rig for a number of days, with no support in sight.

Sometimes with all the excitement and work of an off-road adventure it is easy to forget something (trust me, I’ve forgotten more than my share).  In order to reduce the chance of missing a potential problem, we now keep a laminated memory jogger checklist to help us stick to our inspection program before, during and after a day on the trail.

Pre-Trip / Daily – Rig Inspection

  1. Axles & Differentials – bolts, boots, clips, u-joints, grease points.  Check to ensure everything is tight and look for leaks or drips.
  2. Battery – clean terminals, check for damaged, corroded wiring. Check for loose connections.
  3. Brakes – drums, rotors, pads/shoes, fluid, hoses, leaks, check parking brake, brake lights.  Helps to have a second person pressing on the breaks while checking.
  4. Belts & Hoses – look for cracks or bulges. Ensure spares are packed in the parts bin.
  5. Body/Frame – look for cracks and rust.  Remove any sticks and debris caught up in the frame.
  6. Cooling/Heating system – look for leaks, fluid levels, clean and repair fins, check hoses and clamps, thermostat, radiator cap. Ensure leak repair kit is packed in parts bin.
  7. Communications – CB / ham radio, antenna broadcast and receive.
  8. Driveline/Transmission – inspect case and shifter, leaks, fluids, universal & CV joints, skid plates
  9. Engine – carburetor, fuel injectors, spark plugs, wires, PVC valve, pumps, distributor & wire, check for leaks and cracks, air filter (clean or replace).  Keep an eye out for loose wires and hoses.
  10. Exhaust – muffler, tailpipes (rust or holes or hanging). Check all hardware holding tailpipes in place.
  11. Fluids – oil, transmission, brake, radiator coolant, gear oils, wipers, power steering (check levels and color).  Ensure extra fluids packed in rig.
  12. Lights – headlights, brake lights, auxiliary lights; make sure they’re aimed properly.  Verify turn signals.  Ensure extra bulbs packed in parts bin.
  13. Steering – check alignment, fluid level, belts and hoses, pump and reservoir.  Look for leaks.  Check tie-rod boots for tears or rips.  Check all joints for play.
  14. Suspension – coil overs, springs, shocks, alignment, wheel bearings, steering linkage, control arms, pan bars.  Notice unusual play in components.
  15. Tires – tighten (torque) lug nuts, air pressure, tread wear (including your full-size spare), look for cuts and missing chunks, torque beadlock bolts.  Ensure auxiliary air pump or CO2 tank is operational and packed in the rig.
  16. Winch – free spool rope and inspect, rewind onto drum.  Check for loose connections and look for frayed rope or wires.
  17. Wipers – check for wear, fluid level.

Trail Head – Rig Inspection

Before you take off for the trail start the engine and inspect the following with while the rig warms up:

  1. Fuel level – check fuel gauge ensuring level is on full (plan for next fuel stop if necessary).
  2. Voltage – check voltage gauge for proper level.
  3. Oil pressure – check oil pressure gauge for proper pressure.
  4. Engine RPMs – check tachometer to ensure smooth maintained engine idle speed.  Listen for misfires and unusual engine noise.  (you should know your rig’s personality including how its engine sounds normally)
  5. Temperature – check temperature gauge to see proper operation and coolant temperature.
  6. Transfer case – ensure transfer case engages in 4 wheel high and 4 wheel low as well as disengages smoothly.
  7. Traction control – test that the rear locker engages correctly. Test A-trac (or front locker) for proper engagement.  Make sure the disengage as well.
  8. Load – ensure load is properly secured.  Check hi-lift jack, shovel and any exterior mounted items.
  9. Walk around – make one last walk around the rig.  Look for any item left out.  Ensure valve stem caps are screwed on after airing down.  Check that nothing was left resting on the spare, bumper, hood or roof.

If you are on a multi-day off-road adventure stop early enough so that you can fully inspect your rig for damage while the sun is still out.  Stopping early also gives you enough daylight to see what you are doing if repairs are needed.  Tip: remember fluid levels change based on the engine temperature always read against the appropriate level marks.

While a checklist wont prevent breakage, it will go a long way to lessening potential problems.  By catching leaks, tears and loose bolts early on, you can hopefully avoid finding yourself trying to reconnect a break line while standing in axle deep mud.  But just in case all hell breaks loose… carry lots of duct tape.

voodoo blue fj cruiser driving through snow 4x4 trail

Off-Road Adventure Christmas List

happy holidays explore the new yearWhat would the Christmas season be without lists of cool off-road adventure stuff we hope to find under the tree when we come running down the stairs.  Like a giddy teenage boy on prom night believing anything is possible, we checked all around, asked friends and searched out the Internet for cool gifts and this is our ultimate 4×4 adventure Christmas list.

  • MSR XGK EX Extreme Condition Stove: This small stove is capable of blast furnace output and will boil water in under three minutes (kerosene fuel).  Easily serviceable in the field, this is the stove to bring along on a three month adventure into the Himalayas or an over night camping trip in the Hundred Acre Woods.
  • Maxtrax Vehicle Extraction: There are times a winch isn’t practical such as alone on the sand or snow field with nothing to anchor too.  Sure you can pull the spare tire, dig a hole and build a dead-man anchor or you can pull out Maxtrax, set them in place and drive on out.  Maxtrax makes vehicle recovery an easy one-man job.
  • Petzl E99 PG Tikka XP 2 Headlamp: You can never…  NEVER… have enough headlamps within easy reach.  Whether you’re making a rig inspection on the trail, gathering fire wood, finishing a late night field repair, trying to find stuff in your tent or looking for the perfect tree to relieve yourself after dark, a hands free light is a must.  And just to be clear, one headlamp is not enough.  Spelunkers bring a light, a backup light and a backup to their backup…  as a minimum.  Keep one or two in the rig, one with your camping gear, one with the cooking equipment, one in the emergency kit…  you get the idea…  Don’t forget lots of spare batteries with each.
  • ARB Fridge Freezer: There is nothing like pulling out a steak for dinner along with a cold drink on day five of an off-road adventure.  And what would single malt scotch be without ice as you sit around the fire with a fine cigar.  The ARB fridge freezer is a 12 volt, low amp draw solution to a cooler full of melted ice sloshing around in the back filled with soggy groceries.
  • Pelican 1630 Case: What better way to be ready to go on a adventure than always having your gear packed in waterproof cases waiting to be strapped to the roof or stowed in the back of the pickup.  These cases will keep everything inside dry and safe from the shocks and knocks of the road.  In the unlikely event of an emergency water landing, the Pelican Case will double as a flotation device.
  • SPOT Satellite GPS Messenger: Hula Betty gets a little anxious when we’re off the grid for several days.  The Spot lets you send an “OK” message telling folks you’re fine and not to worry.  And just in case your not ok, the Spot will let you send out an “SOS” with your exact GPS coordinates to the authorities, alerting them that you need help.  The Spot is satellite based so no worries if cell coverage is non-existence.
  • Gerber EVO Jr. Serrated Edge Knife: Remember how your grandfather always had a pocket knife on his belt.  He was prepared for any task that came up.  We’re not talking about a rebuild your engine multi-tool or a gator skinning 18 inch Rambo saber blade.  No, just a simple pocket knife with a good sharp blade that will effortlessly cut parachute cord, slice cleanly through a wad of duct tape or whittle a good sharp stick.  In the hands of anyone who understands the versatility of a pocket knife, the uses are endless.
  • 12-by-20 Super Heavy-Duty Tarp: What can you make out of a tarp?  How about a brooch, a hat, a pterodactyl… The uses for a tarp are up there with a good pocket knife or duct tape.  Many times when on an adventure we’ve turned a tarp into a makeshift shelter staying dry when the weather turned worse than expected.  A tarp also makes an excellent awning for an afternoon siesta or keeping the camp kitchen dry while cooking up a pot of chorizo chili.
  • Kermit Chair: Sure there are hundreds of camp chairs you can pick up at any supper store.  Hell, just look in the back of any soccer mom’s minivan and you’ll find half a dozen different choices.  But none of them are particularly comfortable.  The Kermit Chair lets you pack tight, without giving up on comfort, design and beauty.  No more slouchy seats and squishy backs that you slump into.  These chairs support your tired body as you relax around the fire.  These guys pay attention to details, the add-on cup holder, it took over a year to develop.
  • Wool Blanket: We always have an emergency kit in the rig where ever we go; work, grocery store, skying, or the Arctic.  And in that kit are two wool blankets.  Unlike cotton, wool blankets keep you warm even when they are wet.  They also make great insulated padding when your sleeping on the cold hard ground.  You can even do your best Clint Eastwood imitation (anyone remember “The Good, The Bad and The Ugly”) turning it into a poncho if you have to hike out.
  • Chaser Off-Road Trailer: A fully equipped off-road adventure trail with 46 cubic feet of storage, lots of ground clearance to keep up with the rig, fold out trailer top tent, separate deep cycle battery with solar charging panel for running a fridge and electronic gadgets, fold out kitchen or work area, 19 gallon water tank…  This is roughing it easy.  While it might be a stretch to shove under the tree but you could always leave it in the driveway and set a tree on top.
  • Katadyn Pocket Water Microfilter:  If you plan on a long off-road adventure, eventually you will come to the conclusion that you can not carry all the water you need.  Depending on were you are exploring you will find all sorts of nasty critters swimming around in the local water source (even if it comes out of a tap or clear mountain creek).  The Katadyn Pocket Filter will remove all giardia, fungi, parasites, cholera, typhoid, cryptosporidia, salmonella and other harmful bacteria, parasites, and germs by forcing the water through its ceramic 0.2 micron filtration element.  This is the water filter that is standard issue for international Red Cross field workers.
  • Where Is Joe Merchant? A Novel Tale: We all know I’m not much of a speller…  you’ve read this blog right?  Not much of a reader either…  Dyslexics untie!  But for any die hard Parrot Head this one is a must…  Frank Bama takes off on an adventure in his sea plane to find his ex-girlfriend’s brother, the notorious rock star Joe Merchant.  More a collection of short stories that expand on many of the “Fruit Cakes” song lyrics.  If this doesn’t get you in the mood for an adventure nothing will.
  • Danner Quarry GTX 6 Boots:  Hunting down firewood, hustling up hills to take a baring, running out a winch line, digging for buried treasure or kicking down doors to save the Swedish bikini full-contact origami team requires a sturdy set of boots .  More twisted ankles, bruised toes and blistered feet occur because of flimsy footwear.  Out on the trail is not the place to show off your pedicure in flip flops. Traipsing around in the bush with blisters is low on entertainment value and no way to go through life.  A good set of boots will keep your feet cozy, ankles supported and possibly save you from a snake bite.

This list could go on forever, but Santa only has so much room in his sleigh…  I wonder if it has 4WD… Maybe he should get a Defender 110 or how about a Land Cruiser FJ45.

What’s on your list?  Tell us your great ideas for gear under the tree, stuffed into a stocking or sitting out in the driveway.

swr meter CB radio test setup

Can You Hear Me Now…

cb antenna quick release spring baseCommunication when off-road is key to safety and fun.

The most popular method of trail communications has to be the CB radio. Available at almost every discount department store, a CB radio setup provides good vehicle to vehicle coverage while on the trail.  On outings with many off-road clubs, a CB is mandatory if you plan to participate in a club-sponsored ride.

If you ask Hula Betty, she will tell you there is one universal truth about me…  No matter what, and I really mean it, no matter what, I will forget one thing when I go on an off-road adventure.  And for a while the one thing was a CB antenna which meant I would have to stop along the way and pick one up.  On the good side this has given me a nice collection of CB antennas and an opportunity to try them all out.

The line up includes:

CB radio antennas have two functions…

  1. Capture radio frequency waves and convert them into electrical signals
  2. Radiate out radio-frequency signals, which is done best when the length of the antenna precisely matches the wavelength of the transmitted radio frequency (1 – 40)

CB antenna flexIf they all do essentially the same thing is there a difference in CB antennas you ask. CB antennas come in various sizes, flexibility and with different methods of fine tuning their efficiency.

A CB radio can broadcast for miles but it is based on line of site.  For this reason we use a four foot antenna which mounted on our rear door hinge stands above the roof and any stuff packed in the roof rack giving it a clear view of the horizon in every direction.

SWR (standing wave ratio), is a measurement of how efficiently your antenna system will radiate the power available from your radio. In simple terms, your radio would like to radiate all of its power, but can only do so if the other components cooperate. Bad coax and mounts, inefficient ground plane or poorly tuned antenna can cause system backups.  CB antennas need to be tuned to be as efficient as possible and by setting your antenna’s SWR you reduce the restriction of radiated power. The easiest way to understand the concept is to think of it in terms of water flow. That is, if you put a nozzle on the end of a fire hose, your potential output will be restricted by the outlet and water pressure backs up into the pump. Tuning your antenna opens the nozzle to full.  Poorly tuned antennas restrict the flow of the output frequency and can cause damage by backing up all that power into the CB radio.firestik designer CB antenna

If all radios only transmitted on one channel, it would be a much easier task to design antennas. As it is, there are 40 CB channels to contend with.  CB antennas can only be made to resonate at one specific frequency (channel). The goal of the antenna manufacturers is to build the antenna to resonate at a frequency in the middle of the band (channel 19) and make it broad- banded enough to keep the other frequency’s related SWR at the two extreme ends (channel 1 and Channel 40)  of the band below 2.0:1.  Since each radio system is unique, the final tuning is left to you.  How you go about fine tuning your antenna varies slightly.

firestik II cb antenna tuningThe three models of antenna we now have, are all four feet long with adjustable tips.  Because the antennas stick up high, they run into low branches, overhangs and ferry boat cross beams.  The Wilson flex-4 is designed to bend when it encounters solid objects.  In fact it can double back without cracking or breaking.  The K40 and Firestik requires a spring base that allows the antenna to fold back instead of splintering the fiberglass.  When properly adjusted they all broadcast and receive radio signals well. But here is where they seem to differ the most to us.  The K40 requires a small allen to make adjustments.  The Flex-4 requires a small screw driver for adjustments.  The Firestik uses a turn screw that can be adjusted by hand.  Once you have your antenna dialed in for your CB radio you should not have to worry about it again.

So how do you fine tune you’re CB antenna?  You need a SWR meter, which you can pick up from Radio Shack.  You may want to check with your local 4×4 club to see if anyone there has a SWR meter you can borrow.

You need to understand two basic points before adjusting the length of your antenna (fine tuning it):

  • If the SWR on channel 40 is higher than that on channel 1, your antenna is too long.
  • If the SWR on channel 1 is higher than that on channel 40, your antenna is too short.

Start by finding a suitable location to park your rig. There should be no obstructions, such as trees or buildings, within 10-15 meters of your antenna.  Make sure that you’re inside the rig with the doors and windows closed to ensure an accurate reading.  It is important to have your antenna properly grounded to your rig or it may not operate at all.

IN GENERAL HERE IS HOW YOU FINE TUNE YOUR ANTENNA (follow the directions for your specific SWR meter).

Hook up the SWR meter. Disconnect the coaxial cable from the back of the radio. Reconnect this end of the cable, which leads back to the antenna, to the SWR meter in the slot marked “antenna” or something like that.   Use the jumper lead and connect your radio and the SWR meter through the connection marked “transmitter”or something like that.  You are placing the meter between the CB and the antenna.

  1. You will initially calibrate the meter for your system. Set the switch on the SWR meter to “CAL.”
  2. Turn the radio the Channel 1 (40 on the second pass).
  3. Key the microphone (depress the button and hold it) but do not speak into the microphone.
  4. Turn the knob on the SWR meter labeled “CALABRATION” until the needle reaches the setting position at the end of its range.
  5. Release the transmit key.
  6. Set the function switch to “SWR”.
  7. Key the microphone again without speaking into the microphone.
  8. Quickly record the reading on your SWR meter and release the transmit key on your microphone.

You are now going to repeat this process for channel 40.

Depending on your readings, lengthen or shorten the antenna appropriately and repeat your tests.  Make small adjustments as you work to optimize your antenna and remember:

  • If the SWR on channel 40 is higher than that on channel 1, your antenna is too long.
  • If the SWR on channel 1 is higher than that on channel 40, your antenna is too short.

The objective behind tuning your antenna is to make these two readings identical or as close as possible. Getting down to a ratio between 1.5:1 and 2.0:1 will produce an excellent broadcast signal that will not harm your CB radio and broadcast clearly across all 40 CB channels.

If you only communicate on one or two adjacent channels anywhere within the band, you can tune your antenna to achieve optimum performance on those channels.  However, most people prefer to use the entire bandwidth when tuning.

This procedure can sound a little cumbersome, but fine tuning your rig’s CB antenna only takes a few minutes and is vital in protecting your CB Radio and optimizing its performance .  Each antenna manufacture claims they have power output improvements and other performance enhancements that set them apart.  We found them all to operate the same on the trail when tuned correctly.  Of course it could be our set up and this is not a scientific test by any means.  Can you hear me now.

bowl chorizo sausage stew

Hungry Man Off Road Adventures

bowl chorizo sausage stewA big part of our off-road adventures is getting to camp in the middle of no where under the stars.  Years ago that would have meant a staple diet of Top Romen.  Since then we’ve stepped up to more gourmet fair.

There are lots of high quality ingredients that can be pulled together to make a gourmet one pot meal without resorting to expensive dehydrated pre-packaged backpacking meals or raiding the Army Surplus for cardboard tasting MREs.  A few simple tricks and you can create a favorite dinner of ours, spicy black bean chorizo chili.

  • 1lb ground Mexican chorizo sausage
  • 1 egg
  • 1 quart spicy black bean soup (we like Pacific Natural Foods)
  • 16 oz canned black beans
  • 12 oz frozen corn kernels
  • 4 oz can of diced mild chiles
  • hand full of diced Nopalitos cactus (try Nopalitos – Tender Cactus by Dona Maria)
  • spices (this is just a suggestion…  we like it spicy…  keeps the mosquitoes at bay)
    • dried minced onion to taste about 2 tablespoons
    • dried garlic flakes to taste about 1 teaspoon
    • ground cumin to taste about 1 tablespoon
    • ground oregano to taste about 1 teaspoon
    • fresh cilantro to taste about 2 tablespoon
    • ground chipotle to taste 1/4 teaspoon

Pre-trip food prep makes gourmet meals on the trail much simpler and manageable when the light is fading and you’re hungry.  Start by finely chopping the cilantro.  In a medium mixing bowl lightly beat the egg.  Add in the cilantro and chorizo kneading it all together.  Keeping fresh ingredients from spoiling on the trail takes nothing more than a small cooler and a  source of cold.  Put the sausage mixture into a zip lock bag…  and FREEZE it rock hard, it will be its own source of cold.

Dice up the nopalitos and place them along with the rinsed beans, corn, and chiles into a zip lock bag and freeze it as well.  Put the remaining spices into a zip lock bag (no you don’t need to freeze the spices).

On the morning of your off-road adventure pull everything out of the freezer and put it into the cooler (don’t forget the spices).  By the time you reach camp that night and are ready to cook dinner, they should be thawed out…  put a couple of cold beers in the cooler and you wont need ice to keep everything cool.

Cooking it all up…  We do this all in one pot over a camp stove.  If you’re adventurous you can try it over a fire.  In a pot over medium heat brown the sausage.  You can drain the grease but why…  everyone knows camp food has no calories, is healthy and good for you…  no matter what.   Once the sausage is browned, add the bean soup, corn, chiles, beans, and nopalitos, along with the spices.  Allow it all to simmer for 10 minutes or so stirring every once in awhile.

Serve it up in a bowl with blue corn tortillas chips.  That is all there is too it. A great one pot meal that will make you a rock chief with all your friends on your next off-road adventure.

Serving tweaks:

  • Top a little crumbling cheese, Queso Fresco or Panela
  • Serve over cooked brown rice
  • Line bowl with a corn tortilla and server chili on top
  • Dab of sour cream on top
2007 toyota fj cruiser arb bumper

From A Land Down Under

arb 4x4action summer 2010 coverCan I get a hot shower in the bush…  Who is behind 4WD TV…  How did the “Drive 4 Life” turn out…  Is there a good one woman tent out there…  Can a pig really drink beer… And what else are the crazy Aussies up too…

The new ARB 4x4action newsletter summer 2010 showed up in our in box.  As we’ve told you before, this news letter comes from the Australia head quarters so there is a big down under influence on the articles which give you a new point of view.

This quarters publication offers an opportunity to win an ARB recovery kit as well as an ARB air compressor.  Of course if you don’t win you can still read about the Aussies trekking across Africa.

If you’re not on the ARB list to receive your own free issue, we highly recommend it. Yes it is an on-line infomercial but it is also filled with great off-road adventure information.

trail tracker webpage

Trail Tracker

Every think that you need a place to keep track of the off-road trails trails you’ve driven so you can share them with others?  Ever wonder where you could go to find 4×4 trails in other locations that you want to explore?  Well wonder no more…

As Toyota makes a push to show the world its new 5th generation 4Runner and FJ Cruiser are tough off-road trucks, it has created a website dedicated to sharing trail information.  The web site is built to share GPS coordinates, directions, pictures and trail descriptions with others around the world.  The site, Trail Tracker allows you to set up a profile and than track the trails you have wheeled by either uploading your own trail or adding those shared by others to your favorites.

Toyota’s Trail Tracker has tremendous potential.  Today there are only a few dozen trails logged allowing almost everyone to upload a “first” for their favorite 4×4 trail.

And than there is “Aren’t you pointing out trails to the environmental groups who want to close them down?”.  I don’t believe so.  I actually feel this is a tool to help prevent trail closures.

  • Groups that want to close trails, know where the trails are.  This is not going to show them any trail that is not already known or on their watch list
  • The best way to prevent trail closure is to follow the ethics set out by Tread Lightly and demonstrate good stewardship of the land we wheel
  • Toyota has a vested interest in trails remaining open to sell more off-road vehicles.  They legitimatize the sport to some extent by showing their participation
  • The site can show the strength of the wheeling community by exposing to non-wheelers the number of families that wheel and where we wheel responsibly

You can not change the minds of those against off-roading… We can continue to educate those who are not aware of all sides of the issue and this site can be one of the educating tool. In the end it is up to each of us to always put our best wheel forward when we are on the trail, in a public forum, or simply talking to our friends and neighbors about what we do with our rigs.

The Trail Tracker is still new and it is up to our wheeling community to make it into a resource we can all use.  What trail are you going to up load?

UPDATE:Toyota has taken down their Trail Tracker website.  And while this site is gone we will continue to share with you great off-road resources that we find.