Category Archives: how to maintenance

Learn how to maintain your Toyota FJ Cruiser. From simple oil changes to replacing a wheel baring, we’ll show you how to do it yourself.

toyota fj cruiser transfer case oil filling

Transfer Case Oil Change How To

Amsoil severe gear SAE 75w-90 oilOn an off-road adventure in a 4WD vehicle, the transfer case distributes the power front and back.  The 2007  Toyota  FJ  Cruiser  maintenance  schedule, shows that Toyota recommends changing the gear oil in the transfer case every 30,000 miles depending on usage.

Sure you can bring your rig into the local shop but changing the transfer case’s gear oil yourself is an easy maintenance activity that can be completed by any back yard mechanic. Besides saving money, you will also learn a little more about your 4×4 adventure vehicle which can only help when your on the trail.

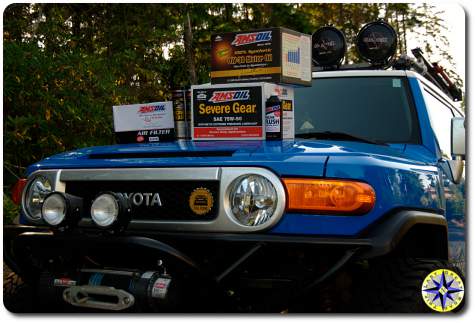
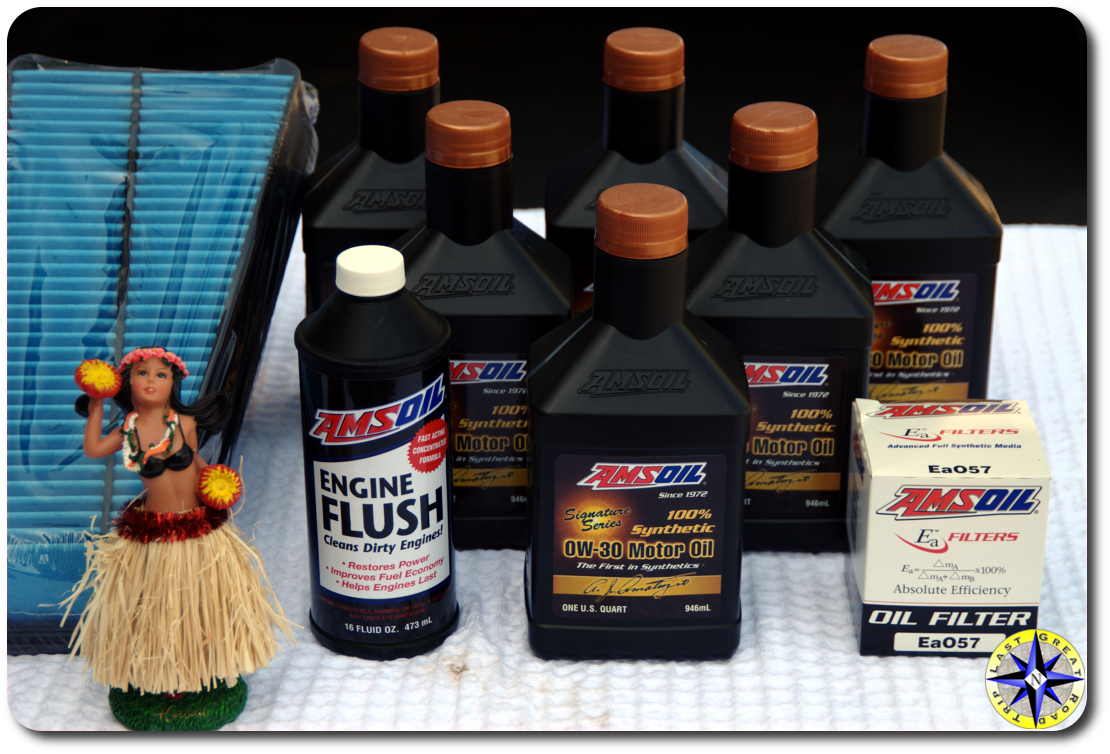
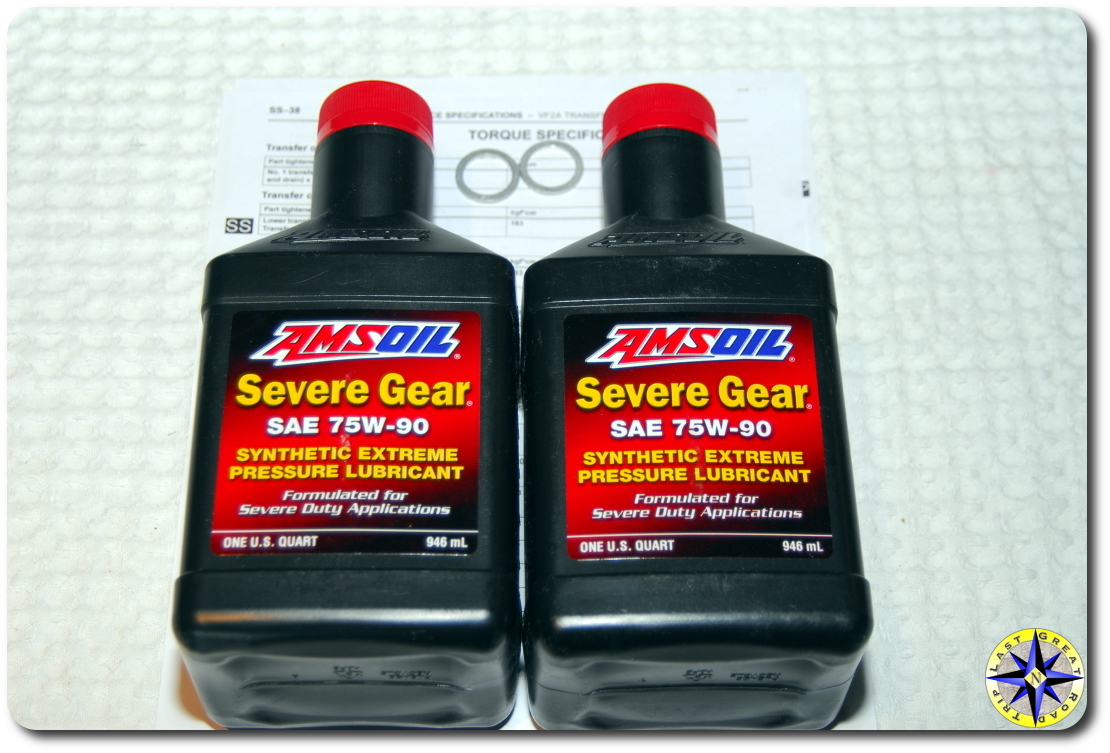
We checked our 2007 Toyota FJ Cruiser owners manual and found we would need 1.5 quarts of Hypoid gear oil API GL-5 (Toyota Recommends oil viscosity: SAE 75W-90).  We went with Amsoil Severe Gear SAE 75W-90 synthetic extreme pressure lubricant, formulated for sever duty applications.

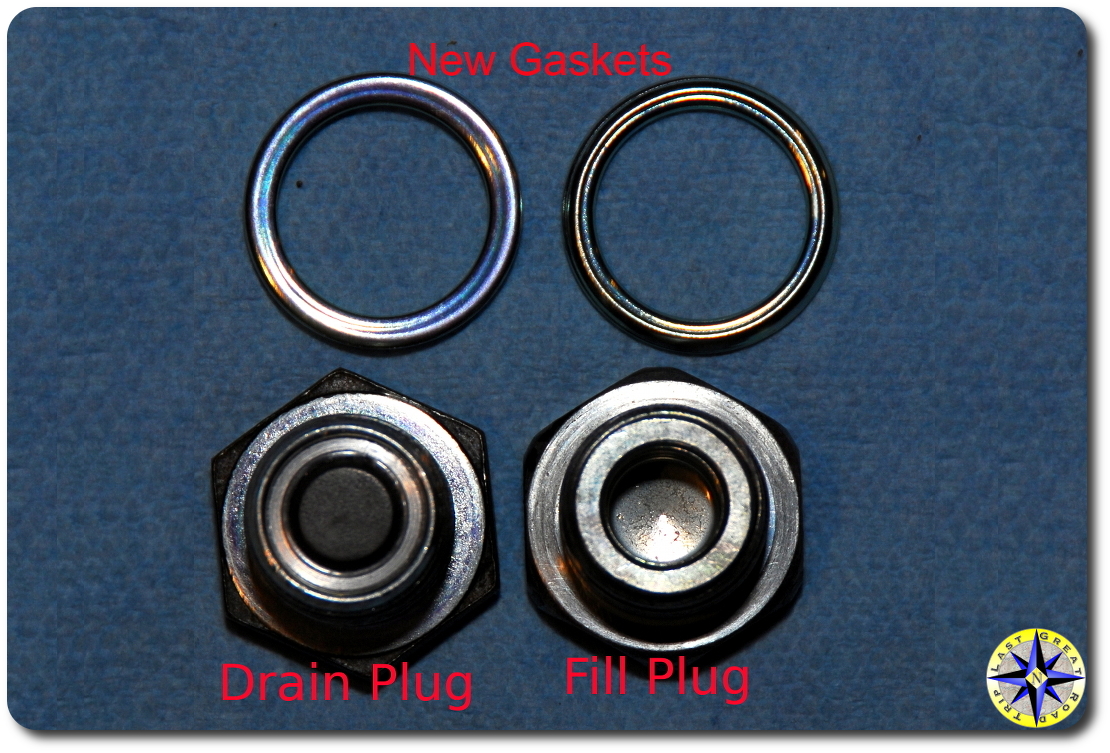
We also grabbed new gaskets for the fill and drain plugs as well as a funnel with flexible tube (Hopkins FloTool 10704 Spill Saver Measu-Funnel) for getting the thick gooey oil into the transfer case.  The only tools needed are a oil catch pan, 24 millimeter socket, ratchet and a torque wrench.

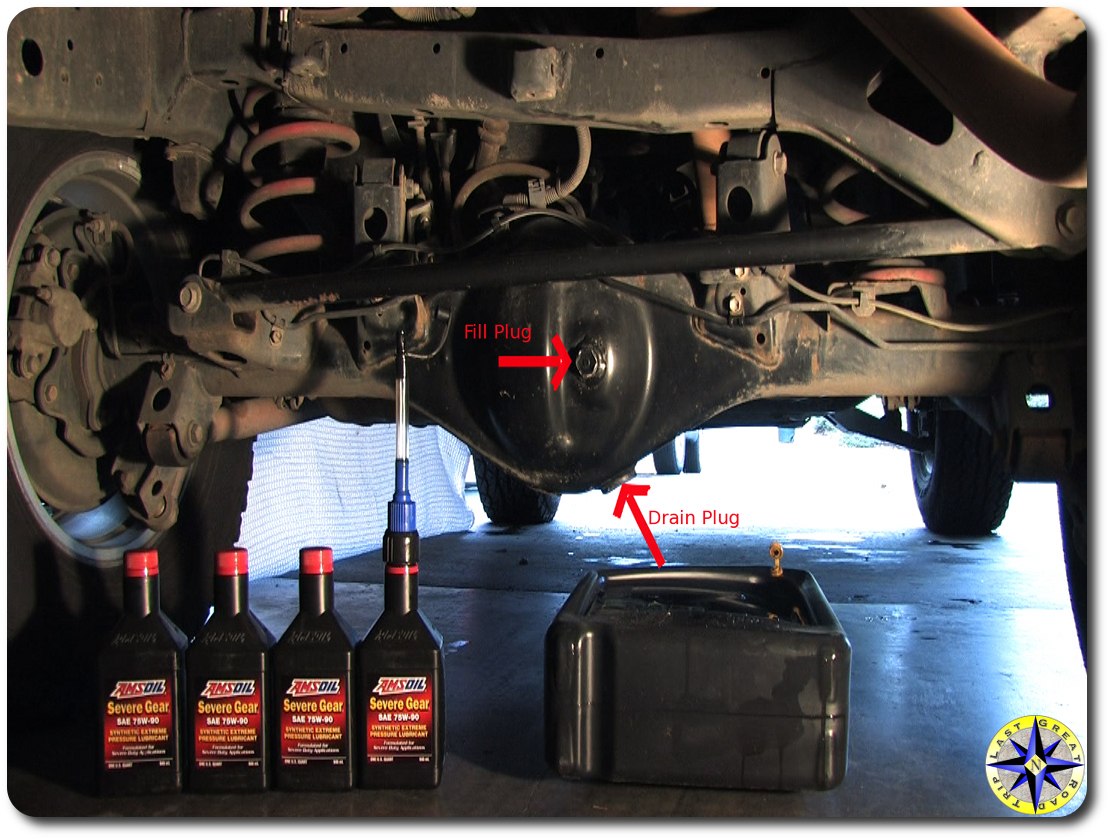
Start by putting the rig on a flat, level spot to ensure good draining and proper refill. Tip: clean around the transfer case with soapy water and a scrub brush to remove the road and trail gunk.  This will prevent any dirt from falling in to the case while changing the oil.

toyota fj cruiser transfer case
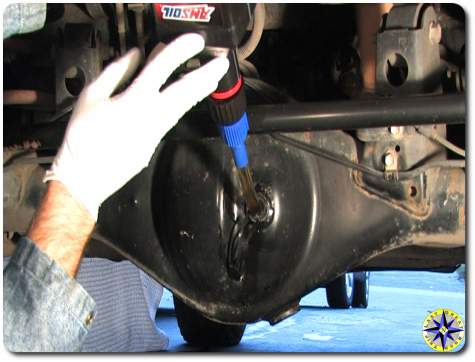
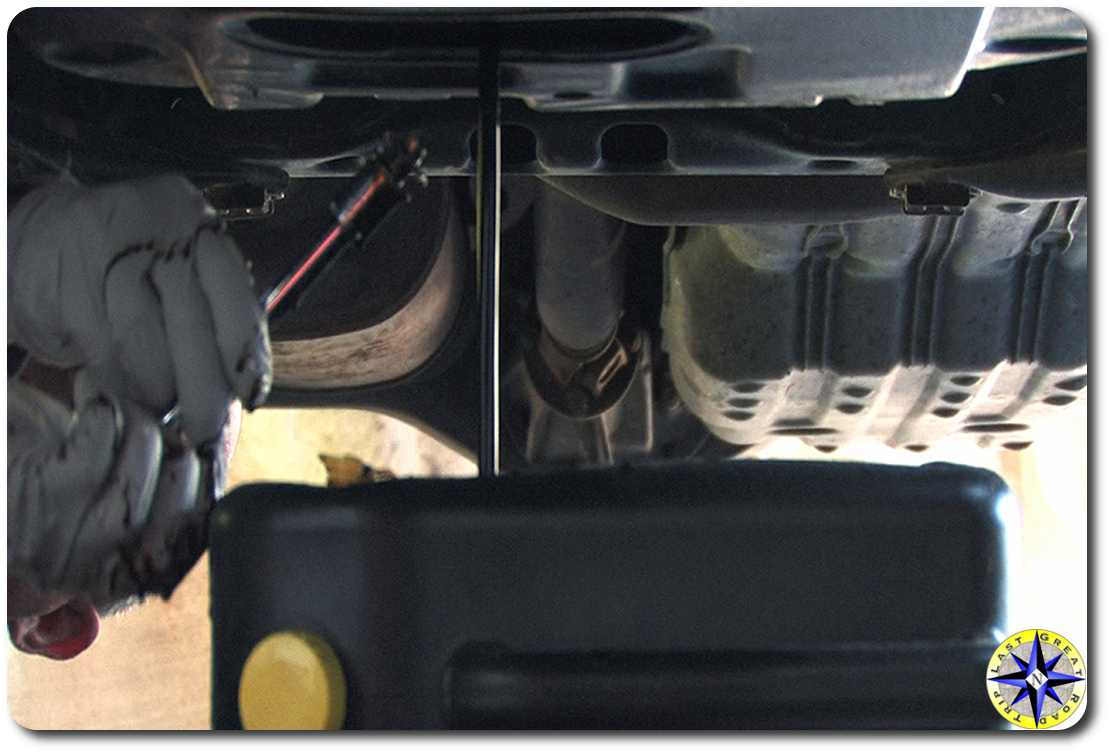
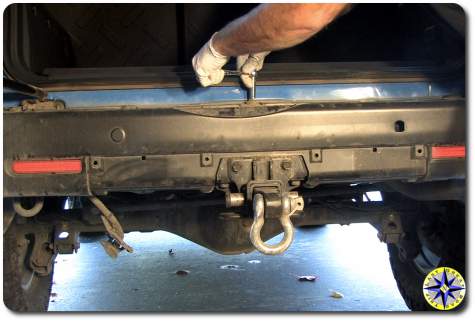
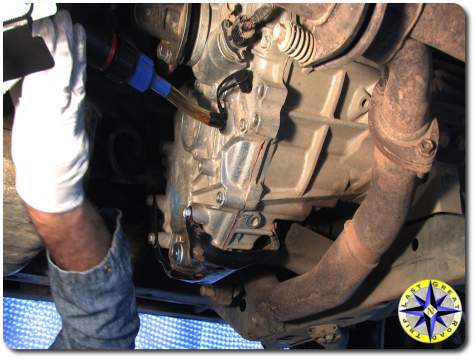
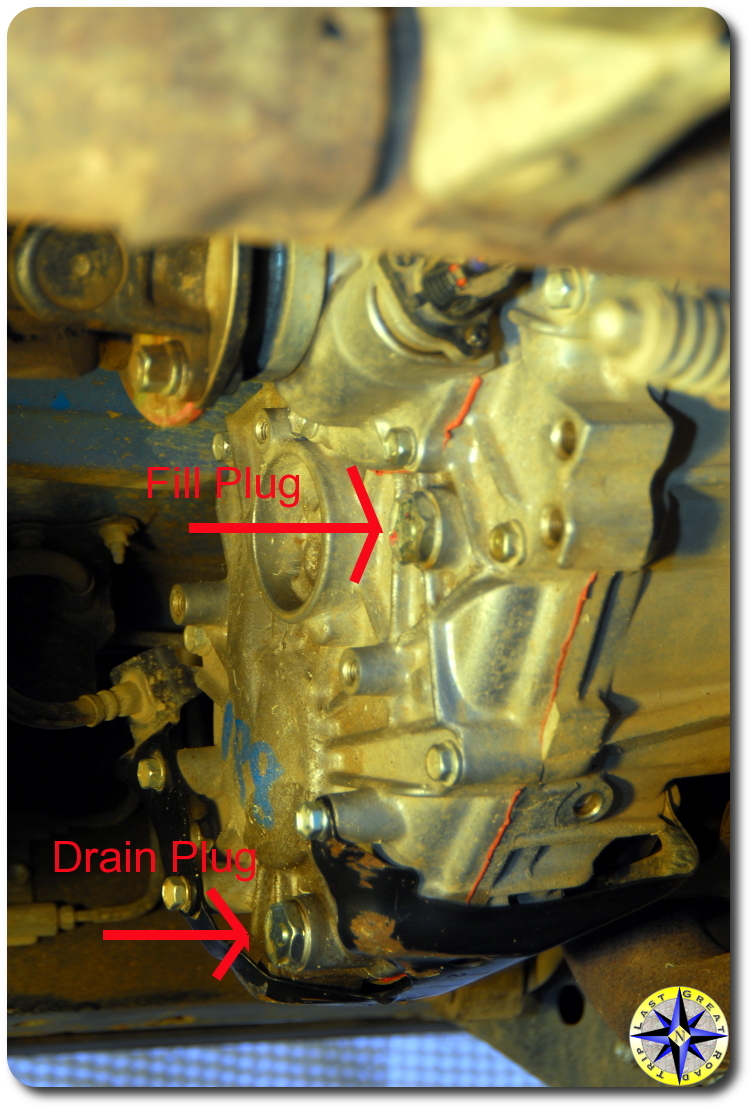
Using the 24mm socket remove the fill plug located in the middle(ish) of the transfer case.  By removing the fill plug first, the housing will be able to breath allowing the gear oil to drain more quickly.

With the oil catch pan in place remove the drain plug, located on the bottom of the transfer case, using the same 24mm socket. If your going to use gloves, this is the time to wear them.

Once the oil is fully drained, wipe the area clean and re-insert the drain plug with a new gasket and hand tighten.  Set the torque correctly on your torque wrench and tighten down the drain plug.  The Toyota maintenance manual states the torque specifications for both the drain and fill plugs as 27 foot pounds for our 2007 Toyota FJ Cruiser.

Remember that funnel with flexible tube?  Getting the oil out of the bottle and into the transfer case through that little hole can be tricky.  One of the advantages of the Hopkins FloTool 10704 Spill Saver Measu-Funnel is that the flexible tube funnel cap will screw directly on to the Amsoil quart bottles.  The cap has an open and close position preventing spills as you position the bottle and hose into place.

Squeezing out thick gear oil through the tube takes awhile.  It works best if you give the quart bottle a few long squeezes and than allow air to flow back into the bottle followed by a few more good squeezes.

The transfer case on our 2007 Toyota FJ Cruiser holds 1.5 quarts.  Checking the fill level on flat ground is easy.  The oil should begin to run out or be just about to run out (within 5mm of the fill opening).toyota fj cruiser rear differential fluid level

Hand tighten the fill plug with a new gasket followed by torquing down the plug to Toyota specifications (27 ft./lbf for the 2007 FJ Cruiser).

Once everything is buttoned up, give the plugs one more wipe down and check for leaks followed by a drive around the block.  Double check for drips and leaks when the test drive is complete.

Keeping the power distributed to the front and rear axles in key in a 4×4 vehicle.  Ensuring the transfer case continues to do its job takes only a little maintenance in the form of an oil change.  Changing the gear oil in the transfer case of a Toyota FJ Cruiser is a simple maintenance job anyone can do with a few tools, a little know how and about 60 minutes.

Don’t forget to change the oil in the rear differential too while your at it. You can learn how with our rear differential oil change how to video.

toyota fj cruiser adding rear differential oil

Changing Rear Differential Oil On The FJ Cruiser

toyota fj cruisdr rear differentialThe gear oil in your rig keeps friction to a minimum and ensures the long life of your differential gears.  Changing the oil in the rear differential is an easy maintenance activity that keeps your off-road rig motoring forward, saves money and allows you to learn a little more about your 4×4 adventure vehicle (you never know when that knowledge will come in handy on the trail).

The first big decision is what oil to use. The Toyota maintenance manual for a 2007 FJ Cruiser specifies: Hypoid gear oil APL GL-5. We went with Amsoil Severe Gear SAE 75W-90 synthetic extreme pressure lubricant, formulated for sever duty applications.  Our FJ Cruiser is equipped with an e-locker which means it requires between 3.01 and 3.12 quarts to properly fill the rear axle housing.

The other item to pick up before you get started are new drain and fill plug gaskets (part# 1215710010).  Unless your on the trail working a field repair, don’t try save a few bucks by reusing these little items.  (Get a complete set of FJ Cruiser differential and transfer case gaskets they will also fit you Lexus GX470 and 4Runner)

Most back yard mechanics will have the tools required to perform this simple activity.  The tools you will need include:

Ok enough shop talk and prep…

Put the rig on a flat level spot to ensure good draining and proper refill. Tip: clean the axle housing with soapy water and a scrub brush to remove the road and trail gunk.  This will prevent any dirt from falling in to the differential while changing the oil.

Using a 24mm socket remove the fill plug located in the middle(ish) of the rear axle housing.  By removing the fill plug first the housing will be able to breath allowing the differential oil to drain more quickly.

With the oil catch pan in place remove the drain plug, located on the bottom of the rear axle housing, using a 24mm socket. If your going to use gloves, this is the time to wear them.

toyota cleaned differential drain and fill plugsThe drain plug has a magnetic insert designed to attract and hold tiny metal shavings that become suspended in the oil.  Yes these are little bits of your gears.  Inspect the drain plug checking for any chunks and observe how much has accumulated.  This will give you an idea of what has been going on inside your differential.

Even with the fill plug removed, it will take a while for the oil to completely drain, which is good since it will give you time to grab the shop rags and clean the plugs, removing all the gunk and accumulated metal shavings.  When your done the plugs should be clean and dry.  Don’t forget which is which.

Once the oil is fully drained, wipe the area clean and re-insert the drain plug (Be sure to use the correct plug) with a new gasket and hand tighten.  Set the torque correctly on your torque wrench and tighten down the drain plug.  The Toyota maintenance manual states the torque specifications for both the drain and fill plugs as 36 foot pounds for our 2007 Toyota FJ Cruiser.

Remember that funnel with flexible tube?  Getting the oil out of the bottle and into the axle housing through that little hole can be tricky.  One of the advantages of the Hopkins FloTool 10704 Spill Saver Measu-Funnel is that the flexible tube funnel cap will screw directly on to the Amsoil quart bottles.  The cap has an open and close position preventing spills as you position the bottle and hose into place.

Squeezing out three plus quarts of thick 90 weight through the tube and into the axle housing will take awhile so get comfortable.  It works best if you give the quart bottle a few long squeezes and than allow air to flow back into the bottle followed by a few more good squeezes.toyota fj cruiser rear differential fluid level

Checking the fill level on flat ground is easy.  The oil should barely begin to run out or just about to run out (within 5mm of the fill opening).

Hand tighten the fill plug and new gasket followed by torquing down the plug to Toyota specifications (36 ft.*lbf for the 2007 FJ Cruiser).

Give everything one more wipe down and check for leaks followed by a drive around the block.  Double check for drips and leaks when the test drive is complete.

There comes a time in every rig’s life when it’s gear oil needs a change to keep all the gears turning smoothly.  Changing the rear differential oil on a Toyota FJ Cruiser is a simple maintenance job anyone can do with a little know how and about 60 minutes.

Be sure to change the gear oil in the transfer case as well. Learn how with our step by step transfer case oil change video.

fj cruiser driverside spark plug location

Time For A Change Sparky

fj cruiser used spark plugOne of the best ways to avoid trouble on an off-road adventure is to know your rig… inside and out.  One of the best ways to get to know your rig is through regular maintenance.  Toyota recommends changing your spark plugs every 30,000 miles.  Changing the spark plugs on a Toyota FJ Cruiser is a simple activity for any backyard mechanic and a good way to get to know your rig.

A couple of things you’ll need in order to change out the spark plugs includes:

  • 6 spark plugs
  • 12 mm and 10 mm socket
  • spark plug socket
  • spark plug gapper
  • couple of 10″ extensions
  • socket wrench
  • torque wrench
  • 2 flat head screw drivers (very helpful)
  • anti-seize (optional)
  • silicon grease (optional)
  • gloves (sure this is optional but Hula Betty wants to protect her manicure. Mechanic or latex gloves work great)

Spark plugs are the business end of your engine’s ignition system.  Its the spark plugs that delivers the spark needed to ignite the air/fuel mixture.  No spark means no combustion!  Combustion occurs when high voltage supplied by the ignition coil jumps across a small gap between the spark plug electrodes. The high voltage surge from the coil goes down the spark plug’s center electrode and forms an arc as it jumps across the gap. The voltage required to form the spark ranges from 4,000 up to 28,000 volts depending on the spark plug gap, engine load and compression. The spark only lasts a tiny millisecond, but it is long enough to start the burn.  And lets face it, a millisecond is a lot longer than you think about the answer to “would you like another beer”.

Never take for granted that your new spark plugs are properly gapped.  Before you tear into the engine check the spark plug gaps and set them to the factory spec.  For our 2007 Toyota FJ Cruiser the gap needs to be .039″ to .043″.  After you have ensured the gaps are correct it is the time to apply a little (it doesn’t take much) anti-seize to the spark plug threads, if you want.

You will want the engine to be cold before you start so the metal in the heads is not expanded. To begin, disconnect the negative battery terminal cable.  I know lots of folks balk at this step but resetting the stereo and compass after it is all done is a small price to pay for avoiding an electrical short and chasing down a burned fuse.  After all you will be disconnecting the ignition coils on your rig.

Before starting you may want to take a look at this fj cruiser Ignition coil component replacement Toyota bulletin showing you how to remove the ignition coils.  Getting to the spark plugs on your rig will require that you pull a few bits from the engine including the:

  • V-Bank cover
  • Air cleaner assembly
  • Surge tank stay and oil stay plate (little brackets)

You will also need to unplug the hoses and electrical connections to the air cleaner assembly.  Once you have everything removed, the passenger side coils will be clearly visible.  The driver side coils are visible too, once you look past the tangle of hoses.  These hoses can be moved aside when you need.

If this is your first time…  changing spark plugs… get your mind out of the gutter and back on task…  start on the passenger side.  Trust me you’ll thank me later.

fj cruiser engine head ignition coilThe Toyota FJ Cruiser has an individual ignition coil attached to each spark plug.   Disconnect the electrical connector to the ignition coil followed by removing the bolt holding the ignition coil to the engine.  With the connector and bolt removed, lift the coil out.  This is a good time to take a look at the ignition coil and check for cracks in the housing or tears in the terminal boots.

To remove the plug from its hole you will need your ratchet, spark plug socket and an extension.  When you are on the driver’s side you’ll need two extensions connected together to reach in through the hoses you didn’t remove.  It may take a little muscle but the plugs will release their grip and can be lifted out once they are unscrewed.

Now grab one of the new spark plugs you prepared earlier. The spark plug socket has a rubber insert designed to hold the spark plug while you lower it into the hole and thread it.  You will want to carefully thread the spark plug by hand so not to cross thread it.  Once the spark plug is hand tightened, brake out the torque wrench and tighten the plug down to 15 ft/lbs (factory spec for our 2007 Toyota FJ Cruiser).fj cruiser ignition coil

Before placing the ignition coil back into place over the spark plug, add a bit of silicone grease to the terminal boots to keep them conditioned and help form a tight dust seal.  Replace the bolt holding the ignition coil in place.  Remember this is a plastic housing so only torque down the bolt to its factory spec of 7.5 ft/lbs.  Reattach the electrical connector to the ignition coil and your done.  Now rinse and repeat with the other five spark plugs.

Before starting on the drivers side you may want to practice a little yoga and limber up. The driver’s side plug procedure is the same but there are a few helpful hints.

  • Small hands are a benefit.
  • Two screwdrivers may be needed to release the connector from the ignition coil.  One screwdriver holds down the clip while the other gently pushes the connector off the ignition coil.
  • Two ratchet extensions will improve the access to the spark plug allowing you better leverage.

Once you have all the spark plugs replaced, the ignition coils in and the connectors reattached, it is time to button it back up.  This is a good time to wipe down all the parts and remove the trail dirt and grim before reassembly.

Start by replacing the surge tank and oil stay followed by any hoses and electrical clips you may have undone on the drivers side to ease access.  Next place the air cleaner assembly back where it belongs and connect the hoses and electrical connector.  Don’t forget the little vacuum tube in the rear.  Cover it all up with the V-Bank cover and reattach the negative ground to the battery.

Turn the key, listen to your engine come to life and enjoy your success!

New spark plugs about $45, time involved about 30 minutes, the feeling that you get from knowing your rig a little better…

amsoil products for fj cruiser

Oil Can Betty…

amsoil engine oil change suppliesOne of our off-road adventure friends, Beau Jaramillo, from Amsoil, sent us a care package that included:

  • Ea Oil Filters
  • Signature Series 0W-30 100% Synthetic Motor Oil
  • Ea Air Filters
  • Engine Flush
  • Severe Gear 75W-90
  • Series 2000 Synthetic Racing Grease

With the Rubicon off-road adventure coming up, this was the perfect time to change the oil.  Engine oil has the primary functions of lubricating and cooling the inside of the engine, and plays a major role in maintaining the engine in proper working order.  Changing the engine oil on the FJ Cruiser is an easy maintenance activity that will extend the life of your rig’s engine more than just about anything else you can do.

What will you need to change your oil:

  • 5.5 quarts Oil
  • Oil filteradding amsoil engine flush
  • Oil plug gasket
  • 14mm socket
  • Oil filter wrench
  • Oil drain bucket
  • Empty soup can (tomato is my favorite)
  • Engine flush (optional)
  • Latex gloves (recommended)

Since the rig’s odometer reads over 50K we decided to clean the engine from the inside out with Amsoil’s Engine Flush.  It doesn’t get much easier than this; just pore the contents into the engine and let the rig idle for 15 to 20 minutes.  Than change out the oil as normal.

draining fj cruiser engine oilIt is best to change the oil when the engine is warm.  This will help suspend the muck in the oil and allow everything to flow out smoothly.  This also means you need to be careful since everything is hot.

The first step is to remove the oil drain plug (fancy name for a bolt and gasket) with a 14 mm socket.   Be sure to have your oil bucket ready and a couple pieces of cardboard under everything will keep the mess to a minimum.  After the oil starts flowing is a good time to take a break…  come’on you’ve been working hard and the oil will take a while to completely drain.

fj cruiser oil filter removalWhen the oil is coming out in only drips, remove the oil filter.  The oil filter may still contain old dirty oil that will run out when you remove it and this is where that soup can comes into play.  Hold the soup can under the oil filter assembly to catch the oil that flows out. The assembly has a little tube that allows for you to hook up a hose and drain the out flow to your oil catch bucket, but a old soup can held in place works too.

STOP…  get back under the rig now and using a new oil plug gasket, put the oil drain plug back into the oil pan (Toyota recommends 30 ft / lbsf torque for the oil drain plug).   You really don’t want all that fresh oil running down the driveway.

adding amsoil to fj cruiser engineWith the new oil filter in hand, take a dab of fresh motor oil and wipe it lightly on the oil filter’s rubber ring seal.  Screw the new oil filter onto the union (fancy name for the hollow tube the oil filter attaches to) by hand.  Be careful not to get the oil filter cross threaded on the union.  This is a good time to wipe down any oil that may have spilled and double check that the oil drain plug is in place.

The Toyota owners manual will tell you the oil capacity is five and one half quarts, that’s 5.2 liters to you and me.  Now depending on your aim you may want to use a funnel to minimize the mess when poring the motor oil into the oil fill spout.  Toyota recommends SAE 5W-30  weight motor oil.  Thanks to Beau we upgraded with AMSOIL Signature Series 0W-30 100% Synthetic Motor Oil.   AMSOIL Signature Series claims an extended life with recommended changes at:fj cruiser dip stick check

  • Normal Service (personal vehicles frequently traveling greater than 10 miles (16km) at a time and not operating under severe service) – Up to 35,000 miles or one year, whichever comes first
  • Severe Service (turbo or supercharged vehicles, commercial or fleet vehicles, extensive engine idling, first and subsequent use of AMSOIL in vehicles with over 100,000 miles, daily short trip driving less than 10 miles (16km), frequent towing, plowing, hauling or dusty condition driving) – Up to 17,500 miles or one year, whichever comes first

Once you pour in the 5.5 quarts of oil and replace the filler spout cap, start the engine and allow the rig to idle for a minute, than turn off the rig and check the engine oil level.  The correct way to check the oil level is to park the rig on level ground, allow it to sit for a minute, remove the dip stick, wipe the dip stick off with a clean rag and re-insert it as far as it will go.  Pull out the dip stick and read the oil level.how to read engine oil dip stick

The final thing to check is for any drips coming from the oil drain plug or oil filter.  It’s not likely but a second look is well worth it.

When changing your own oil, don’t forget to check the other fluid levels (brake, power steering and coolant)  and top off the windshield washer fluid.  This is also the time to change the engine’s air filter and check your tires’ air pressure.

fish out of water

Big Breath, Hold It… Hold It…

fj cruiser air filtersOk, Let it out…  and breath.  How to change your Toyota FJ Cruiser’s engine and cabin air filter.

Here are the filters needed:

When your FJ Cruiser can’t draw in the fresh air it needs, your engine runs less efficiently, gas mileage plummets and horse power evaporates.

The easiest way keep your engine running at peak performance is to regularly check the air filter and change it when it becomes filled with dirt and debris.

Depending on where you live, how you drive and where you take your rig off-road, your maintenance schedule including the engine’s air filter can change.  At a minimum, the air filter should be checked with every oil change and replaced (or cleaned if its a reusable filter) every 8000 miles.

The lessor known and often over looked cabin filter should also be replaced.  A dirty cabin filter can contribute to the pollution circulating inside the rig and place an unneeded stress on the air condition unit which may work over time trying to cool the interior.

Luckily for FJC owners, the factory engine and cabin air filters on the FJ Cruiser are one of the easiest maintenance items to perform.  Each takes only a couple of minutes and with a little on-line shopping, an FJ Cruiser engine air filter can cost less than $15.fj cruiser engine air filter clips

Starting with the engine’s air filter the steps are:

  1. Lift the hood, locating the air filter housing and the two clips that hold it in place.
  2. Flip the two clips open releasing the air filter housing and allowing you to pull it away from the engine and exposing the air filter inside.fj cruiser engine air filter in air box
  3. The filter, although fitting snugly inside the housing, lifts directly out.
  4. After pulling out the old dirty filter, simply drop in the new clean one into the housing.
  5. slide the housing back into place and re-secure the clips holding the air filter housing to the engine.

That’s it. Your done.  Really…  Two minutes tops and your engine will thank you, it can now pull in all the air it needs to achieve the most effective air fuel mixture creating the combustion that will power the rig at peak performance.fj cruiser glove box stopper locations

Now that you mastered the engine air filer and are on a roll it is time to move to the interior.

  1. The FJ Cruiser cabin air filter is hidden behind the glove box. Remove the glove box by unclipping the hinge pin and than pressing in on the sides of the glove box as it lowers down past the stoppers.fj cruiser cabin air filter compartment
  2. The cabin air filter is inside the fan housing that is now exposed.  By pressing the two clips on the face of the fan housing will you can remove the filter tray.
  3. Remove the old filter from the tray and replace it with the new one.  The filter is flexible and will slide under the retaining clips on the tray.new fj cruiser cabin air filter
  4. Place the filter tray back into the fan housing
  5. Replace the glove box.

That is all there is too changing the cabin air filter.  And depending on how dirty the filter was, you should notice an improvement in the air flow the next time its hot and you need turn on the AC.

You can also save money by making your own cabin air filter.

cv axle insides

IFS Axle Disassembly (Old School)

I don’t always disassemble an IFS half shaft…  But when I do I use kinetic energy. The world’s most interesting Land Cruiser Guy.

It does not happen often, but when you need to rebuild your font axle, its good to know how it all comes apart. Recently Metal Tech upgraded our front end, which involved rebuilding the front axles with longer shafts. While we where there, Mark Hawley demonstrated how to disassemble the front axles. The typical IFS method involves duct tape and a chop saw followed by cutting and throwing away the shaft. Instead of cutting, Mark went old school, calling on trick from the cruiser guys that uses a little kinetic energy release the shaft from the CVC.

For the price of some pipe or tubing you have laying around save yourself the cost of replacing the shaft or rounding up a chop saw.

toyota mass air flow sensor removal

How To Clean A Mass Air Flow Sensor

Toyota mass air flow MAF sensorToday’s sophisticated computer controlled fuel injected engines squeeze a significant amount of horse power out of each combustion chamber.  In order to achieve their maximum output, they need precise input.  That precision involves 14.7 parts air for every 1 part fuel or 14.7:1.

In order to know the correct amount of fuel to pump, the engine must know how much air is coming  in.  Air flow is not a constant. As the rig drives down the trail, through the hot and cold as well as humid or dry conditions air volumes change. Enter the Mass Air Flow (MAF ) sensor. The technical jargon behind the acronym MAF involves a constant voltage passed over two heated wires placed into the airflow.  As the air flows across the the wires, they cool down creating a positive temperature coefficient (PTC).  In other words by measuring the drop in temperature of the wires (or increase in current passing through them) the engine’s computer can calculate the airflow.  To ensure a correct reading the engine’s computer takes into account temperature and humidity as well.

Eventually, dirt and oily film can cook on the wire creating a thin insulating layer of muck.  Periodically, there’s a cleaning cycle where the wires are heated to a very high temperature to burn off deposits. If the deposits remain and engine’s computer sees an air mass value out of range, it sets an error code…  and the dash board lights up like a Christmas tree.

2007 toyota fj cruiser engine bayManufacturers of MAF sensors recommend replacing the sensor, after all they are in the business of selling them.  If you have a few garage tools and about twenty minutes you can clean the MAF sensor, which may solve the issue, if the wires are mucky between cleaning cycles.

Removing the FJ Cruiser’s MAF sensor for a visual inspection and cleaning is a simple procedure.  The first step is to remove the plastic engine cover, by loosening the two nuts up front and lifting the cover off it’s hinge.

mass air flow maf location fj cruiserOnce cover is removed, the MAF is exposed in the front of the secondary air flow box.  Carefully, unhook the wire harness connecting the MAF to the engine’s computer.  To remove the wire harness, depress the clip and give a snug pull on the sides of the connector.  Do not pull on the wires.  If the connector refuses to release its grip, try holding the clip down while sliding a screw driver between the connector and MAF, gently prying  the two apart, careful not to apply too much force (remember plastic exposed to heat, over time can become brittle).

With the harness disconnected, remove the two screws holding the MAF in place and lift the sensor out of the the air flow box.  You can cover the opening with a shop towel to prevent any dirt, bugs or stray bird poop from falling in while you clean the sensor.

With the MAF sensor removed inspect the hot wires for muck.  In order to clean the hot wires we picked up “contact cleaner” from Radio Shack and following the directions, really read the directions… sprayed the hot wires with cleaner.

The contact cleaner we used drys in about 10 minutes and does not leave a film.  After the cleaner has done it’s job, slide the MAF back into place.  You will hear a click as it seats past the O ring on the sensor’s collar.  Screw it into place, connect the wire harness and reattach the engine cover.  Your done.

If you have an Intelligent Tester, you can ensure the mass air flow sensor is operating within spec following the Toyota mass air flow check service bulletin.  We simply made sure the dash board lights didn’t go into hyper-drive when we started the rig and let it warm up.

fj cruiser rear bumper cover top bolts removal

Eyes In The Back Of Your Rig

fj cruiser backup sensorEveryone who owns and FJ Cruiser knows how difficult it can be to judge distance when backing up.  Little cars that sit below your line of site which are impossible to see and make parallel parking hell.  Luckily Toyota added a Toyota parking assist system to tell you when you’re getting close.

Awhile back we ran into a little trouble with our sensor… so to speak… And as a result, needed to replace the back up sensor on the passenger side. After a quick trip to our local Toyota dealer for the part it was time to play back yard mechanic.

With the advent of snap together components, replacing sensors is usually an easy operation.  And this was no different.  In fact we spent most of our time fj cruiser rear bumper cover button snap locationunbolting the plastic bumper cover to get to the sensor location.  All of the bolts can be removed with an 11 mm socket.  A flat head screw driver is helpful for unplugging the sensor coupling as well as the plastic pop snap on located inside the back door edge on the side of the bumper cover.

We started at the bottom and worked our way up.  Note: We removed the metallic bumper cover so we could pull out the black cover further for pictures. You should be able to leave it in place and simply remove to screws holding the back bumper cover on the bottom side. There are a total of six bolts holding the bumper cover to the underside of the bumper.  Four along the base of the bumper and one on each back corner.  These last two are set into little plastic clips and keep the bumper corner covers in place.fj cruiser rear bumper bottom bolt removal

You will have to open the back door to access the four bolts on the top of the bumper cover.  You will also find a sneaky little button fastener where the bumper cover wraps into the back door.  A flat head screw driver will lift it out easily.

The old cruisers had panels welded and riveted in place.  Enter the era of ABS plastics.  To remove the bumper cover after you’ve unbolted everything and pulled the little button snap; follow the cover around the corner where it meet up this the fender and give it a strong, even pull away from the truck.  It is held in place with ABS plastic snaps that will release their grip with a little force.  Since we were only replacing one of the sensors we only removed the passenger’s side.fj cruiser rear bumper side cover removal

Now it was simply a matter of pulling the cover away from the bumper enough to unplug the old sensor, slide in the new one and connect it to the two wire plug.  It really is that easy.

After hooking up the sensor and before bolting it all up, we tested the sensors to ensure everything was connected correctly.  Even though we only replace one sensor, we check both to make sure we had not pulled any wires loose in the process.

fj cruiser backup sensor wire connectorOnce we were sure every thing worked, it was simply a matter of buttoning it all up with the bolts we had removed four on top, six underneath and that one little button snap.

The backup sensors help you gauge distance but will never substitute for using your mirrors and knowing what is behind you before you put it into reverse.