Category Archives: 4×4 Tech

How to fix, maintain or modify your off road adventure truck is here. We also discuss gear and how it holds up out on an adventure.

toyota fj cruiser adding rear differential oil

Changing Rear Differential Oil On The FJ Cruiser

toyota fj cruisdr rear differentialThe gear oil in your rig keeps friction to a minimum and ensures the long life of your differential gears.  Changing the oil in the rear differential is an easy maintenance activity that keeps your off-road rig motoring forward, saves money and allows you to learn a little more about your 4×4 adventure vehicle (you never know when that knowledge will come in handy on the trail).

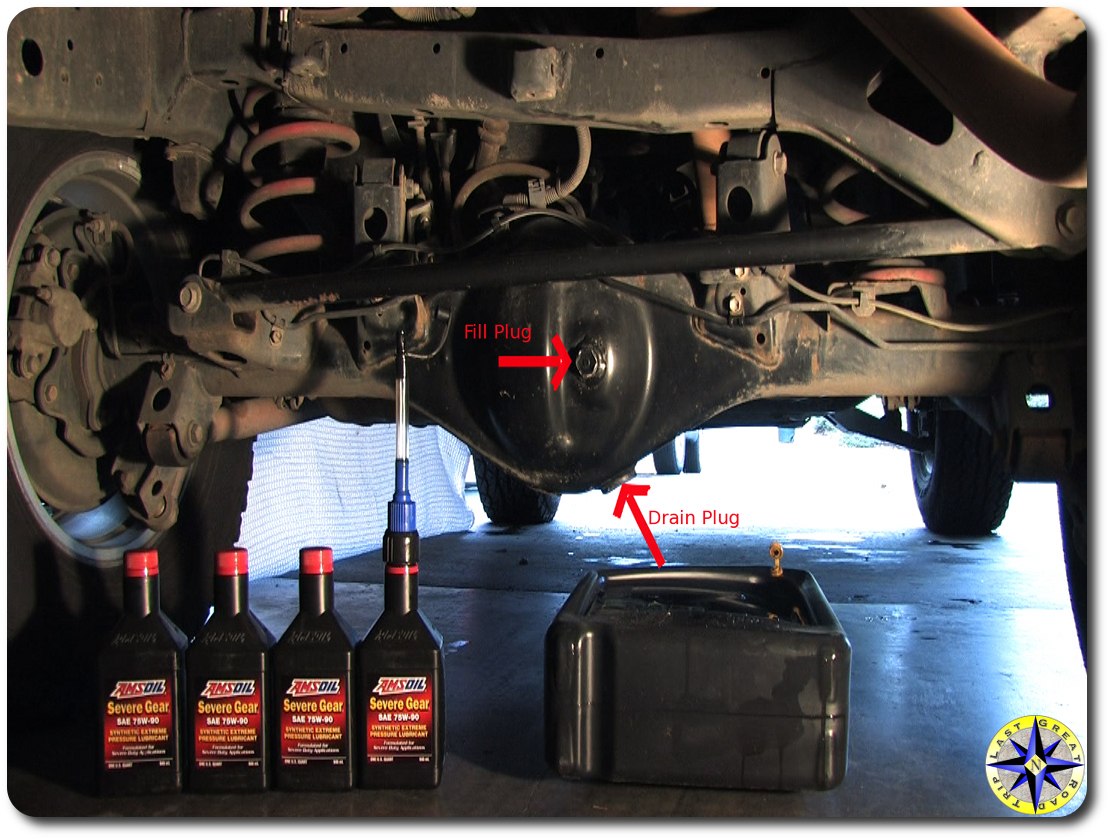
The first big decision is what oil to use. The Toyota maintenance manual for a 2007 FJ Cruiser specifies: Hypoid gear oil APL GL-5. We went with Amsoil Severe Gear SAE 75W-90 synthetic extreme pressure lubricant, formulated for sever duty applications.  Our FJ Cruiser is equipped with an e-locker which means it requires between 3.01 and 3.12 quarts to properly fill the rear axle housing.

The other item to pick up before you get started are new drain and fill plug gaskets (part# 1215710010).  Unless your on the trail working a field repair, don’t try save a few bucks by reusing these little items.  (Get a complete set of FJ Cruiser differential and transfer case gaskets they will also fit you Lexus GX470 and 4Runner)

Most back yard mechanics will have the tools required to perform this simple activity.  The tools you will need include:

Ok enough shop talk and prep…

Put the rig on a flat level spot to ensure good draining and proper refill. Tip: clean the axle housing with soapy water and a scrub brush to remove the road and trail gunk.  This will prevent any dirt from falling in to the differential while changing the oil.

Using a 24mm socket remove the fill plug located in the middle(ish) of the rear axle housing.  By removing the fill plug first the housing will be able to breath allowing the differential oil to drain more quickly.

With the oil catch pan in place remove the drain plug, located on the bottom of the rear axle housing, using a 24mm socket. If your going to use gloves, this is the time to wear them.

toyota cleaned differential drain and fill plugs
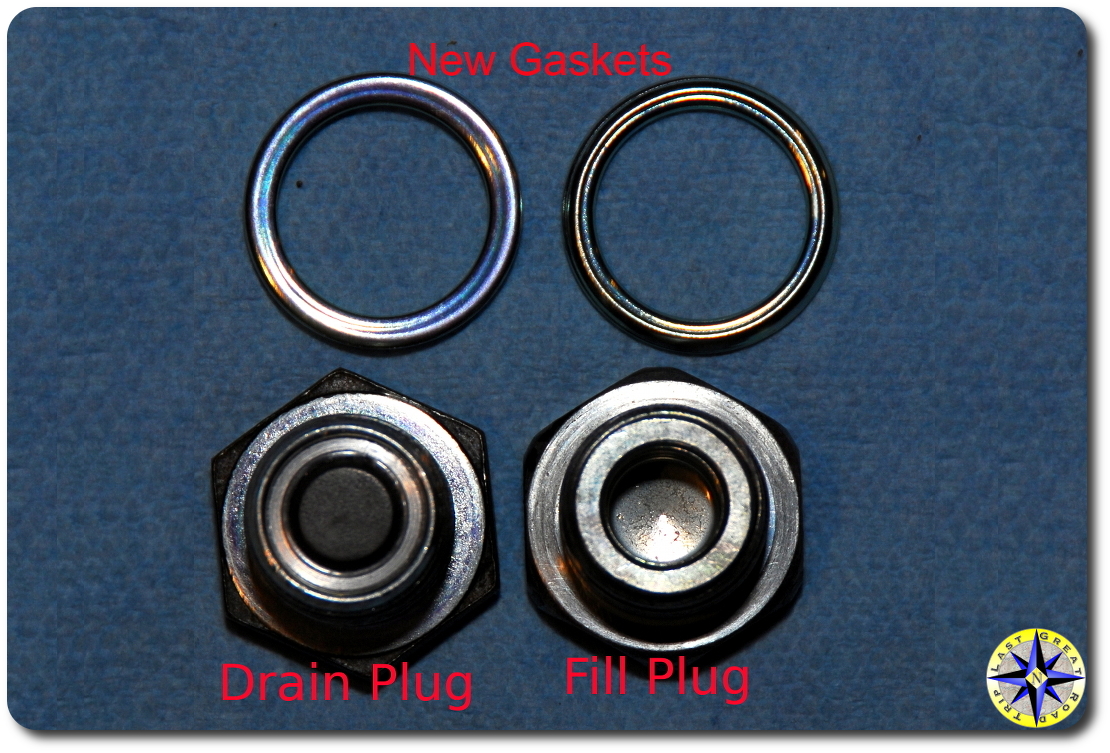
The drain plug has a magnetic insert designed to attract and hold tiny metal shavings that become suspended in the oil.  Yes these are little bits of your gears.  Inspect the drain plug checking for any chunks and observe how much has accumulated.  This will give you an idea of what has been going on inside your differential.

Even with the fill plug removed, it will take a while for the oil to completely drain, which is good since it will give you time to grab the shop rags and clean the plugs, removing all the gunk and accumulated metal shavings.  When your done the plugs should be clean and dry.  Don’t forget which is which.

Once the oil is fully drained, wipe the area clean and re-insert the drain plug (Be sure to use the correct plug) with a new gasket and hand tighten.  Set the torque correctly on your torque wrench and tighten down the drain plug.  The Toyota maintenance manual states the torque specifications for both the drain and fill plugs as 36 foot pounds for our 2007 Toyota FJ Cruiser.

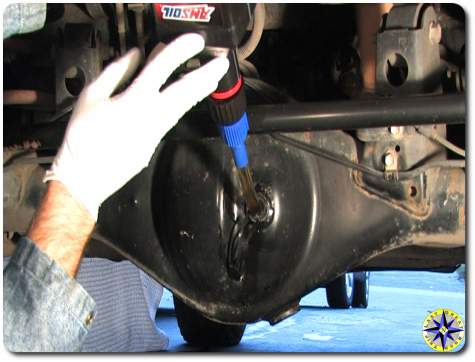
Remember that funnel with flexible tube?  Getting the oil out of the bottle and into the axle housing through that little hole can be tricky.  One of the advantages of the Hopkins FloTool 10704 Spill Saver Measu-Funnel is that the flexible tube funnel cap will screw directly on to the Amsoil quart bottles.  The cap has an open and close position preventing spills as you position the bottle and hose into place.

Squeezing out three plus quarts of thick 90 weight through the tube and into the axle housing will take awhile so get comfortable.  It works best if you give the quart bottle a few long squeezes and than allow air to flow back into the bottle followed by a few more good squeezes.toyota fj cruiser rear differential fluid level

Checking the fill level on flat ground is easy.  The oil should barely begin to run out or just about to run out (within 5mm of the fill opening).

Hand tighten the fill plug and new gasket followed by torquing down the plug to Toyota specifications (36 ft.*lbf for the 2007 FJ Cruiser).

Give everything one more wipe down and check for leaks followed by a drive around the block.  Double check for drips and leaks when the test drive is complete.

There comes a time in every rig’s life when it’s gear oil needs a change to keep all the gears turning smoothly.  Changing the rear differential oil on a Toyota FJ Cruiser is a simple maintenance job anyone can do with a little know how and about 60 minutes.

Be sure to change the gear oil in the transfer case as well. Learn how with our step by step transfer case oil change video.

swr meter CB radio test setup

Can You Hear Me Now…

cb antenna quick release spring baseCommunication when off-road is key to safety and fun.

The most popular method of trail communications has to be the CB radio. Available at almost every discount department store, a CB radio setup provides good vehicle to vehicle coverage while on the trail.  On outings with many off-road clubs, a CB is mandatory if you plan to participate in a club-sponsored ride.

If you ask Hula Betty, she will tell you there is one universal truth about me…  No matter what, and I really mean it, no matter what, I will forget one thing when I go on an off-road adventure.  And for a while the one thing was a CB antenna which meant I would have to stop along the way and pick one up.  On the good side this has given me a nice collection of CB antennas and an opportunity to try them all out.

The line up includes:

CB radio antennas have two functions…

  1. Capture radio frequency waves and convert them into electrical signals
  2. Radiate out radio-frequency signals, which is done best when the length of the antenna precisely matches the wavelength of the transmitted radio frequency (1 – 40)

CB antenna flexIf they all do essentially the same thing is there a difference in CB antennas you ask. CB antennas come in various sizes, flexibility and with different methods of fine tuning their efficiency.

A CB radio can broadcast for miles but it is based on line of site.  For this reason we use a four foot antenna which mounted on our rear door hinge stands above the roof and any stuff packed in the roof rack giving it a clear view of the horizon in every direction.

SWR (standing wave ratio), is a measurement of how efficiently your antenna system will radiate the power available from your radio. In simple terms, your radio would like to radiate all of its power, but can only do so if the other components cooperate. Bad coax and mounts, inefficient ground plane or poorly tuned antenna can cause system backups.  CB antennas need to be tuned to be as efficient as possible and by setting your antenna’s SWR you reduce the restriction of radiated power. The easiest way to understand the concept is to think of it in terms of water flow. That is, if you put a nozzle on the end of a fire hose, your potential output will be restricted by the outlet and water pressure backs up into the pump. Tuning your antenna opens the nozzle to full.  Poorly tuned antennas restrict the flow of the output frequency and can cause damage by backing up all that power into the CB radio.firestik designer CB antenna

If all radios only transmitted on one channel, it would be a much easier task to design antennas. As it is, there are 40 CB channels to contend with.  CB antennas can only be made to resonate at one specific frequency (channel). The goal of the antenna manufacturers is to build the antenna to resonate at a frequency in the middle of the band (channel 19) and make it broad- banded enough to keep the other frequency’s related SWR at the two extreme ends (channel 1 and Channel 40)  of the band below 2.0:1.  Since each radio system is unique, the final tuning is left to you.  How you go about fine tuning your antenna varies slightly.

firestik II cb antenna tuningThe three models of antenna we now have, are all four feet long with adjustable tips.  Because the antennas stick up high, they run into low branches, overhangs and ferry boat cross beams.  The Wilson flex-4 is designed to bend when it encounters solid objects.  In fact it can double back without cracking or breaking.  The K40 and Firestik requires a spring base that allows the antenna to fold back instead of splintering the fiberglass.  When properly adjusted they all broadcast and receive radio signals well. But here is where they seem to differ the most to us.  The K40 requires a small allen to make adjustments.  The Flex-4 requires a small screw driver for adjustments.  The Firestik uses a turn screw that can be adjusted by hand.  Once you have your antenna dialed in for your CB radio you should not have to worry about it again.

So how do you fine tune you’re CB antenna?  You need a SWR meter, which you can pick up from Radio Shack.  You may want to check with your local 4×4 club to see if anyone there has a SWR meter you can borrow.

You need to understand two basic points before adjusting the length of your antenna (fine tuning it):

  • If the SWR on channel 40 is higher than that on channel 1, your antenna is too long.
  • If the SWR on channel 1 is higher than that on channel 40, your antenna is too short.

Start by finding a suitable location to park your rig. There should be no obstructions, such as trees or buildings, within 10-15 meters of your antenna.  Make sure that you’re inside the rig with the doors and windows closed to ensure an accurate reading.  It is important to have your antenna properly grounded to your rig or it may not operate at all.

IN GENERAL HERE IS HOW YOU FINE TUNE YOUR ANTENNA (follow the directions for your specific SWR meter).

Hook up the SWR meter. Disconnect the coaxial cable from the back of the radio. Reconnect this end of the cable, which leads back to the antenna, to the SWR meter in the slot marked “antenna” or something like that.   Use the jumper lead and connect your radio and the SWR meter through the connection marked “transmitter”or something like that.  You are placing the meter between the CB and the antenna.

  1. You will initially calibrate the meter for your system. Set the switch on the SWR meter to “CAL.”
  2. Turn the radio the Channel 1 (40 on the second pass).
  3. Key the microphone (depress the button and hold it) but do not speak into the microphone.
  4. Turn the knob on the SWR meter labeled “CALABRATION” until the needle reaches the setting position at the end of its range.
  5. Release the transmit key.
  6. Set the function switch to “SWR”.
  7. Key the microphone again without speaking into the microphone.
  8. Quickly record the reading on your SWR meter and release the transmit key on your microphone.

You are now going to repeat this process for channel 40.

Depending on your readings, lengthen or shorten the antenna appropriately and repeat your tests.  Make small adjustments as you work to optimize your antenna and remember:

  • If the SWR on channel 40 is higher than that on channel 1, your antenna is too long.
  • If the SWR on channel 1 is higher than that on channel 40, your antenna is too short.

The objective behind tuning your antenna is to make these two readings identical or as close as possible. Getting down to a ratio between 1.5:1 and 2.0:1 will produce an excellent broadcast signal that will not harm your CB radio and broadcast clearly across all 40 CB channels.

If you only communicate on one or two adjacent channels anywhere within the band, you can tune your antenna to achieve optimum performance on those channels.  However, most people prefer to use the entire bandwidth when tuning.

This procedure can sound a little cumbersome, but fine tuning your rig’s CB antenna only takes a few minutes and is vital in protecting your CB Radio and optimizing its performance .  Each antenna manufacture claims they have power output improvements and other performance enhancements that set them apart.  We found them all to operate the same on the trail when tuned correctly.  Of course it could be our set up and this is not a scientific test by any means.  Can you hear me now.

Toyota fj cruiser splashing muddy water

Falken Rocky Mountain ATS Review… Be Brutally Honest!

falken tires fj cruiser rockThe folks over at Discount Tire asked us to put a set of Falken Rocky Mountain ATS to the test and then be brutally honest in our review.  It’s a tough job but somebody has to do it!

Every tire carries a wealth of information…  the industry’s own version of truth in manufacturing.  To make informed tire choices you need to understand the ABCs of the tire industry.   A quick read of Discount Tire’s tire dictionary will give you a big leg up when comparing tires.

Some tire facts of the Falken Rocky Mountain ATS we tested: LT285/70R17D1 121S B

  • type- light truck
  • size – 285/70/17
  • construction – radial
  • plies – D (8 plies)
  • load – 121 (3,197 lbs)
  • speed rating – S (up to 112mph {don’t try to test this one})
  • temperature grade – B

In order to run these tires through a real world situation we opted to have the guys at Discount Tires mount up our 285/70/17 on stock rims with traditional lead weight balancing.   Our rig is part hard core 4×4 trail rig, part overland explorer and come Monday, daily driver.   That means these Rocky Mountain all terrains need to balance performance across all sorts of driving conditions.  The first thing we noticed is these tires look good on the rig.  Rugged, multi-angled grooves and blocked tread with a 50,000 mile warranty… But can they dance when the when things get a little dirty.

To us, all terrain means dirt, rocks, mud, hills, washboard gravel and water.  In order to tackle all these conditions we aired them down to 25 psi and hit the trails of the northwest.  On loose dirt and rocks where gravity pulls downhill, the tires maintained a grip on the ground without sliding, allowing our gears to work their magic and keep the rig motoring under control down the hills.

falken rocky moutain ats total chaos long travelOne of our favorite thing is to bomb down the old logging road (not so closed course and definitely not a professional driver). Opening it up on the gravel, the Rocky Mountain ATS’ felt confident as we zipped through the corners and raised a little dust.

When you think 4×4 adventures and off-road driving, climbing over stuff in the way is usually what comes to mind.  We motored over to the rock garden in order to see how the Falken tires held up to the boulders.  Even with mud all around, the all terrains grabbed and climbed up rocks as they contoured to the obstacles allowing us to keep a controlled forward momentum.

With all the dirt it was only a matter of time before we looked to wash off the rig and the north west has plenty of puddles to “clean up” in.  The tire’s aggressive tread design shed water and found traction in the mud below letting us make a big splash on the trail.

After a day of wheeling trails, we can honestly say Falken’s Rocky Mountain ATS are a strong tire capable of living up to its all terrain designation.

falken rocky mountain ats turning on top big rockAnd what about daily driving?  We put 2,000 miles on these tires in a short two weeks.  Think four trips from Seattle WA. to Eugene OR…  Hula Betty just started university.  The rig covered wet high ways, worn down city streets  and pot hole filled back roads.  With that much travel, we appreciated the smooth quiet ride and sure footed grip, especially at 70+ mph on the wet pavement… Have you driven I5?  It’s a high speed trucking route where cars are allowed as long as they stay out of the way.

Balanced on and off road performance along with daily driver comfort makes Falken’s Rocky Mountain ATS a good choice for anyone interested in a tire that will play hard on the weekend and show up for work come Monday.

Guess our first impressions of the Falken Rocky Mountain ATS were right… Who Knew.

bowl chorizo sausage stew

Hungry Man Off Road Adventures

bowl chorizo sausage stewA big part of our off-road adventures is getting to camp in the middle of no where under the stars.  Years ago that would have meant a staple diet of Top Romen.  Since then we’ve stepped up to more gourmet fair.

There are lots of high quality ingredients that can be pulled together to make a gourmet one pot meal without resorting to expensive dehydrated pre-packaged backpacking meals or raiding the Army Surplus for cardboard tasting MREs.  A few simple tricks and you can create a favorite dinner of ours, spicy black bean chorizo chili.

  • 1lb ground Mexican chorizo sausage
  • 1 egg
  • 1 quart spicy black bean soup (we like Pacific Natural Foods)
  • 16 oz canned black beans
  • 12 oz frozen corn kernels
  • 4 oz can of diced mild chiles
  • hand full of diced Nopalitos cactus (try Nopalitos – Tender Cactus by Dona Maria)
  • spices (this is just a suggestion…  we like it spicy…  keeps the mosquitoes at bay)
    • dried minced onion to taste about 2 tablespoons
    • dried garlic flakes to taste about 1 teaspoon
    • ground cumin to taste about 1 tablespoon
    • ground oregano to taste about 1 teaspoon
    • fresh cilantro to taste about 2 tablespoon
    • ground chipotle to taste 1/4 teaspoon

Pre-trip food prep makes gourmet meals on the trail much simpler and manageable when the light is fading and you’re hungry.  Start by finely chopping the cilantro.  In a medium mixing bowl lightly beat the egg.  Add in the cilantro and chorizo kneading it all together.  Keeping fresh ingredients from spoiling on the trail takes nothing more than a small cooler and a  source of cold.  Put the sausage mixture into a zip lock bag…  and FREEZE it rock hard, it will be its own source of cold.

Dice up the nopalitos and place them along with the rinsed beans, corn, and chiles into a zip lock bag and freeze it as well.  Put the remaining spices into a zip lock bag (no you don’t need to freeze the spices).

On the morning of your off-road adventure pull everything out of the freezer and put it into the cooler (don’t forget the spices).  By the time you reach camp that night and are ready to cook dinner, they should be thawed out…  put a couple of cold beers in the cooler and you wont need ice to keep everything cool.

Cooking it all up…  We do this all in one pot over a camp stove.  If you’re adventurous you can try it over a fire.  In a pot over medium heat brown the sausage.  You can drain the grease but why…  everyone knows camp food has no calories, is healthy and good for you…  no matter what.   Once the sausage is browned, add the bean soup, corn, chiles, beans, and nopalitos, along with the spices.  Allow it all to simmer for 10 minutes or so stirring every once in awhile.

Serve it up in a bowl with blue corn tortillas chips.  That is all there is too it. A great one pot meal that will make you a rock chief with all your friends on your next off-road adventure.

Serving tweaks:

  • Top a little crumbling cheese, Queso Fresco or Panela
  • Serve over cooked brown rice
  • Line bowl with a corn tortilla and server chili on top
  • Dab of sour cream on top
2011 toyota fj cruiser driving

Rumors Of Its Death Are Highly Exaggerated (2011 FJ Cruiser)

Since the introduction of Toyota’s FJ Cruiser  in 2006 (it was called a 2007), rumors run rampant that THIS was the last year of production.   With forum poster trying to impress others with their insider scoop of the rigs demise, its death has been declared again and again.  Yet each year Toyota has continued to release a new model year.

Toyota has announced the 2011 FJ Cruiser (FJC) will be coming off the assembly line.  A couple of notable updates for the 2011 model year include:

  • Two new colors
    • Calvary Blue
    • Quicksand
  • New Trail Teams Special Edition in Army Green
  • New Audio Systems, Including  Available JBL Premium System
  • Standard Locking Rear Differential (standard on manual transmission/ optional for automatic)
  • Improved Visibility and Rear Seat Access (Didn’t know it needed improvement)
  • Standard iPod® Connectivity and XM Satellite Radio

Out of the box the FJC 4×4 has ground clearance of 9.6 inches, 260 hp @ 5,600 rpm, 271 lb-ft @ 4,400 rpm, dual transfer case and a 41.84:1 crawl ratio making it a capable trail rig.  In fact for 2010 Consumer Reports put the Toyota FJ Cruiser at the top of its “Best Off-Road” vehicle list.

If you want the full scoop on the upcoming 2011 FJ Cruiser take a look at the Toyota 2011 FJ Cruiser product information from Toyota’s press room.

We’re glad to see the rig is maintaining its funky style, white roof and solid off-road performance. And while it’s not voodoo…  the new blue is pretty sick.

No idea how long Toyota will continue to produce this rig but we are sure it will be produced in 2011.

UPDATE: Toyota announced in 2013 that 2014 is the last year of production of the FJ Cruiser for the U.S. market. With thousands of Toyota FJ Cruisers on the road there will be plenty of them around for years to come so that everyone can continue to use them for what they were intended, off-road adventures.

fj cruiser total chaos long travel falken rockie mountain tire

Falken Rocky Mountain Tires First Impressions

discount tire mountingAfter 65,000 miles it was time for some new tires…  These things don’t last forever you know.  Take a quick tour of the Internet and you quickly discover there are lots of choices out there so we had some decisions to make.

The Blue Bunny is part daily driver, part extreme off-road rig and part overland explorer which means we needed a tire that feels at home in all sorts of conditions including the rain and snow of the pacific northwest.  With this in mind we decided to turn to a pro and give Travis over at Discount Tires a call…  Ok really we just emailed him since it was 2:00 am, but let me tell the story in my own way.  After a few email exchanges back and forth as well as a real call to discuss what we wanted out these tires Travis had a suggestion for us.  He had just returned from the 2010 North America JK Experience where he had seen tires put through their paces in the one of the toughest Jeep challenges anywhere.

Newly developed by Falken the Rocky Mountain ATS tire delivers tough off-road traction while at the same time providing highway comfort and handling. Rugged design and long tread life makes it an exceptional value. Our 285/70/17 size (Rocky Mountain is available in 15-inch to 20-inch sizes) feature a 3-ply sidewall construction for great off-road durability.discount tire spin balancing

Some of the features Travis pointed out included:

  • Four wide, aggressive multi-angled grooves for clearing out water, mud and snow
  • Block tread edges providing solid traction and control
  • Smooth quite ride (remember the Blue Bunny still serves daily driving duties)
  • Two steel belts and 3-ply sidewalls for protection and strength
  • 50,000 mile tread life warranty

Now as everyone knows, tires are only as good as the dealer who stands behind them.  Discount Tires has 750 stores in 22 states making it the world’s largest independent tire and wheel retailer today.  These guys will also drop ship tires directly to your doorstep if you plan on mounting them yourself or at another local tire shop.

tightening lugnut on new tiresWe headed down to our local Discount Tire dealer in Bremerton, WA. where Nick and the guys took care of us.  One of the cool things about showing up with a handful camera gear is that it gets you into places that are normally off limits.  With the rig in the bay we got to go back and see everything as the guys quickly went to work.  Sure on the trail you can break a tire bead and pull it off a wheel with a hi-lift jack but when professionals mount tires they get to use all the cool tools.

In no time the guys had the new rubber mounted on our original stock rims and were throwing them on the balancing machine.  You really do have to credit the guy who figured out how to apply centrifugal force and computers together in a way that would perfectly balance all that alloy and rubber.

Ok I know I’m gushing a little but really the crew there was great.  We chatted about some of the adventures we’d been on and a couple still in the planning stages.  We talked tires… go figure…  and got to see how it all works behind the scenes.  While this wasn’t an NASCAR pit time, they did have us in and out in less than thirty minutes.  And remember that stand behind the tire thing.  These guys warrant their tires from any of those 750 stores across the country.east bremerton discount tire staff

The first thing you notice…  dang these are smooth and quiet on the highway…  For a while now I thought I’ve been loosing my hearing having to crank the stereo up to obscene levels to hear it over the road noise…  But no more.  I can now enjoy the stereo and carry on a conversation cruising down the highway.  They also hold the road well and let us carve through the corners without worry…  Remember though we are in a rig not a Porsche so our carving is relative…  but it feels good through the corners.  And on a short jaunt down some two tracks the tires responded nicely.  Not to mention they look pretty sick on the rig.fj cruiser new falken rockie mountain tires

Of course we plan on putting these Falken Rocky Mountain ATS through more serious off-road tests soon and we’ll let you know how well they hold up to the trails, mud and snow.  Look for a longer term review soon but for now these are looking like a good all-terrain choice.

—– follow up —-

Well after a bunch of miles we put up the results of our Tire Test of Falken Rocky Mountain All-Terrains.  Check out the video and write up for more info.

fj cruiser RAM mount laptop

Putting The Mobile Into Mobile PC

fj cruiser RAM Mount baseWhen we last left our off-road adventure heroine, Hula Betty had just put together a mobile GPS command center. For a test run, throwing the laptop on the front seat was fine but having the brains of the navigation center bouncing around on the trail is no way to go through life.  Turns out for my birthday, Hula Betty came up with a solution.

A local northwest company called RAM Mounts makes all sorts of cool gadget attaching stuff…  and by attaching stuff we mean just about anything to anything.  The anything that caught our eye was the vehicle based laptop mount, although the articulating, swivel beer can mount for kayaks is pretty cool too.

RAM Vehicle Laptop Mounts are designed to install quickly without drilling any holes.  They accomplish this feat of marvel by having a unique base plate for each vehicle that ties into the bolt pattern of the front seat.  The rest of the mounting uses common components letting you mix and match or move from one rig to the next (provided you have base plates for each).fj cruiser RAM mount components

Installing the RAM Mounts is just as easy as they say.  Remove the two front bolts holding the passenger seat in place, bolt in the RAM Mounts base with the new bolts than together the rest of the components.

These guys make a number of different components for holding your laptop in place and we decided to keep it pretty basic.  We can always add the map light, note pad try or power caddy down the road.  Our base set up included:

  • Universal laptop mount tray
  • 8″ telescoping pole top
  • Telescoping pole base
  • Double swing arm with socket arm
  • Toyota FJ vehicle base

RAM mounts accessoryTo keep thing stable and secure when the rig is off camber or bombing down a washboard dirt road we added:

  • Laptop screen support
  • 24″ support leg

When its all together our laptop is held securely in place and manages to take the bumps in stride although it doesn’t leave much room for a passenger.  However when not in use, pull the laptop mount try and the swing arm folds out of the way allowing for a passenger to stretch out.

The 17″ laptop we built our mobile GPS command center around is heavy but the RAM Mount keeps it in place.  The double swing arm allows us to adjust the laptop’s location and angle to ensure proper placement.

Perched up at dash level you can easily glance over and see position, speed, and altitude.  Adjust the position for quick reach to move between maps  or lower the laptop screen when not in use.

When we first set the laptop in place we found  the larger 17″ screen had a tendency to block the view of the passenger side mirror.  A couple of adjustments swinging the arms around and the laptop seemed to settle in a spot that kept the mirror and system in view.

Simple, strong and a nice finish make our new laptop mount a nice addition to our rig and we’re sure to be putting it to the real test soon.

Tango software Install

Adventures Are Not On Any Map (but a good GPS doesn’t hurt)

map and compassI like maps!  I’ll spend hours in map stores, looking, touching, smelling maps, planning off-road adventures.  Maps are great!

I like maps… But I love technology.  Now before you scream about technology on an off-road adventure failing, breaking, getting dusty and wet or  how the battery can die off, I always carry hard copies of maps stored water tight with a compass…  and I know how to use them.

In order to get a technology fix we decided to build our own mobile satellite GPS tracking command center that can be loaded up with high quality maps of areas we want to explore.  Sure we have Brenda our Garmin GPS (or a close facsimile of her following the 2009 abduction incident), but we wanted something we could load trail routes into, create tracks, pin point ourselves on multiple maps and display higher resolution of 4×4 trails.  Turns out it is not that hard to take an old lap top, some open source software along with a few bits and turn it into GPS Central.

When we set out to build our GPS system we had a few requirements for this build:

  1. has to be cheap or better yet… free
  2. must work with maps from several sources
  3. maps must be free and unencumbered by copyrights
  4. needs to be capable of working on-line or off line (sure the internet is in Chicken, AK. but some of these places are still passing messages by carrier pigeons)
  5. easy to use, easy to read, easy to zoom in tight, easy to zoom out big, easy, easy, easy

With our requirements in hand the first thing to do was decide how to make it all happen.  This is where we insert a big thank you to Jeff Baker from the NWFJCC.  We rode his technical coattails all the way on this mod.

Following Jeff’s lead we made a list of needed stuff:

  • old laptop
  • Operating system
  • GPS software
  • Waterproof GPS Receiver

The old laptop:  You would be surprised at how easy it is to scrounge an old laptop. Now you’re not going to end up with a 3.4 GHz Hyper-Threading quad proc, quad core, with 32 Gigs of ram, dual 10,000 rpm raid five disk set, HD graphics advanced video engine, or 7.1-channel Dolby audio but check with your techie friends.  You don’t need much for this build and tech guys are always cycling through the latest and greatest, discarding leftovers in their path.  We ended up with an old HP Pavilion.

ubuntu linux osOperating system: the open source movement really began with Linux, a Unix like operating system that came into the world in 1991 and spread through the Internet faster than a leveraged buyout rumor on Wall Street’s trading floor.  While Linux will fly on butch hardware it was designed to run on more modest equipment and is perfect for use on an old recycled laptop. There are several Linux flavors available: RedHat, SUSE, Debian, Fedora, Ubuntu…  you get the picture.  All the distributions use the same basic Linux kernel and than add their own set of libraries, tools and software, packaging it all up under their brand name.  Some of the distributions are commercial but many are free.  In a past life as a software developer, I’ve used many of the different distributions and it is amazing how far they have come with ease of installation, rock solid updates, intuitive desktops, do anything software and geeky cool factor.  Today there are really good distributions that are community supported and free.  Remember requirement number one.

The Ubuntu distribution is simple and quick to install with a desktop that is intuitive.  The interweb (that is for all our Corner Gas Canadian friends) is full of helpful forums and instructions on installing and using Ubuntu so answers to questions are everywhere.  Installing software packages like web browsers, games, DVD players, email, word processing, spreadsheets, picture editors or instant messaging chat,  is just as easy.  Ubuntu is the distribution I always suggest to non-technical folks looking to try Linux.

tango trip mapUbuntu took about 30 minutes to install. Really that was it.  Next task, the gps software that would be the cornerstone of the operations.

GPS software: there are a number of free mapping software packages available out there.  We decided to go with tangoGPS since it was one of the easier ones to work with.  It wont do everything some of the other packages will but it does all the stuff on our list.  A big selling point for us was the ability to work with open source maps (OSM) as well as Google Maps, Opencyclemap and others.  As new map sources become available you can configure tangGPS to use them.  Jeff found one source that takes OSM maps and layers them over GIS Topo maps.  Simply add a new map type in the tangoGPS configuration tab and point to its URI (uniform resource identifier).  In this case it was: “http://mobilemap.petschge.de/topomirror.php?z=%d&x=%d&y=%d”

Each mapping project tends to focus on different aspects when creating their maps such as roads, businesses, trails or what not.  With the ability to use multiple maps you can see your location from different perspectives and verify the information across multiple sources.

When you are connected to the Internet, tangoGPS can automatically down load map tiles (fancy term for little picture) as needed.  These same cached map tiles are than available to you when you are off line.  If you’re not sure of exactly where you will be exploring in a particular area you can zoom out and down load all the tiles of that area.  We downloaded all the map tiles for the Olympia Mountains (about a 1,000 square mile area)…  it took 22 hours and we have a fast connection!  There is are several levels of detail and you can choose to down load some or all of them.

Tango software InstalltangoGPS is one of the applications in the Ubuntu App Manager which means installation is simply clicking on the install button, making it extremely easy to install or remove.  Navigation within and Configuration of tangoGPS are straightforward as well.

There is even a “Friends” option which, if you have an Internet connection, will allow you to publish your location and leave a message to a website letting friends know you’re OK.

When you install tangoGPS, the App Manager also downloads the GPS demon (Unix speak for program) known appropriately as gpsd.  This little demon allows you to hook up and integrate a GPS satellite receiver with tangoGPS.  By integrate I mean plug-in, tangoGPS takes it from there.  With a GPS satellite receiver (or two) tangoGPS locates you on the maps, allowing you to track your movements, create bread crumb trails (record way-points) and view information such as your longitude, latitude, heading, elevation and speed.

It is at this point we hit the wall with free.

usb gps recieverGPS Receiver: Obtaining a GPS receiver required us to crack the piggy bank. If we were going to get the most out of our system this was a must have item.  Fortunately for the little piggy a GlobalSat BU-353 Waterproof USB GPS Receiver was only $37.50.   Certainly there are more expensive receivers, but this little unit worked great.  And with it’s USB connector, integrating it with our laptop couldn’t be simpler.

The GlobalSat receiver came with a little suction cup and has a magnet in its base so you can attach it just about anywhere.

xgps screensAfter plugging in the GPS receiver and starting up tangoGPS everything should just work.  Last great software lie right.  Well it did for us.  If you run into any problems with your receiver or want a view of what is going on with it you can peer into the black hole and eaily test it.  Plug in the GPS receiver and start the GPS demon with the following command: gpsd /dev/ttyUSB0 Than start up the simple viewer called xgps.  You may need to add this program using the Ubuntu app manager if you did not add it when installing the tangoGPS package.  To start the viewer type xgps on the command line.  xgps will display a window showing the satellites available to the receiver, their signal strength and location.  It will also show you the information that gpsd is parsing out.

Getting this all to work sitting on the back deck is one thing, having it work while driving 70 mph down the highway is another.  To put our new GPS system through its paces we decided to drag it with us on a recent off-road camping and fishing adventure .  We loaded the maps from Seattle, WA to Eugene, OR and the areas surrounding the north fork of the Willamette River. The system worked better than expected.  In our test we stuck the lap top in the passenger’s seat with the GPS receiver tossed up on the dash.  The system tracked our every movement, keeping our position centered in the screen, clearly showing details that are lost on the smaller GPS units.  The GPS and maps lined up exactly and with a single mouse click we could zoom in or out without missing a beat.

There is one small issue to get used to with a system like this.  Driving at night, a 17 monitor will illuminate everything around it and more often than not as we passed others on the highway, heads turned as they noticed the glow emanating from the passengers seat.  At the rest stops, several folks would wonder over to get a better look at the system, ask about it and inquire where we were heading.  But this is a small price to pay for a GPS system that can do so much and cost so little.  Now to try it out on a worthy adventure.

fj cruiser driverside spark plug location

Time For A Change Sparky

fj cruiser used spark plugOne of the best ways to avoid trouble on an off-road adventure is to know your rig… inside and out.  One of the best ways to get to know your rig is through regular maintenance.  Toyota recommends changing your spark plugs every 30,000 miles.  Changing the spark plugs on a Toyota FJ Cruiser is a simple activity for any backyard mechanic and a good way to get to know your rig.

A couple of things you’ll need in order to change out the spark plugs includes:

  • 6 spark plugs
  • 12 mm and 10 mm socket
  • spark plug socket
  • spark plug gapper
  • couple of 10″ extensions
  • socket wrench
  • torque wrench
  • 2 flat head screw drivers (very helpful)
  • anti-seize (optional)
  • silicon grease (optional)
  • gloves (sure this is optional but Hula Betty wants to protect her manicure. Mechanic or latex gloves work great)

Spark plugs are the business end of your engine’s ignition system.  Its the spark plugs that delivers the spark needed to ignite the air/fuel mixture.  No spark means no combustion!  Combustion occurs when high voltage supplied by the ignition coil jumps across a small gap between the spark plug electrodes. The high voltage surge from the coil goes down the spark plug’s center electrode and forms an arc as it jumps across the gap. The voltage required to form the spark ranges from 4,000 up to 28,000 volts depending on the spark plug gap, engine load and compression. The spark only lasts a tiny millisecond, but it is long enough to start the burn.  And lets face it, a millisecond is a lot longer than you think about the answer to “would you like another beer”.

Never take for granted that your new spark plugs are properly gapped.  Before you tear into the engine check the spark plug gaps and set them to the factory spec.  For our 2007 Toyota FJ Cruiser the gap needs to be .039″ to .043″.  After you have ensured the gaps are correct it is the time to apply a little (it doesn’t take much) anti-seize to the spark plug threads, if you want.

You will want the engine to be cold before you start so the metal in the heads is not expanded. To begin, disconnect the negative battery terminal cable.  I know lots of folks balk at this step but resetting the stereo and compass after it is all done is a small price to pay for avoiding an electrical short and chasing down a burned fuse.  After all you will be disconnecting the ignition coils on your rig.

Before starting you may want to take a look at this fj cruiser Ignition coil component replacement Toyota bulletin showing you how to remove the ignition coils.  Getting to the spark plugs on your rig will require that you pull a few bits from the engine including the:

  • V-Bank cover
  • Air cleaner assembly
  • Surge tank stay and oil stay plate (little brackets)

You will also need to unplug the hoses and electrical connections to the air cleaner assembly.  Once you have everything removed, the passenger side coils will be clearly visible.  The driver side coils are visible too, once you look past the tangle of hoses.  These hoses can be moved aside when you need.

If this is your first time…  changing spark plugs… get your mind out of the gutter and back on task…  start on the passenger side.  Trust me you’ll thank me later.

fj cruiser engine head ignition coilThe Toyota FJ Cruiser has an individual ignition coil attached to each spark plug.   Disconnect the electrical connector to the ignition coil followed by removing the bolt holding the ignition coil to the engine.  With the connector and bolt removed, lift the coil out.  This is a good time to take a look at the ignition coil and check for cracks in the housing or tears in the terminal boots.

To remove the plug from its hole you will need your ratchet, spark plug socket and an extension.  When you are on the driver’s side you’ll need two extensions connected together to reach in through the hoses you didn’t remove.  It may take a little muscle but the plugs will release their grip and can be lifted out once they are unscrewed.

Now grab one of the new spark plugs you prepared earlier. The spark plug socket has a rubber insert designed to hold the spark plug while you lower it into the hole and thread it.  You will want to carefully thread the spark plug by hand so not to cross thread it.  Once the spark plug is hand tightened, brake out the torque wrench and tighten the plug down to 15 ft/lbs (factory spec for our 2007 Toyota FJ Cruiser).fj cruiser ignition coil

Before placing the ignition coil back into place over the spark plug, add a bit of silicone grease to the terminal boots to keep them conditioned and help form a tight dust seal.  Replace the bolt holding the ignition coil in place.  Remember this is a plastic housing so only torque down the bolt to its factory spec of 7.5 ft/lbs.  Reattach the electrical connector to the ignition coil and your done.  Now rinse and repeat with the other five spark plugs.

Before starting on the drivers side you may want to practice a little yoga and limber up. The driver’s side plug procedure is the same but there are a few helpful hints.

  • Small hands are a benefit.
  • Two screwdrivers may be needed to release the connector from the ignition coil.  One screwdriver holds down the clip while the other gently pushes the connector off the ignition coil.
  • Two ratchet extensions will improve the access to the spark plug allowing you better leverage.

Once you have all the spark plugs replaced, the ignition coils in and the connectors reattached, it is time to button it back up.  This is a good time to wipe down all the parts and remove the trail dirt and grim before reassembly.

Start by replacing the surge tank and oil stay followed by any hoses and electrical clips you may have undone on the drivers side to ease access.  Next place the air cleaner assembly back where it belongs and connect the hoses and electrical connector.  Don’t forget the little vacuum tube in the rear.  Cover it all up with the V-Bank cover and reattach the negative ground to the battery.

Turn the key, listen to your engine come to life and enjoy your success!

New spark plugs about $45, time involved about 30 minutes, the feeling that you get from knowing your rig a little better…

fourtreks hi-lift Jack mounted fj cruiser

Mounting Your Off-Road Adventure Stuff

fourtrek tube mounting componentsLong off-road adventures are all about having the stuff you need to get unstuck, stay safe and remain comfortable.  Some of the most import safety equipment on a 4×4 adventure, a shovel and Hi-lift jack, or fire extinguisher are also the most cumbersome and difficult to store.  And like a teenager reaching for the Clearasil on prom night, you want immediate access to this stuff when you need it.

Solving the storage problem, Fourtreks has come up with an versatile solution for  easily mounting much of your off-road equipment in places that keep it out of the way and easily accessible.  By taking advantage of the tubing on most 4×4 rigs (bumpers, roof racks, roll cages…) Fourtreks has developed a versatile modular system of tube clamp rings and accessory mounts that attach to their clamp rings holding all sorts of off-road equipment.

Made from T-6061 aluminum, the system components are light weight yet very strong.  The different accessory mounts are designed to hold such things as:

  • Hi-lift jack
  • Shovel
  • Axe
  • Fire Extinguisher
  • CO2 tank
  • Jerry can
  • Maglite flashlight
  • GPS
  • … you get the idea

Keeping in mind that one size does not fill all, the clamp rings are available for 1″, 1-1/8″, 1-1/4″, 1-1/2”, 1-5/8”, 1-3/4”, 1-7/8”, 2”, 2-1/4” and 2-3/8″ diameter tubing. All of the accessory mounts bolt to any of the clamp rings allowing you to mix and match storage locations for quick access to all your important 4×4 accessories.

Using Fourtreks mounts, we’ve been storing our Hi-lift jack and shovel on the roof for over three years now.  Knowing these items are safely stored out of the way and easily available has allowed us to explore the roads less traveled with piece of mind.