Tag Archives: off road truck stuff

Toyota fj cruiser splashing muddy water

Falken Rocky Mountain ATS Review… Be Brutally Honest!

falken tires fj cruiser rockThe folks over at Discount Tire asked us to put a set of Falken Rocky Mountain ATS to the test and then be brutally honest in our review.  It’s a tough job but somebody has to do it!

Every tire carries a wealth of information…  the industry’s own version of truth in manufacturing.  To make informed tire choices you need to understand the ABCs of the tire industry.   A quick read of Discount Tire’s tire dictionary will give you a big leg up when comparing tires.

Some tire facts of the Falken Rocky Mountain ATS we tested: LT285/70R17D1 121S B

  • type- light truck
  • size – 285/70/17
  • construction – radial
  • plies – D (8 plies)
  • load – 121 (3,197 lbs)
  • speed rating – S (up to 112mph {don’t try to test this one})
  • temperature grade – B

In order to run these tires through a real world situation we opted to have the guys at Discount Tires mount up our 285/70/17 on stock rims with traditional lead weight balancing.   Our rig is part hard core 4×4 trail rig, part overland explorer and come Monday, daily driver.   That means these Rocky Mountain all terrains need to balance performance across all sorts of driving conditions.  The first thing we noticed is these tires look good on the rig.  Rugged, multi-angled grooves and blocked tread with a 50,000 mile warranty… But can they dance when the when things get a little dirty.

To us, all terrain means dirt, rocks, mud, hills, washboard gravel and water.  In order to tackle all these conditions we aired them down to 25 psi and hit the trails of the northwest.  On loose dirt and rocks where gravity pulls downhill, the tires maintained a grip on the ground without sliding, allowing our gears to work their magic and keep the rig motoring under control down the hills.

falken rocky moutain ats total chaos long travelOne of our favorite thing is to bomb down the old logging road (not so closed course and definitely not a professional driver). Opening it up on the gravel, the Rocky Mountain ATS’ felt confident as we zipped through the corners and raised a little dust.

When you think 4×4 adventures and off-road driving, climbing over stuff in the way is usually what comes to mind.  We motored over to the rock garden in order to see how the Falken tires held up to the boulders.  Even with mud all around, the all terrains grabbed and climbed up rocks as they contoured to the obstacles allowing us to keep a controlled forward momentum.

With all the dirt it was only a matter of time before we looked to wash off the rig and the north west has plenty of puddles to “clean up” in.  The tire’s aggressive tread design shed water and found traction in the mud below letting us make a big splash on the trail.

After a day of wheeling trails, we can honestly say Falken’s Rocky Mountain ATS are a strong tire capable of living up to its all terrain designation.

falken rocky mountain ats turning on top big rockAnd what about daily driving?  We put 2,000 miles on these tires in a short two weeks.  Think four trips from Seattle WA. to Eugene OR…  Hula Betty just started university.  The rig covered wet high ways, worn down city streets  and pot hole filled back roads.  With that much travel, we appreciated the smooth quiet ride and sure footed grip, especially at 70+ mph on the wet pavement… Have you driven I5?  It’s a high speed trucking route where cars are allowed as long as they stay out of the way.

Balanced on and off road performance along with daily driver comfort makes Falken’s Rocky Mountain ATS a good choice for anyone interested in a tire that will play hard on the weekend and show up for work come Monday.

Guess our first impressions of the Falken Rocky Mountain ATS were right… Who Knew.

2011 toyota fj cruiser driving

Rumors Of Its Death Are Highly Exaggerated (2011 FJ Cruiser)

Since the introduction of Toyota’s FJ Cruiser  in 2006 (it was called a 2007), rumors run rampant that THIS was the last year of production.   With forum poster trying to impress others with their insider scoop of the rigs demise, its death has been declared again and again.  Yet each year Toyota has continued to release a new model year.

Toyota has announced the 2011 FJ Cruiser (FJC) will be coming off the assembly line.  A couple of notable updates for the 2011 model year include:

  • Two new colors
    • Calvary Blue
    • Quicksand
  • New Trail Teams Special Edition in Army Green
  • New Audio Systems, Including  Available JBL Premium System
  • Standard Locking Rear Differential (standard on manual transmission/ optional for automatic)
  • Improved Visibility and Rear Seat Access (Didn’t know it needed improvement)
  • Standard iPod® Connectivity and XM Satellite Radio

Out of the box the FJC 4×4 has ground clearance of 9.6 inches, 260 hp @ 5,600 rpm, 271 lb-ft @ 4,400 rpm, dual transfer case and a 41.84:1 crawl ratio making it a capable trail rig.  In fact for 2010 Consumer Reports put the Toyota FJ Cruiser at the top of its “Best Off-Road” vehicle list.

If you want the full scoop on the upcoming 2011 FJ Cruiser take a look at the Toyota 2011 FJ Cruiser product information from Toyota’s press room.

We’re glad to see the rig is maintaining its funky style, white roof and solid off-road performance. And while it’s not voodoo…  the new blue is pretty sick.

No idea how long Toyota will continue to produce this rig but we are sure it will be produced in 2011.

UPDATE: Toyota announced in 2013 that 2014 is the last year of production of the FJ Cruiser for the U.S. market. With thousands of Toyota FJ Cruisers on the road there will be plenty of them around for years to come so that everyone can continue to use them for what they were intended, off-road adventures.

fj cruiser total chaos long travel falken rockie mountain tire

Falken Rocky Mountain Tires First Impressions

discount tire mountingAfter 65,000 miles it was time for some new tires…  These things don’t last forever you know.  Take a quick tour of the Internet and you quickly discover there are lots of choices out there so we had some decisions to make.

The Blue Bunny is part daily driver, part extreme off-road rig and part overland explorer which means we needed a tire that feels at home in all sorts of conditions including the rain and snow of the pacific northwest.  With this in mind we decided to turn to a pro and give Travis over at Discount Tires a call…  Ok really we just emailed him since it was 2:00 am, but let me tell the story in my own way.  After a few email exchanges back and forth as well as a real call to discuss what we wanted out these tires Travis had a suggestion for us.  He had just returned from the 2010 North America JK Experience where he had seen tires put through their paces in the one of the toughest Jeep challenges anywhere.

Newly developed by Falken the Rocky Mountain ATS tire delivers tough off-road traction while at the same time providing highway comfort and handling. Rugged design and long tread life makes it an exceptional value. Our 285/70/17 size (Rocky Mountain is available in 15-inch to 20-inch sizes) feature a 3-ply sidewall construction for great off-road durability.discount tire spin balancing

Some of the features Travis pointed out included:

  • Four wide, aggressive multi-angled grooves for clearing out water, mud and snow
  • Block tread edges providing solid traction and control
  • Smooth quite ride (remember the Blue Bunny still serves daily driving duties)
  • Two steel belts and 3-ply sidewalls for protection and strength
  • 50,000 mile tread life warranty

Now as everyone knows, tires are only as good as the dealer who stands behind them.  Discount Tires has 750 stores in 22 states making it the world’s largest independent tire and wheel retailer today.  These guys will also drop ship tires directly to your doorstep if you plan on mounting them yourself or at another local tire shop.

tightening lugnut on new tiresWe headed down to our local Discount Tire dealer in Bremerton, WA. where Nick and the guys took care of us.  One of the cool things about showing up with a handful camera gear is that it gets you into places that are normally off limits.  With the rig in the bay we got to go back and see everything as the guys quickly went to work.  Sure on the trail you can break a tire bead and pull it off a wheel with a hi-lift jack but when professionals mount tires they get to use all the cool tools.

In no time the guys had the new rubber mounted on our original stock rims and were throwing them on the balancing machine.  You really do have to credit the guy who figured out how to apply centrifugal force and computers together in a way that would perfectly balance all that alloy and rubber.

Ok I know I’m gushing a little but really the crew there was great.  We chatted about some of the adventures we’d been on and a couple still in the planning stages.  We talked tires… go figure…  and got to see how it all works behind the scenes.  While this wasn’t an NASCAR pit time, they did have us in and out in less than thirty minutes.  And remember that stand behind the tire thing.  These guys warrant their tires from any of those 750 stores across the country.east bremerton discount tire staff

The first thing you notice…  dang these are smooth and quiet on the highway…  For a while now I thought I’ve been loosing my hearing having to crank the stereo up to obscene levels to hear it over the road noise…  But no more.  I can now enjoy the stereo and carry on a conversation cruising down the highway.  They also hold the road well and let us carve through the corners without worry…  Remember though we are in a rig not a Porsche so our carving is relative…  but it feels good through the corners.  And on a short jaunt down some two tracks the tires responded nicely.  Not to mention they look pretty sick on the rig.fj cruiser new falken rockie mountain tires

Of course we plan on putting these Falken Rocky Mountain ATS through more serious off-road tests soon and we’ll let you know how well they hold up to the trails, mud and snow.  Look for a longer term review soon but for now these are looking like a good all-terrain choice.

—– follow up —-

Well after a bunch of miles we put up the results of our Tire Test of Falken Rocky Mountain All-Terrains.  Check out the video and write up for more info.

fj cruiser RAM mount laptop

Putting The Mobile Into Mobile PC

fj cruiser RAM Mount baseWhen we last left our off-road adventure heroine, Hula Betty had just put together a mobile GPS command center. For a test run, throwing the laptop on the front seat was fine but having the brains of the navigation center bouncing around on the trail is no way to go through life.  Turns out for my birthday, Hula Betty came up with a solution.

A local northwest company called RAM Mounts makes all sorts of cool gadget attaching stuff…  and by attaching stuff we mean just about anything to anything.  The anything that caught our eye was the vehicle based laptop mount, although the articulating, swivel beer can mount for kayaks is pretty cool too.

RAM Vehicle Laptop Mounts are designed to install quickly without drilling any holes.  They accomplish this feat of marvel by having a unique base plate for each vehicle that ties into the bolt pattern of the front seat.  The rest of the mounting uses common components letting you mix and match or move from one rig to the next (provided you have base plates for each).fj cruiser RAM mount components

Installing the RAM Mounts is just as easy as they say.  Remove the two front bolts holding the passenger seat in place, bolt in the RAM Mounts base with the new bolts than together the rest of the components.

These guys make a number of different components for holding your laptop in place and we decided to keep it pretty basic.  We can always add the map light, note pad try or power caddy down the road.  Our base set up included:

  • Universal laptop mount tray
  • 8″ telescoping pole top
  • Telescoping pole base
  • Double swing arm with socket arm
  • Toyota FJ vehicle base

RAM mounts accessoryTo keep thing stable and secure when the rig is off camber or bombing down a washboard dirt road we added:

  • Laptop screen support
  • 24″ support leg

When its all together our laptop is held securely in place and manages to take the bumps in stride although it doesn’t leave much room for a passenger.  However when not in use, pull the laptop mount try and the swing arm folds out of the way allowing for a passenger to stretch out.

The 17″ laptop we built our mobile GPS command center around is heavy but the RAM Mount keeps it in place.  The double swing arm allows us to adjust the laptop’s location and angle to ensure proper placement.

Perched up at dash level you can easily glance over and see position, speed, and altitude.  Adjust the position for quick reach to move between maps  or lower the laptop screen when not in use.

When we first set the laptop in place we found  the larger 17″ screen had a tendency to block the view of the passenger side mirror.  A couple of adjustments swinging the arms around and the laptop seemed to settle in a spot that kept the mirror and system in view.

Simple, strong and a nice finish make our new laptop mount a nice addition to our rig and we’re sure to be putting it to the real test soon.

Tango software Install

Adventures Are Not On Any Map (but a good GPS doesn’t hurt)

map and compass
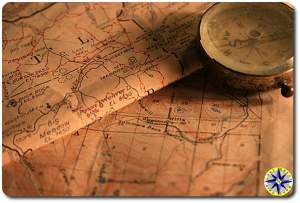
I like maps!  I’ll spend hours in map stores, looking, touching, smelling maps, planning off-road adventures.  Maps are great!

I like maps… But I love technology.  Now before you scream about technology on an off-road adventure failing, breaking, getting dusty and wet or  how the battery can die off, I always carry hard copies of maps stored water tight with a compass…  and I know how to use them.

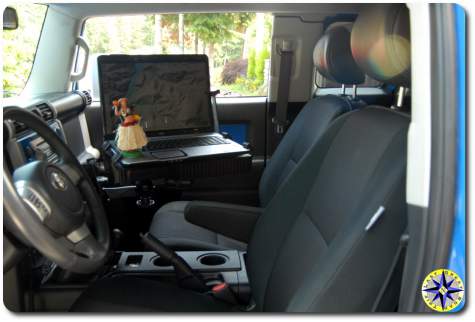
In order to get a technology fix we decided to build our own mobile satellite GPS tracking command center that can be loaded up with high quality maps of areas we want to explore.  Sure we have Brenda our Garmin GPS (or a close facsimile of her following the 2009 abduction incident), but we wanted something we could load trail routes into, create tracks, pin point ourselves on multiple maps and display higher resolution of 4×4 trails.  Turns out it is not that hard to take an old lap top, some open source software along with a few bits and turn it into GPS Central.

When we set out to build our GPS system we had a few requirements for this build:

  1. has to be cheap or better yet… free
  2. must work with maps from several sources
  3. maps must be free and unencumbered by copyrights
  4. needs to be capable of working on-line or off line (sure the internet is in Chicken, AK. but some of these places are still passing messages by carrier pigeons)
  5. easy to use, easy to read, easy to zoom in tight, easy to zoom out big, easy, easy, easy

With our requirements in hand the first thing to do was decide how to make it all happen.  This is where we insert a big thank you to Jeff Baker from the NWFJCC.  We rode his technical coattails all the way on this mod.

Following Jeff’s lead we made a list of needed stuff:

  • old laptop
  • Operating system
  • GPS software
  • Waterproof GPS Receiver

The old laptop:  You would be surprised at how easy it is to scrounge an old laptop. Now you’re not going to end up with a 3.4 GHz Hyper-Threading quad proc, quad core, with 32 Gigs of ram, dual 10,000 rpm raid five disk set, HD graphics advanced video engine, or 7.1-channel Dolby audio but check with your techie friends.  You don’t need much for this build and tech guys are always cycling through the latest and greatest, discarding leftovers in their path.  We ended up with an old HP Pavilion.

ubuntu linux osOperating system: the open source movement really began with Linux, a Unix like operating system that came into the world in 1991 and spread through the Internet faster than a leveraged buyout rumor on Wall Street’s trading floor.  While Linux will fly on butch hardware it was designed to run on more modest equipment and is perfect for use on an old recycled laptop. There are several Linux flavors available: RedHat, SUSE, Debian, Fedora, Ubuntu…  you get the picture.  All the distributions use the same basic Linux kernel and than add their own set of libraries, tools and software, packaging it all up under their brand name.  Some of the distributions are commercial but many are free.  In a past life as a software developer, I’ve used many of the different distributions and it is amazing how far they have come with ease of installation, rock solid updates, intuitive desktops, do anything software and geeky cool factor.  Today there are really good distributions that are community supported and free.  Remember requirement number one.

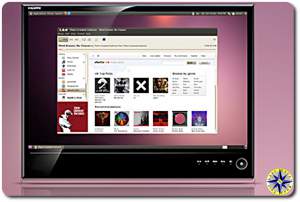
The Ubuntu distribution is simple and quick to install with a desktop that is intuitive.  The interweb (that is for all our Corner Gas Canadian friends) is full of helpful forums and instructions on installing and using Ubuntu so answers to questions are everywhere.  Installing software packages like web browsers, games, DVD players, email, word processing, spreadsheets, picture editors or instant messaging chat,  is just as easy.  Ubuntu is the distribution I always suggest to non-technical folks looking to try Linux.

tango trip mapUbuntu took about 30 minutes to install. Really that was it.  Next task, the gps software that would be the cornerstone of the operations.

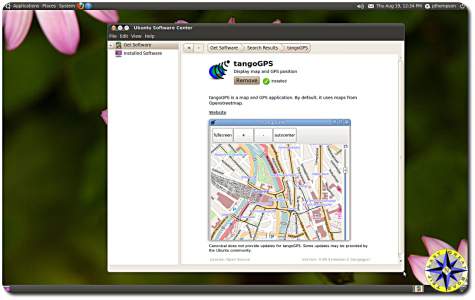
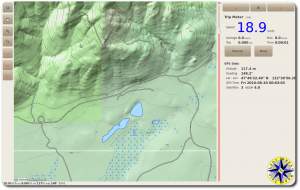
GPS software: there are a number of free mapping software packages available out there.  We decided to go with tangoGPS since it was one of the easier ones to work with.  It wont do everything some of the other packages will but it does all the stuff on our list.  A big selling point for us was the ability to work with open source maps (OSM) as well as Google Maps, Opencyclemap and others.  As new map sources become available you can configure tangGPS to use them.  Jeff found one source that takes OSM maps and layers them over GIS Topo maps.  Simply add a new map type in the tangoGPS configuration tab and point to its URI (uniform resource identifier).  In this case it was: “http://mobilemap.petschge.de/topomirror.php?z=%d&x=%d&y=%d”

Each mapping project tends to focus on different aspects when creating their maps such as roads, businesses, trails or what not.  With the ability to use multiple maps you can see your location from different perspectives and verify the information across multiple sources.

When you are connected to the Internet, tangoGPS can automatically down load map tiles (fancy term for little picture) as needed.  These same cached map tiles are than available to you when you are off line.  If you’re not sure of exactly where you will be exploring in a particular area you can zoom out and down load all the tiles of that area.  We downloaded all the map tiles for the Olympia Mountains (about a 1,000 square mile area)…  it took 22 hours and we have a fast connection!  There is are several levels of detail and you can choose to down load some or all of them.

Tango software Install
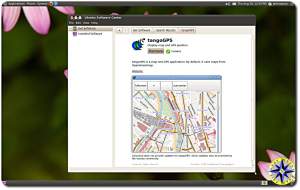
tangoGPS is one of the applications in the Ubuntu App Manager which means installation is simply clicking on the install button, making it extremely easy to install or remove.  Navigation within and Configuration of tangoGPS are straightforward as well.

There is even a “Friends” option which, if you have an Internet connection, will allow you to publish your location and leave a message to a website letting friends know you’re OK.

When you install tangoGPS, the App Manager also downloads the GPS demon (Unix speak for program) known appropriately as gpsd.  This little demon allows you to hook up and integrate a GPS satellite receiver with tangoGPS.  By integrate I mean plug-in, tangoGPS takes it from there.  With a GPS satellite receiver (or two) tangoGPS locates you on the maps, allowing you to track your movements, create bread crumb trails (record way-points) and view information such as your longitude, latitude, heading, elevation and speed.

It is at this point we hit the wall with free.

usb gps reciever
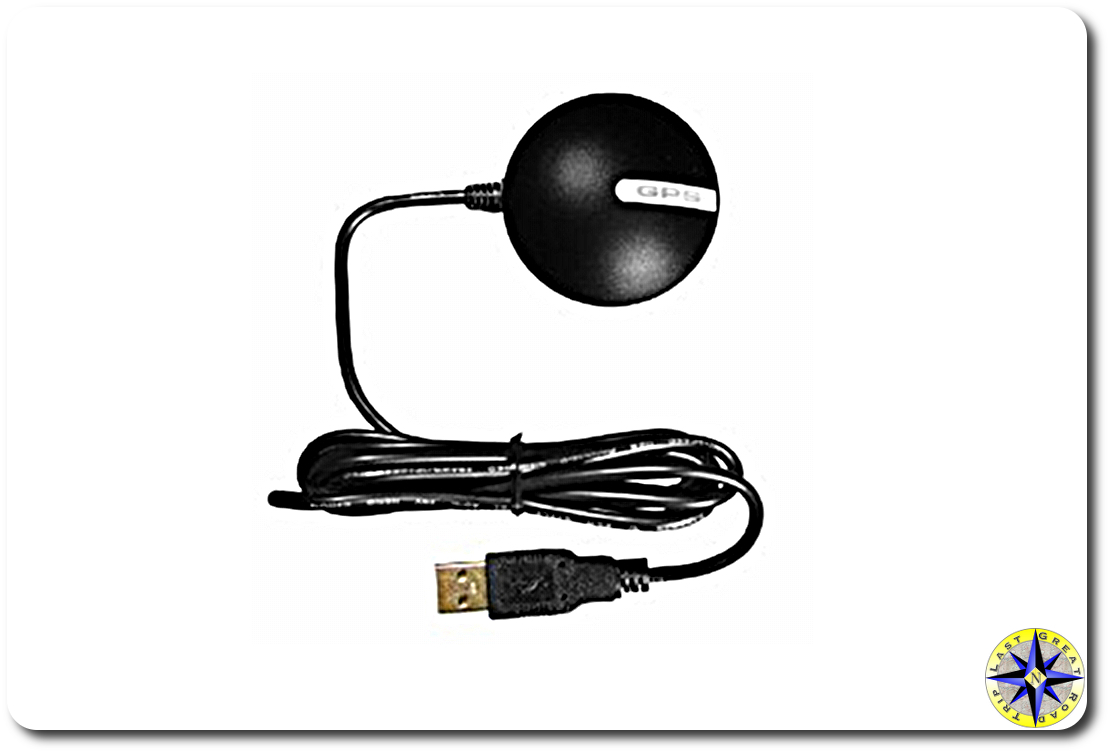
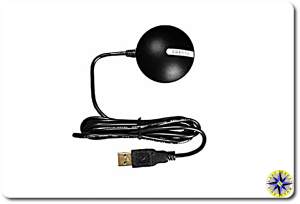
GPS Receiver: Obtaining a GPS receiver required us to crack the piggy bank. If we were going to get the most out of our system this was a must have item.  Fortunately for the little piggy a GlobalSat BU-353 Waterproof USB GPS Receiver was only $37.50.   Certainly there are more expensive receivers, but this little unit worked great.  And with it’s USB connector, integrating it with our laptop couldn’t be simpler.

The GlobalSat receiver came with a little suction cup and has a magnet in its base so you can attach it just about anywhere.

xgps screens
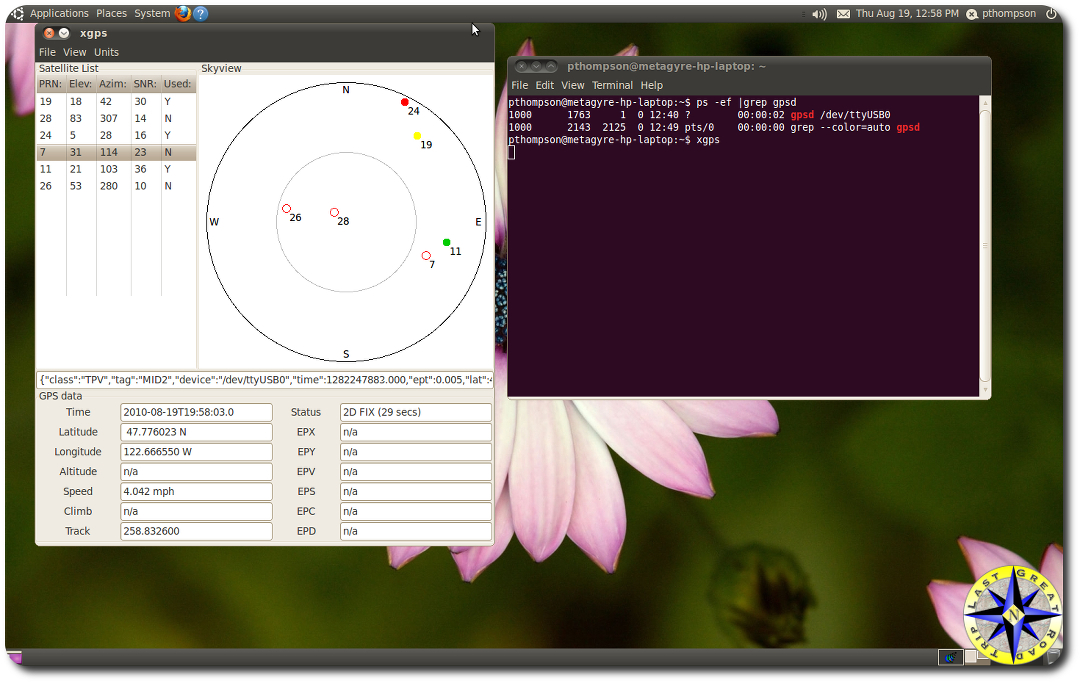
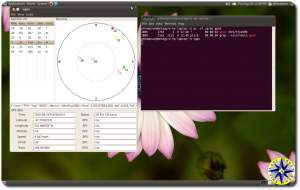
After plugging in the GPS receiver and starting up tangoGPS everything should just work.  Last great software lie right.  Well it did for us.  If you run into any problems with your receiver or want a view of what is going on with it you can peer into the black hole and eaily test it.  Plug in the GPS receiver and start the GPS demon with the following command: gpsd /dev/ttyUSB0 Than start up the simple viewer called xgps.  You may need to add this program using the Ubuntu app manager if you did not add it when installing the tangoGPS package.  To start the viewer type xgps on the command line.  xgps will display a window showing the satellites available to the receiver, their signal strength and location.  It will also show you the information that gpsd is parsing out.

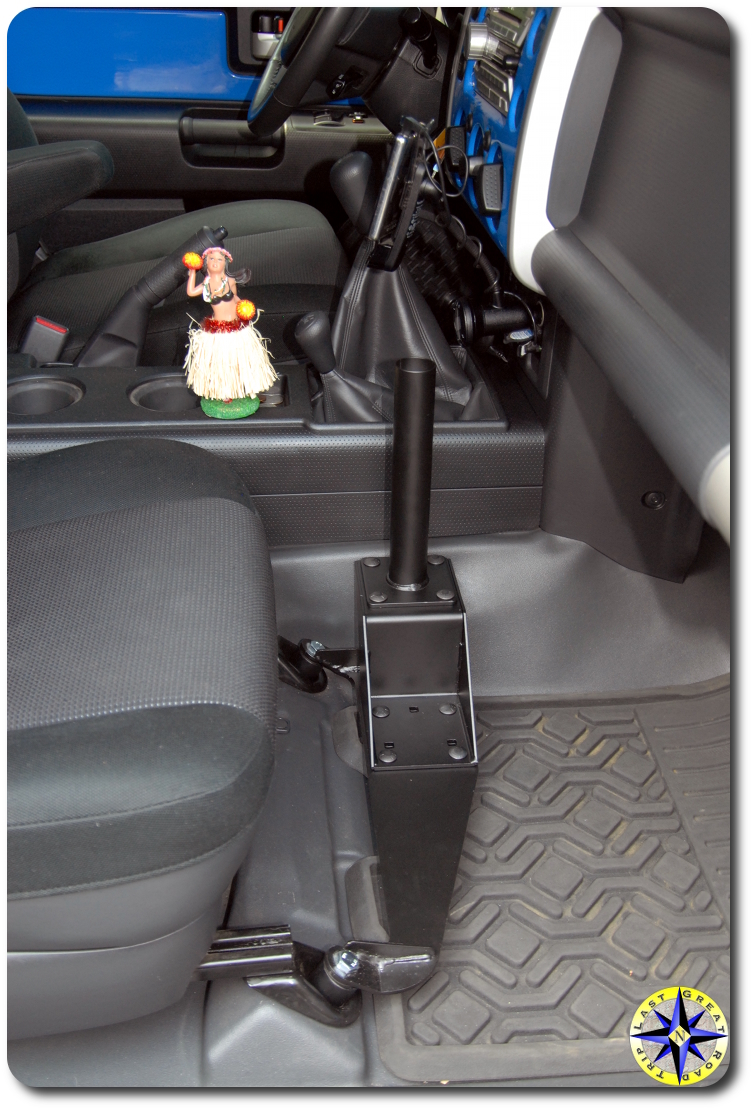
Getting this all to work sitting on the back deck is one thing, having it work while driving 70 mph down the highway is another.  To put our new GPS system through its paces we decided to drag it with us on a recent off-road camping and fishing adventure .  We loaded the maps from Seattle, WA to Eugene, OR and the areas surrounding the north fork of the Willamette River. The system worked better than expected.  In our test we stuck the lap top in the passenger’s seat with the GPS receiver tossed up on the dash.  The system tracked our every movement, keeping our position centered in the screen, clearly showing details that are lost on the smaller GPS units.  The GPS and maps lined up exactly and with a single mouse click we could zoom in or out without missing a beat.

There is one small issue to get used to with a system like this.  Driving at night, a 17 monitor will illuminate everything around it and more often than not as we passed others on the highway, heads turned as they noticed the glow emanating from the passengers seat.  At the rest stops, several folks would wonder over to get a better look at the system, ask about it and inquire where we were heading.  But this is a small price to pay for a GPS system that can do so much and cost so little.  Now to try it out on a worthy adventure.
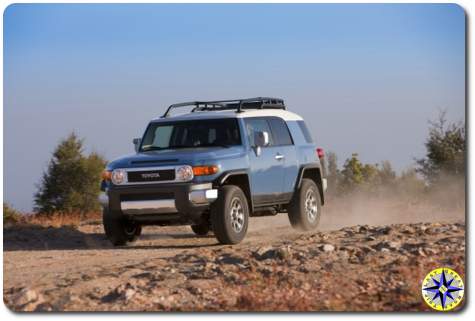
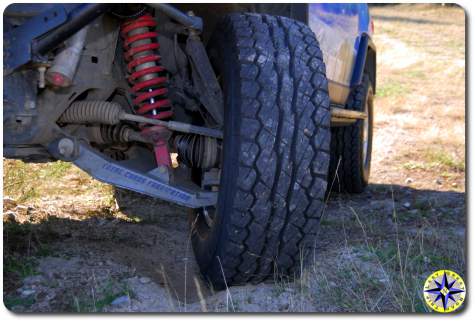
fj cruiser driverside spark plug location

Time For A Change Sparky

fj cruiser used spark plugOne of the best ways to avoid trouble on an off-road adventure is to know your rig… inside and out.  One of the best ways to get to know your rig is through regular maintenance.  Toyota recommends changing your spark plugs every 30,000 miles.  Changing the spark plugs on a Toyota FJ Cruiser is a simple activity for any backyard mechanic and a good way to get to know your rig.

A couple of things you’ll need in order to change out the spark plugs includes:

  • 6 spark plugs
  • 12 mm and 10 mm socket
  • spark plug socket
  • spark plug gapper
  • couple of 10″ extensions
  • socket wrench
  • torque wrench
  • 2 flat head screw drivers (very helpful)
  • anti-seize (optional)
  • silicon grease (optional)
  • gloves (sure this is optional but Hula Betty wants to protect her manicure. Mechanic or latex gloves work great)

Spark plugs are the business end of your engine’s ignition system.  Its the spark plugs that delivers the spark needed to ignite the air/fuel mixture.  No spark means no combustion!  Combustion occurs when high voltage supplied by the ignition coil jumps across a small gap between the spark plug electrodes. The high voltage surge from the coil goes down the spark plug’s center electrode and forms an arc as it jumps across the gap. The voltage required to form the spark ranges from 4,000 up to 28,000 volts depending on the spark plug gap, engine load and compression. The spark only lasts a tiny millisecond, but it is long enough to start the burn.  And lets face it, a millisecond is a lot longer than you think about the answer to “would you like another beer”.

Never take for granted that your new spark plugs are properly gapped.  Before you tear into the engine check the spark plug gaps and set them to the factory spec.  For our 2007 Toyota FJ Cruiser the gap needs to be .039″ to .043″.  After you have ensured the gaps are correct it is the time to apply a little (it doesn’t take much) anti-seize to the spark plug threads, if you want.

You will want the engine to be cold before you start so the metal in the heads is not expanded. To begin, disconnect the negative battery terminal cable.  I know lots of folks balk at this step but resetting the stereo and compass after it is all done is a small price to pay for avoiding an electrical short and chasing down a burned fuse.  After all you will be disconnecting the ignition coils on your rig.

Before starting you may want to take a look at this fj cruiser Ignition coil component replacement Toyota bulletin showing you how to remove the ignition coils.  Getting to the spark plugs on your rig will require that you pull a few bits from the engine including the:

  • V-Bank cover
  • Air cleaner assembly
  • Surge tank stay and oil stay plate (little brackets)

You will also need to unplug the hoses and electrical connections to the air cleaner assembly.  Once you have everything removed, the passenger side coils will be clearly visible.  The driver side coils are visible too, once you look past the tangle of hoses.  These hoses can be moved aside when you need.

If this is your first time…  changing spark plugs… get your mind out of the gutter and back on task…  start on the passenger side.  Trust me you’ll thank me later.

fj cruiser engine head ignition coilThe Toyota FJ Cruiser has an individual ignition coil attached to each spark plug.   Disconnect the electrical connector to the ignition coil followed by removing the bolt holding the ignition coil to the engine.  With the connector and bolt removed, lift the coil out.  This is a good time to take a look at the ignition coil and check for cracks in the housing or tears in the terminal boots.

To remove the plug from its hole you will need your ratchet, spark plug socket and an extension.  When you are on the driver’s side you’ll need two extensions connected together to reach in through the hoses you didn’t remove.  It may take a little muscle but the plugs will release their grip and can be lifted out once they are unscrewed.

Now grab one of the new spark plugs you prepared earlier. The spark plug socket has a rubber insert designed to hold the spark plug while you lower it into the hole and thread it.  You will want to carefully thread the spark plug by hand so not to cross thread it.  Once the spark plug is hand tightened, brake out the torque wrench and tighten the plug down to 15 ft/lbs (factory spec for our 2007 Toyota FJ Cruiser).fj cruiser ignition coil

Before placing the ignition coil back into place over the spark plug, add a bit of silicone grease to the terminal boots to keep them conditioned and help form a tight dust seal.  Replace the bolt holding the ignition coil in place.  Remember this is a plastic housing so only torque down the bolt to its factory spec of 7.5 ft/lbs.  Reattach the electrical connector to the ignition coil and your done.  Now rinse and repeat with the other five spark plugs.

Before starting on the drivers side you may want to practice a little yoga and limber up. The driver’s side plug procedure is the same but there are a few helpful hints.

  • Small hands are a benefit.
  • Two screwdrivers may be needed to release the connector from the ignition coil.  One screwdriver holds down the clip while the other gently pushes the connector off the ignition coil.
  • Two ratchet extensions will improve the access to the spark plug allowing you better leverage.

Once you have all the spark plugs replaced, the ignition coils in and the connectors reattached, it is time to button it back up.  This is a good time to wipe down all the parts and remove the trail dirt and grim before reassembly.

Start by replacing the surge tank and oil stay followed by any hoses and electrical clips you may have undone on the drivers side to ease access.  Next place the air cleaner assembly back where it belongs and connect the hoses and electrical connector.  Don’t forget the little vacuum tube in the rear.  Cover it all up with the V-Bank cover and reattach the negative ground to the battery.

Turn the key, listen to your engine come to life and enjoy your success!

New spark plugs about $45, time involved about 30 minutes, the feeling that you get from knowing your rig a little better…

fourtreks hi-lift Jack mounted fj cruiser

Mounting Your Off-Road Adventure Stuff

fourtrek tube mounting componentsLong off-road adventures are all about having the stuff you need to get unstuck, stay safe and remain comfortable.  Some of the most import safety equipment on a 4×4 adventure, a shovel and Hi-lift jack, or fire extinguisher are also the most cumbersome and difficult to store.  And like a teenager reaching for the Clearasil on prom night, you want immediate access to this stuff when you need it.

Solving the storage problem, Fourtreks has come up with an versatile solution for  easily mounting much of your off-road equipment in places that keep it out of the way and easily accessible.  By taking advantage of the tubing on most 4×4 rigs (bumpers, roof racks, roll cages…) Fourtreks has developed a versatile modular system of tube clamp rings and accessory mounts that attach to their clamp rings holding all sorts of off-road equipment.

Made from T-6061 aluminum, the system components are light weight yet very strong.  The different accessory mounts are designed to hold such things as:

  • Hi-lift jack
  • Shovel
  • Axe
  • Fire Extinguisher
  • CO2 tank
  • Jerry can
  • Maglite flashlight
  • GPS
  • … you get the idea

Keeping in mind that one size does not fill all, the clamp rings are available for 1″, 1-1/8″, 1-1/4″, 1-1/2”, 1-5/8”, 1-3/4”, 1-7/8”, 2”, 2-1/4” and 2-3/8″ diameter tubing. All of the accessory mounts bolt to any of the clamp rings allowing you to mix and match storage locations for quick access to all your important 4×4 accessories.

Using Fourtreks mounts, we’ve been storing our Hi-lift jack and shovel on the roof for over three years now.  Knowing these items are safely stored out of the way and easily available has allowed us to explore the roads less traveled with piece of mind.

toyota fj80 and fj cruiser rubicon trail

And They Call It Vendor Love…

thanks for the off road adventuresWith all the mods on the rig we’ve had to work with a number of 4×4 off-road shops and after market vendors. And as you know, some of them are better than others. So what makes one vendor better than another?

Certainly some vendors produce higher quality gear than others, but not everyone wants or needs the top of the line equipment. Some shops have lower prices than others. But what is it that really separates the great vendors for the not so good and down right awful.

For us, its service. There are all kinds of ways to define service but ultimately we break it down into two categories:

  • Service before and after the sale
  • Service when things go bad

But working with a good shop or vendor is a two way street.  We have responsibility in all this as well:

  • Support a good shop with your loyalty
  • Don’t expect something for nothing

Any time someone asks me a question my usual response is “It depends”.  A good shop will happily talk to you about your project, get to know your needs and what type of wheeling you enjoy so they can give you the right information and help you make good choices.  Good shops and vendors know a well informed customer will make better choices, be much happier with any purchase and hopefully will become a loyal customer.  Don’t take advantage of this by asking for truck loads of information, advice or install support only to turn around and surf the Internet for the lowest price on all the parts they have helped you select for your project.

No matter how tight the quality controls, once in awhile a bad supply of raw materials sneaks in and a bad product gets out the door. Whats important is how the vendor or shop deals with it.  Good vendors and shops want to make it right.  Sometimes it means replacing or fixing a part.  Sometimes it means working with you to try other options.  Work with your vendor honestly when things go sideways and be open to options.  Good shops want to make it right and you have to work with them so they can.

Most of the really great shops and vendors I know are small business owned by individuals who have a real love for what they do and believe in their product.  They are small enough to know each of their good customers (good doesn’t mean spends a lot) personally.  They care about their business’ reputation and want to do what is right for their customers.  But they don’t have deep pockets and can’t give away the store.  These are folks trying to put out a good product or service at a fair price.

So why am I feeling the love for vendors?  The last couple of weeks I been trying to run down parts for a project I started and I turned to Baja Designs, Fourtreks and Plus 1 Accessories for help.   They all were great! They worked with me to understand what I needed and did what they could to help.

Luke over at Fourtreks had a few custom parts made up so that my original designs would still work.  This, while he was trying to get his house, family and business packed up to move.  I’ve moved… a lot!  And Helping others during that time was not my first priority.  I could take a lesson there…  the man deserves a medal.

Plus 1 Accessories found some raw tubing they could send my way that is going to work out and Baja Designs didn’t hesitate to toss in some extra clips, connectors and light buckets I needed.

We’ve all dealt with bad vendors (lord knows I’ve had my share) and the hassles they cause you can feel like nails on a blackboard.  But I’ve been lucky to work with a number of good ones too.  These days when I need help I know I have a good base to turn too.  Even when they can not help, they usually know who can and send me to someone they trust and that says a lot.

2007 toyota fj cruiser arb bumper

From A Land Down Under

arb 4x4action summer 2010 coverCan I get a hot shower in the bush…  Who is behind 4WD TV…  How did the “Drive 4 Life” turn out…  Is there a good one woman tent out there…  Can a pig really drink beer… And what else are the crazy Aussies up too…

The new ARB 4x4action newsletter summer 2010 showed up in our in box.  As we’ve told you before, this news letter comes from the Australia head quarters so there is a big down under influence on the articles which give you a new point of view.

This quarters publication offers an opportunity to win an ARB recovery kit as well as an ARB air compressor.  Of course if you don’t win you can still read about the Aussies trekking across Africa.

If you’re not on the ARB list to receive your own free issue, we highly recommend it. Yes it is an on-line infomercial but it is also filled with great off-road adventure information.

cartoon toyota fj cruiser

2010 FJ Cruiser Still Going Strong

The Toyota FJ Cruiser continues to be one of the top selling off-road adventure SUVs.  The rig has not changed much over the years and continues to stay true to its rugged off-road roots and long land cruiser heritage.  The most notable change are the new engine updates that now delivers 260-horsepower @ 5,600 rpm and 271 lb-ft @4,400 rpm from the 4.0 liter DOHC 24-valve V6.

Fuel mileage remains an anemic 15 city, 19 highway for the 4WD, 6 speed manual transmission and 17 city, 21 highway with 4WD 5 speed automatic transmission.

Toyota’s FJ Cruiser continues to be one of the few 4WD trucks that out of the box is capable of bombing down desert roads, meandering over 4×4 trails or taking you on extended off-road adventures.  Continuing since its introduction in 2007 the Toyota FJ Cruiser maintains a huge community of dedicated followers who appreciate its quality engineering and quirky styling.